LangFlow Tutorial: Building Production-Ready AI Applications With Visual Workflows
In this comprehensive tutorial, you'll learn how to build powerful AI applications using LangFlow's visual interface. We'll cover everything from basic concepts to advanced techniques for creating production-ready solutions without extensive coding.
What is LangFlow?
Building AI applications typically requires extensive coding knowledge and complex integrations. Many teams struggle to prototype AI solutions quickly or involve non-technical stakeholders in development.
LangFlow solves this with a visual, drag-and-drop interface for creating AI applications. It is a flowchart editor for AI – you connect pre-built components like language models, data sources, and tools to build complete workflows without writing code.
Alternative Approaches: Compare LangFlow with n8n automation workflows for business automation, or explore code-first agent frameworks and RAG frameworks for more control.
The platform also excels at building multi-agent systems where multiple AI assistants collaborate, and RAG (Retrieval Augmented Generation) applications that combine your data with language models for accurate responses.
This tutorial will guide you through building production-ready AI applications using LangFlow's visual interface, creating custom components to extend functionality, and deploying your workflows as APIs that integrate seamlessly with existing systems.
Comparing LangFlow to Alternatives
When choosing a visual AI workflow builder, you need to understand how different platforms approach the same problems and what trade-offs each makes.
LangFlow vs. Flowise
Both platforms help you build AI workflows visually, but LangFlow uses one consistent drag-and-drop interface for all project types - chatbots, RAG systems, and multi-agent workflows. Flowise separates these into different interfaces (workflows, assistants, agents), which can organize complex projects but requires learning multiple approaches.
Flowise has better tutorials with step-by-step guides, while LangFlow stays free with self-hosting. Flowise jumps from free to $35/month for their hosted platform, making LangFlow more cost-effective for small projects despite requiring deployment setup.
LangFlow vs. n8n
n8n excels at business automation with hundreds of integrations for CRM platforms, email tools, and data sync. It treats AI as another API service, perfect for comprehensive web automation workflows where AI complements existing processes. Check out our n8n workflow templates for ready-to-use examples.
LangFlow takes an AI-first approach with components built for language models, embeddings, and vector databases. It understands AI concepts like token limits and context windows, enabling complex patterns like multi-step reasoning and dynamic prompts that general automation tools struggle with.
LangFlow vs. LangChain
LangChain requires Python expertise and understanding abstractions like chains, agents, and retrievers. This code-first approach offers unlimited control but creates barriers for teams without deep programming skills or time to track constantly changing documentation.
LangFlow provides visual representations of LangChain's concepts through drag-and-drop components. It includes official LangChain components like chat models and text splitters, letting you build workflows visually while still writing Python for custom logic when needed - a practical middle ground for AI engineers pressed for time.
Decision Framework
Pick the platform that fits your team's technical skills, project scope, and operational needs.
| Platform | Best For | Technical Requirements | Cost Model | Key Strength |
|---|---|---|---|---|
| LangFlow | AI-first applications with deployment options | Basic Python knowledge helps | Free (self-hosted) | One visual interface for all AI workflows |
| Flowise | Standard AI patterns with guided setup | Minimal coding needed | Free tier, then $35/month hosted | Rich documentation and tutorials |
| n8n | AI as part of broader business automation | Basic automation concepts | Free tier, paid plans for advanced features | Tons of third-party integrations |
| LangChain | Custom AI applications with full control | Strong Python and AI expertise | Free (open source) | Maximum control and customization |
Choose LangFlow if you want to focus on AI applications while keeping deployment options open. It works well when you need to prototype quickly but think you might need custom features later. The self-hosting model works if you want to control infrastructure costs and don't mind managing your own hosting.
Flowise makes sense if you value good documentation and can work within their categorized workflow types. You'll benefit from the detailed tutorials if you're willing to spend time learning multiple interfaces, though you'll need to budget for hosted deployment after the free tier.
Pick n8n when AI is just one piece of larger business automation puzzles. If you're on an operations team managing complex integrations across multiple business systems, you'll appreciate adding AI capabilities without restructuring your entire automation approach.
LangChain remains ideal if you have strong Python skills and need granular control over every implementation detail. Choose this path when you don't need visual collaboration tools and prefer writing code to express complex logic rather than configuring it through interfaces.
LangFlow Quickstart
LangFlow's documentation is high-quality, so we won't repeat details already covered there throughout the article. Instead, we'll provide links to the official docs and focus on concepts that might not be immediately clear from reading alone after setting up your LangFlow instance.
Installation and Setup
Getting started with LangFlow is simple with Python's uv package manager (install UV here if you don't have it):
# Create and activate virtual environment
uv venv langflow-env
source langflow-env/bin/activate  # On macOS/Linux
# langflow-env\Scripts\activate   # On Windows

# Install LangFlow
uv pip install langflow

# Start LangFlow
uv run langflow run
For other installation methods including Docker and desktop versions, check the official installation guide.
LangFlow will launch in your browser at http://localhost:7860/.
Understanding LangFlow Through the Document QA Template
The Document QA template is perfect for grasping how LangFlow works. This template shows how different components connect to create a question-answering system for an uploaded document.
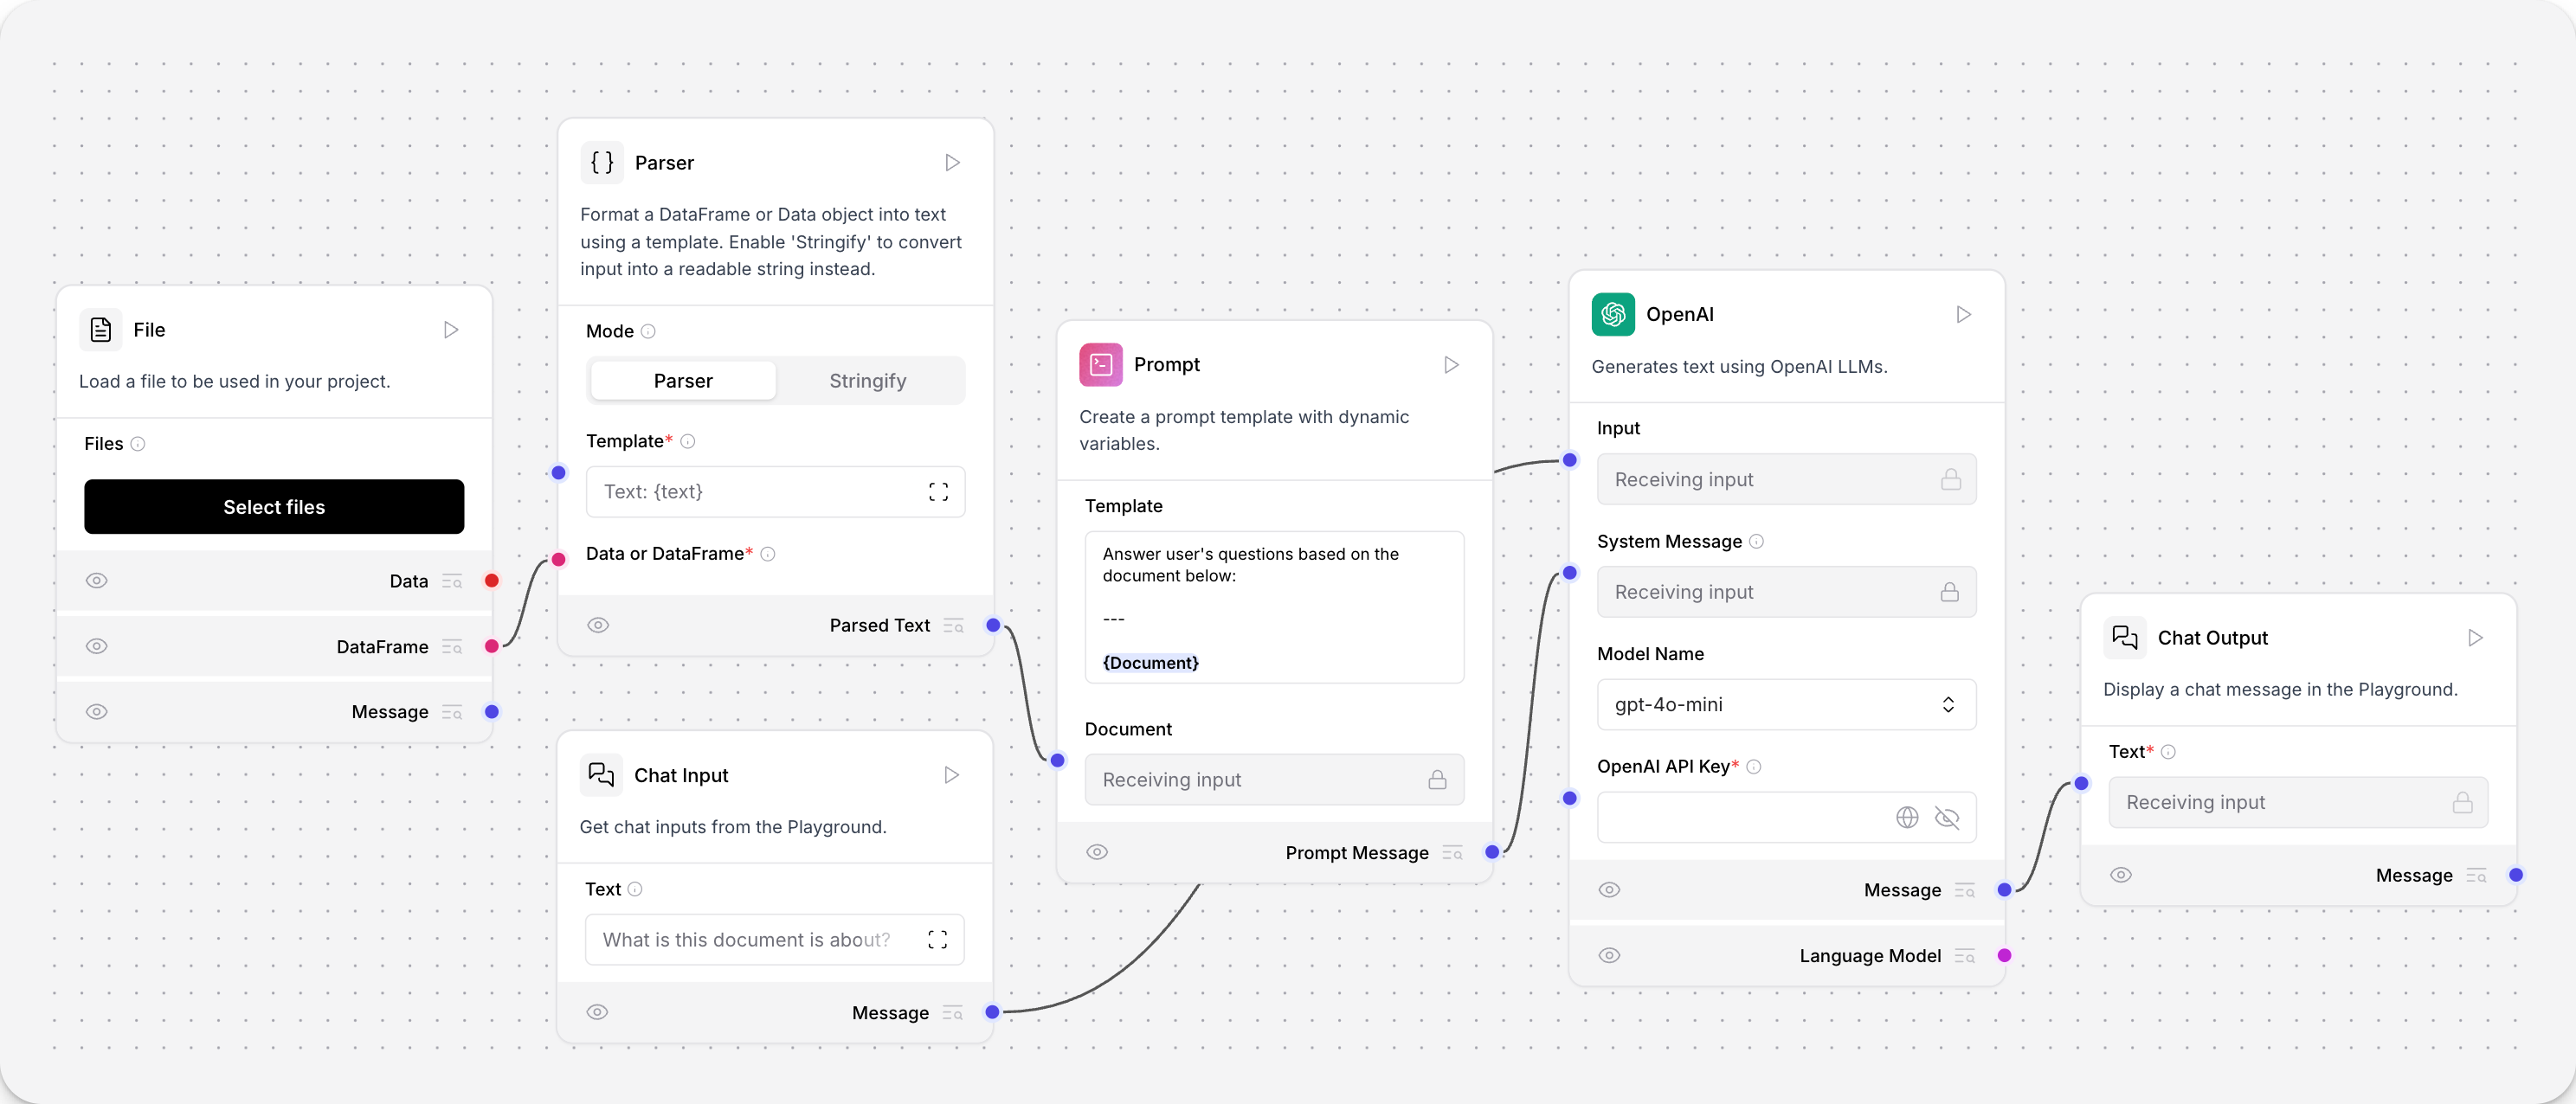
The flow contains six components that work together:
Input components: Two file input nodes handle document uploads, while a chat input receives user questions.
Parser component: Converts raw file contents into readable text format, acting as a bridge between binary file data and text processing.
Dynamic prompt component: Creates prompts with variables that combine document content with user questions. The template structure adapts based on input data.
OpenAI LLM component: The language model that generates answers. You'll need to add your OpenAI API key in the component settings.
Chat output component: Shows the final response in a conversational format.
Notice the colored edges connecting these components. Each color represents a different data type:
- Red edges carry raw data like file uploads
- Pink edges transport structured data frames
- Blue edges handle text strings
- Purple edges manage message objects
You can only connect components with matching edge colors. This prevents incompatible data types from being linked together. When you click any edge, the left sidebar automatically filters to show compatible components - the interface guides you toward valid connections.
Testing and Next Steps
Click Playground to test your flow. Upload a document through the file input, then ask questions about its content. You'll see how data moves through each component and watch the reasoning process unfold.
The playground shows exactly how your prompt is constructed, what the LLM receives, and how the response is generated.
LangFlow rewards experimentation. Spend 10-30 minutes trying different components from the components library. Drag new nodes into your workspace, connect them in various ways, and observe how edge colors guide your choices.
Browse additional templates to see how common AI applications are structured. Each template teaches different patterns for building chatbots, data processors, and multi-agent systems. Start with templates, modify them to fit your needs, then build your own flows as you get comfortable with the platform.
Extending LangFlow with Custom Components
LangFlow's templates and built-in components provide an excellent foundation for most AI applications. However, you'll face situations where you need functionality that doesn't exist in the components library. Perhaps you want to integrate a specific API, implement custom data processing logic, or connect to a service that LangFlow doesn't support natively.
Rather than switching to a different platform or writing everything from scratch, LangFlow lets you extend its capabilities through custom components. These are Python classes that integrate seamlessly with the visual interface, giving you the power of code when you need it while maintaining the drag-and-drop workflow for everything else.
Understanding Custom Components
Custom components in LangFlow follow a simple pattern. Each component is a Python class that defines what inputs it accepts, what outputs it produces, and how it processes data between the two.
from langflow.custom import Component
from langflow.io import StrInput, Output
from langflow.schema import Data

class MyComponent(Component):
    display_name = "My Component"
    inputs = [StrInput(name="text", display_name="Input Text")]
    outputs = [Output(name="result", display_name="Result", method="process")]

    def process(self) -> Data:
        # Your processing logic here
        return Data(data={"processed": self.text.upper()})
This simple structure creates a component that appears in LangFlow's interface with proper input fields, connection handles, and visual representation.
Every custom component has four main parts:
Metadata tells LangFlow how to display your component in the interface:
class TextProcessor(Component):
    display_name = "Text Processor"  # Shows in the node header
    description = "Processes text data"  # Appears in tooltips
    icon = "type"  # Lucide icon name taken from lucide.dev
    name = "TextProcessor"  # Internal identifier
Inputs define what data your component accepts. LangFlow provides different input types for various data formats:
inputs = [
    StrInput(name="content", display_name="Content"),
    IntInput(name="limit", display_name="Character Limit", value=100),
    BoolInput(name="uppercase", display_name="Convert to Uppercase")
]
Outputs specify what your component produces and which method generates each output:
outputs = [
    Output(name="processed_text", display_name="Processed Text", method="process_text")
]
Methods contain your actual processing logic. Each output connects to a method that returns structured data:
def process_text(self) -> Data:
    text = self.content
    if self.uppercase:
        text = text.upper()
    return Data(data={"result": text[:self.limit]})
Building a Firecrawl Search Component
To demonstrate custom component development, we'll build a component that integrates Firecrawl's search API. This gives LangFlow users access to web search capabilities combined with content scraping.
Firecrawl transforms how AI applications access web data. Traditional web scraping breaks when sites use JavaScript, implement bot detection, or frequently change their structure. Firecrawl handles these challenges by combining intelligent scraping with a search API that returns clean, structured data ready for AI processing.
The search endpoint we'll integrate performs web searches and optionally scrapes the full content of search results. This means your LangFlow agents can search for current information and immediately access the complete text content, not just titles and snippets. This combination makes it possible to build agents that can research topics, find recent information, and work with comprehensive web content.
Learn More: Explore web scraping libraries and browser automation tools for custom data collection. Convert scraped content to llms.txt files for LLM training.
You can find the complete component code in this GitHub Gist for reference while following along.
We'll start by creating the basic component class and metadata:
from langflow.custom import Component
from langflow.io import SecretStrInput, MessageTextInput, IntInput, BoolInput, DropdownInput, StrInput, Output
from langflow.schema import Data
import httpx
from loguru import logger

class FirecrawlSearchComponent(Component):
    display_name = "Firecrawl Search"
    description = "Search the web and get full content using Firecrawl"
    icon = "flame"
    name = "FirecrawlSearch"
This creates the foundation with proper imports and component metadata like the display name and a customary flame icon taken from Lucide (search for an icon and use its text).
Firecrawl's search API supports multiple parameters for customizing search behavior. We'll add inputs that cover the most useful options:
inputs = [
    SecretStrInput(
        name="api_key",
        display_name="Firecrawl API Key",
        required=True,
        info="Your Firecrawl API key from firecrawl.dev"
    ),
    MessageTextInput(
        name="query",
        display_name="Search Query",
        info="The search query to execute",
        tool_mode=True
    ),
    IntInput(
        name="limit",
        display_name="Results Limit",
        info="Maximum number of search results",
        value=5,
        advanced=True
    ),
    StrInput(
        name="location",
        display_name="Search Location",
        info="Geographic location for search results (e.g., 'Germany', 'San Francisco')",
        advanced=True
    ),
    DropdownInput(
        name="time_range",
        display_name="Time Range",
        options=["", "qdr:h", "qdr:d", "qdr:w", "qdr:m", "qdr:y"],
        value="",
        info="Filter results by time period",
        advanced=True
    ),
    BoolInput(
        name="scrape_content",
        display_name="Scrape Full Content",
        info="Get complete page content, not just search snippets",
        value=True,
        advanced=True
    )
]
The SecretStrInput safely handles API keys, while tool_mode=True on the query input allows agents to use this component as a tool. The advanced=True parameter groups less common options in the component's advanced settings.
The core method handles API communication and data processing:
def search_web(self) -> Data:
    try:
        url = "https://api.firecrawl.dev/v1/search"
        headers = {
            "Authorization": f"Bearer {self.api_key}",
            "Content-Type": "application/json"
        }

        payload = {
            "query": self.query,
            "limit": self.limit
        }

        # Add optional parameters
        if self.location:
            payload["location"] = self.location

        if self.time_range:
            payload["tbs"] = self.time_range

        if self.scrape_content:
            payload["scrapeOptions"] = {
                "formats": ["markdown", "links"]
            }

        with httpx.Client(timeout=90.0) as client:
            response = client.post(url, json=payload, headers=headers)
            response.raise_for_status()
            search_results = response.json()

        results = []

        for item in search_results.get("data", []):
            result_data = {
                "title": item.get("title", ""),
                "url": item.get("url", ""),
                "description": item.get("description", "")
            }

            # Add scraped content if available
            if "markdown" in item:
                result_data["content"] = item["markdown"]
                results.append(Data(text=item["markdown"], data=result_data))
            else:
                results.append(Data(text=item.get("description", ""), data=result_data))

        self.status = f"Found {len(results)} search results"
        return Data(data={"results": results, "count": len(results)})

    except httpx.TimeoutException:
        error_msg = "Search request timed out. Try reducing the limit or simplifying the query."
        logger.error(error_msg)
        return Data(data={"error": error_msg, "results": []})

    except httpx.HTTPStatusError as e:
        error_msg = f"Search failed: {e.response.status_code} - {e.response.text}"
        logger.error(error_msg)
        return Data(data={"error": error_msg, "results": []})
The search_web method builds and sends a POST request to the Firecrawl API. The payload includes the query and any optional parameters like location or time range. We use httpx to make the request and handle potential errors like timeouts or bad responses, ensuring the flow doesn't crash. The response processing creates LangFlow-compatible Data objects from Firecrawl's JSON response, using the full markdown content when available or falling back to descriptions.
Loading Your Custom Component
Once you've written your component, LangFlow needs to know where to find it. Create a directory structure that organizes components by category:
~/langflow_custom_components/
└── tools/
    └── firecrawl_search.py
The category folder name (tools) determines where your component appears in LangFlow's sidebar menu. Set the LANGFLOW_COMPONENTS_PATH environment variable to point to your custom components directory:
export LANGFLOW_COMPONENTS_PATH="/path/to/custom_components"
uv run langflow run
When LangFlow starts, it will scan this directory and load your custom components alongside the built-in ones.
You can also load your component without any of the above hassles by clicking on the "Create new component" button available at the bottom of the left sidebar.
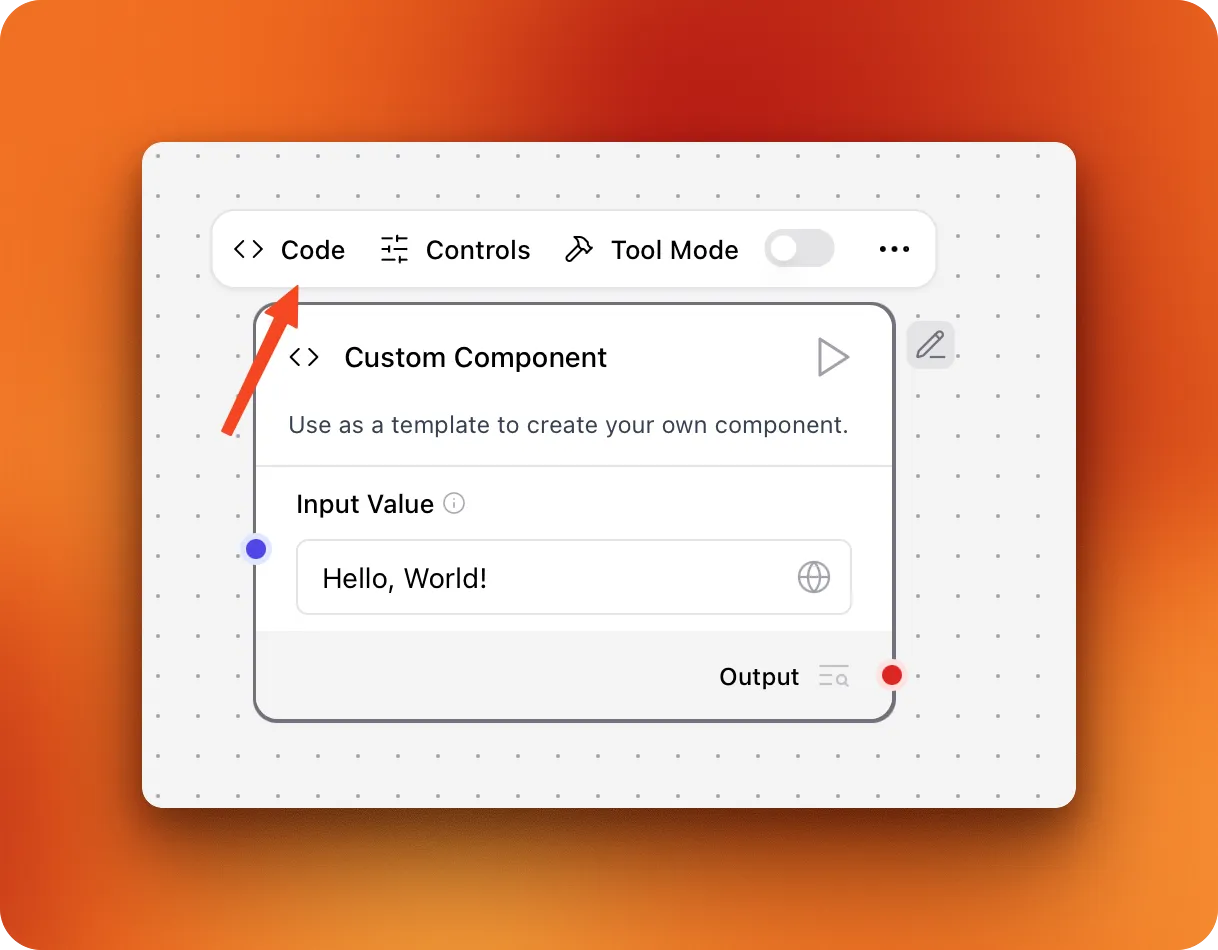
The button creates a blank "Hello, world!" component where you can click on the "Code" pane and paste the component's code we've written in this section. After these setup steps, your component should like this on the canvas:
If you didn't set the LangFlow custom components path, make sure to save your component by clicking the three dots so that it will show up in the left sidebar for future flows.
Testing Your Component
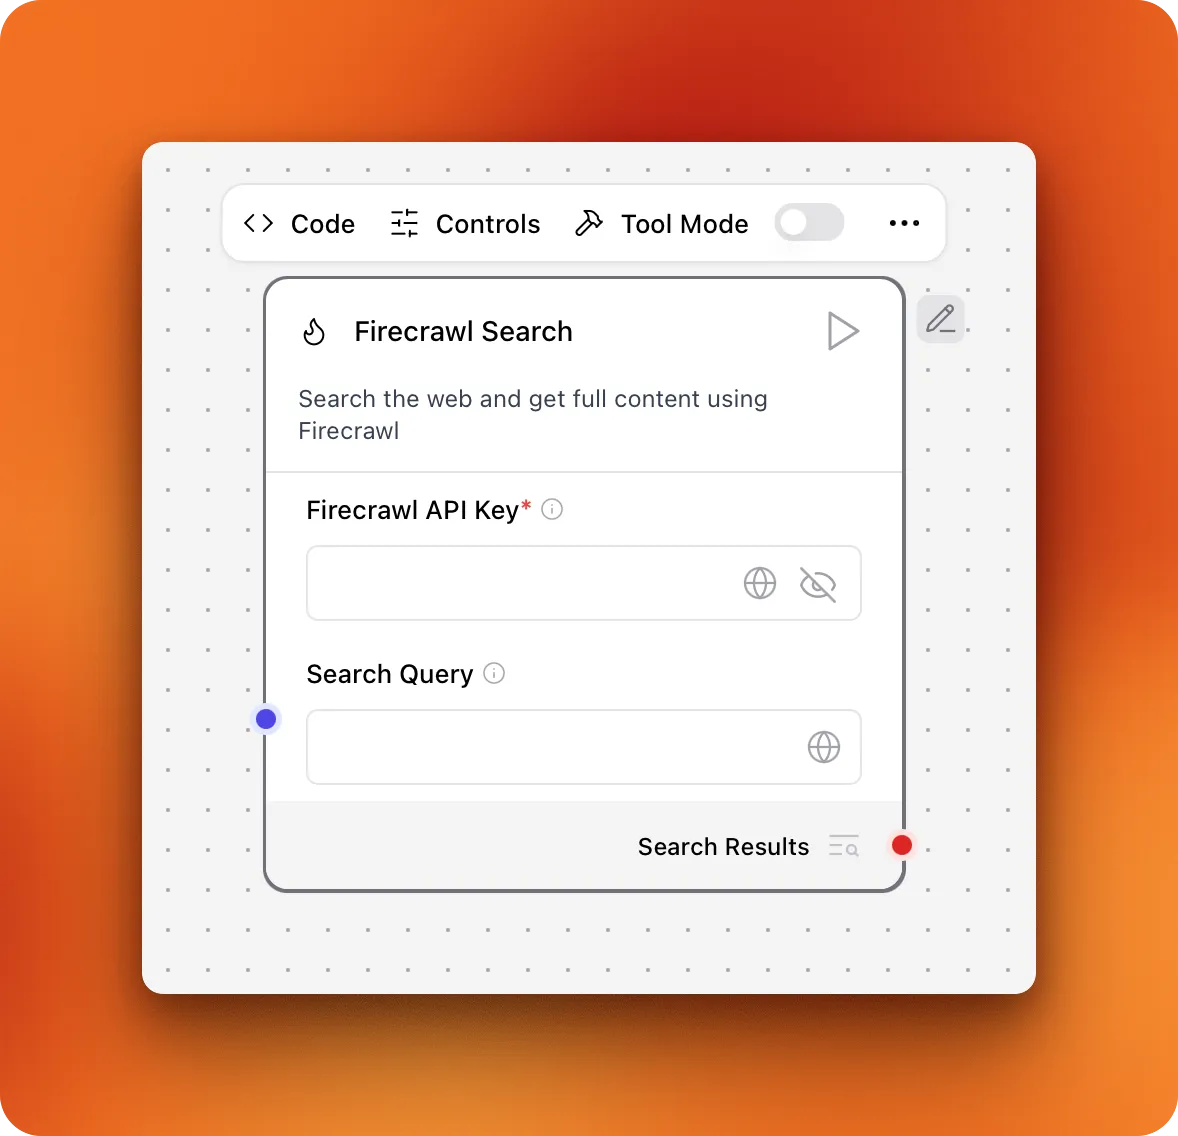
Create a simple flow to test your Firecrawl search component:
- Create a new project and a new blank flow
- Search and drag the Firecrawl Search component onto the canvas
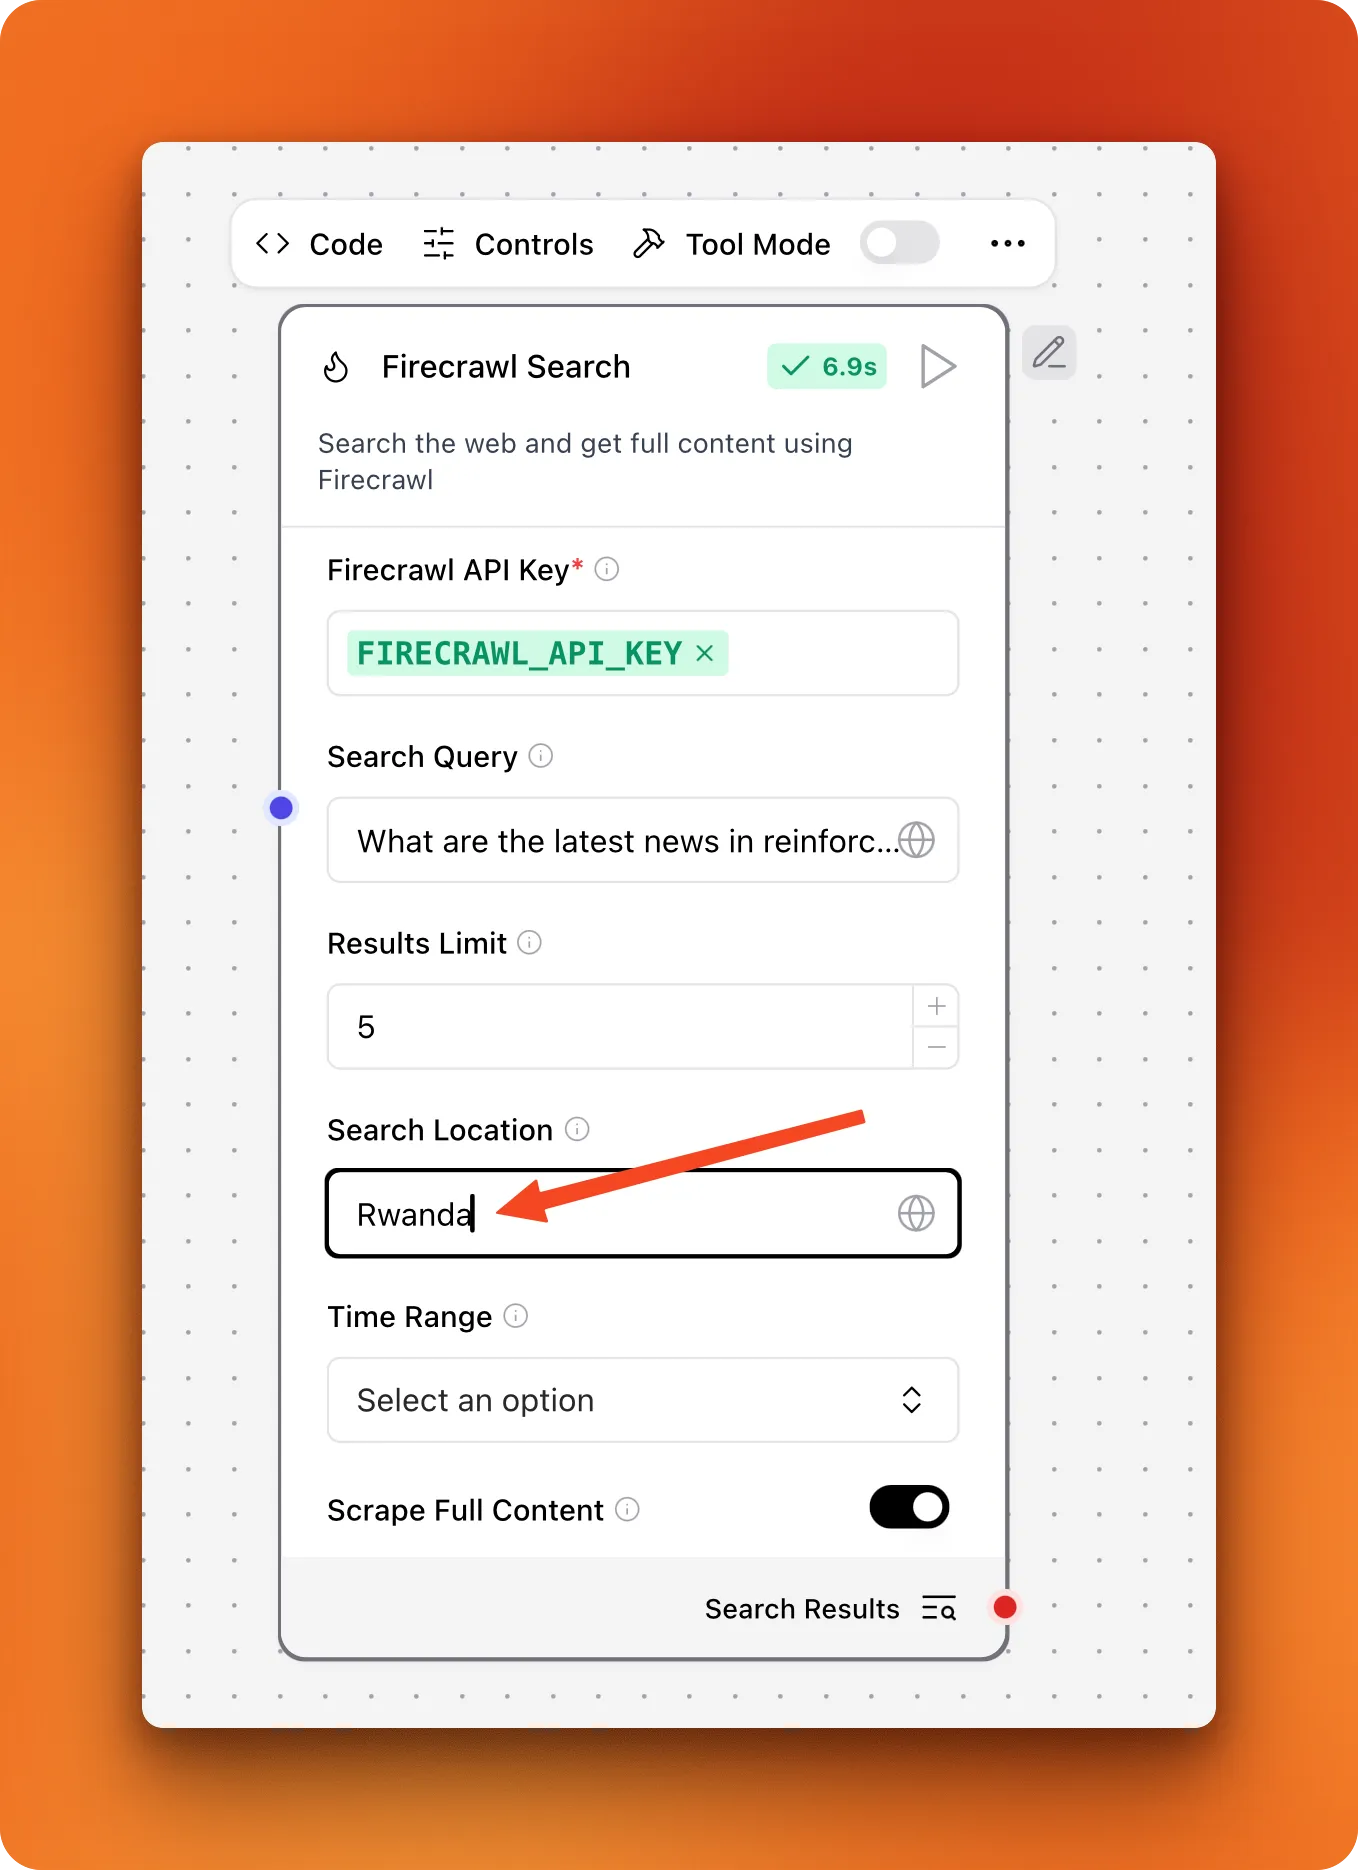
- Click the "Globe" icon to set up your Firecrawl API key after you sign up.
- Write a test query like "What are the latest news in reinforcement learning?"
- Click the "Play" button and wait for a green checkmark.
If successful, you should be able to click on the "Search results" field at the bottom right corner of your component. This should bring up the component outputs window:
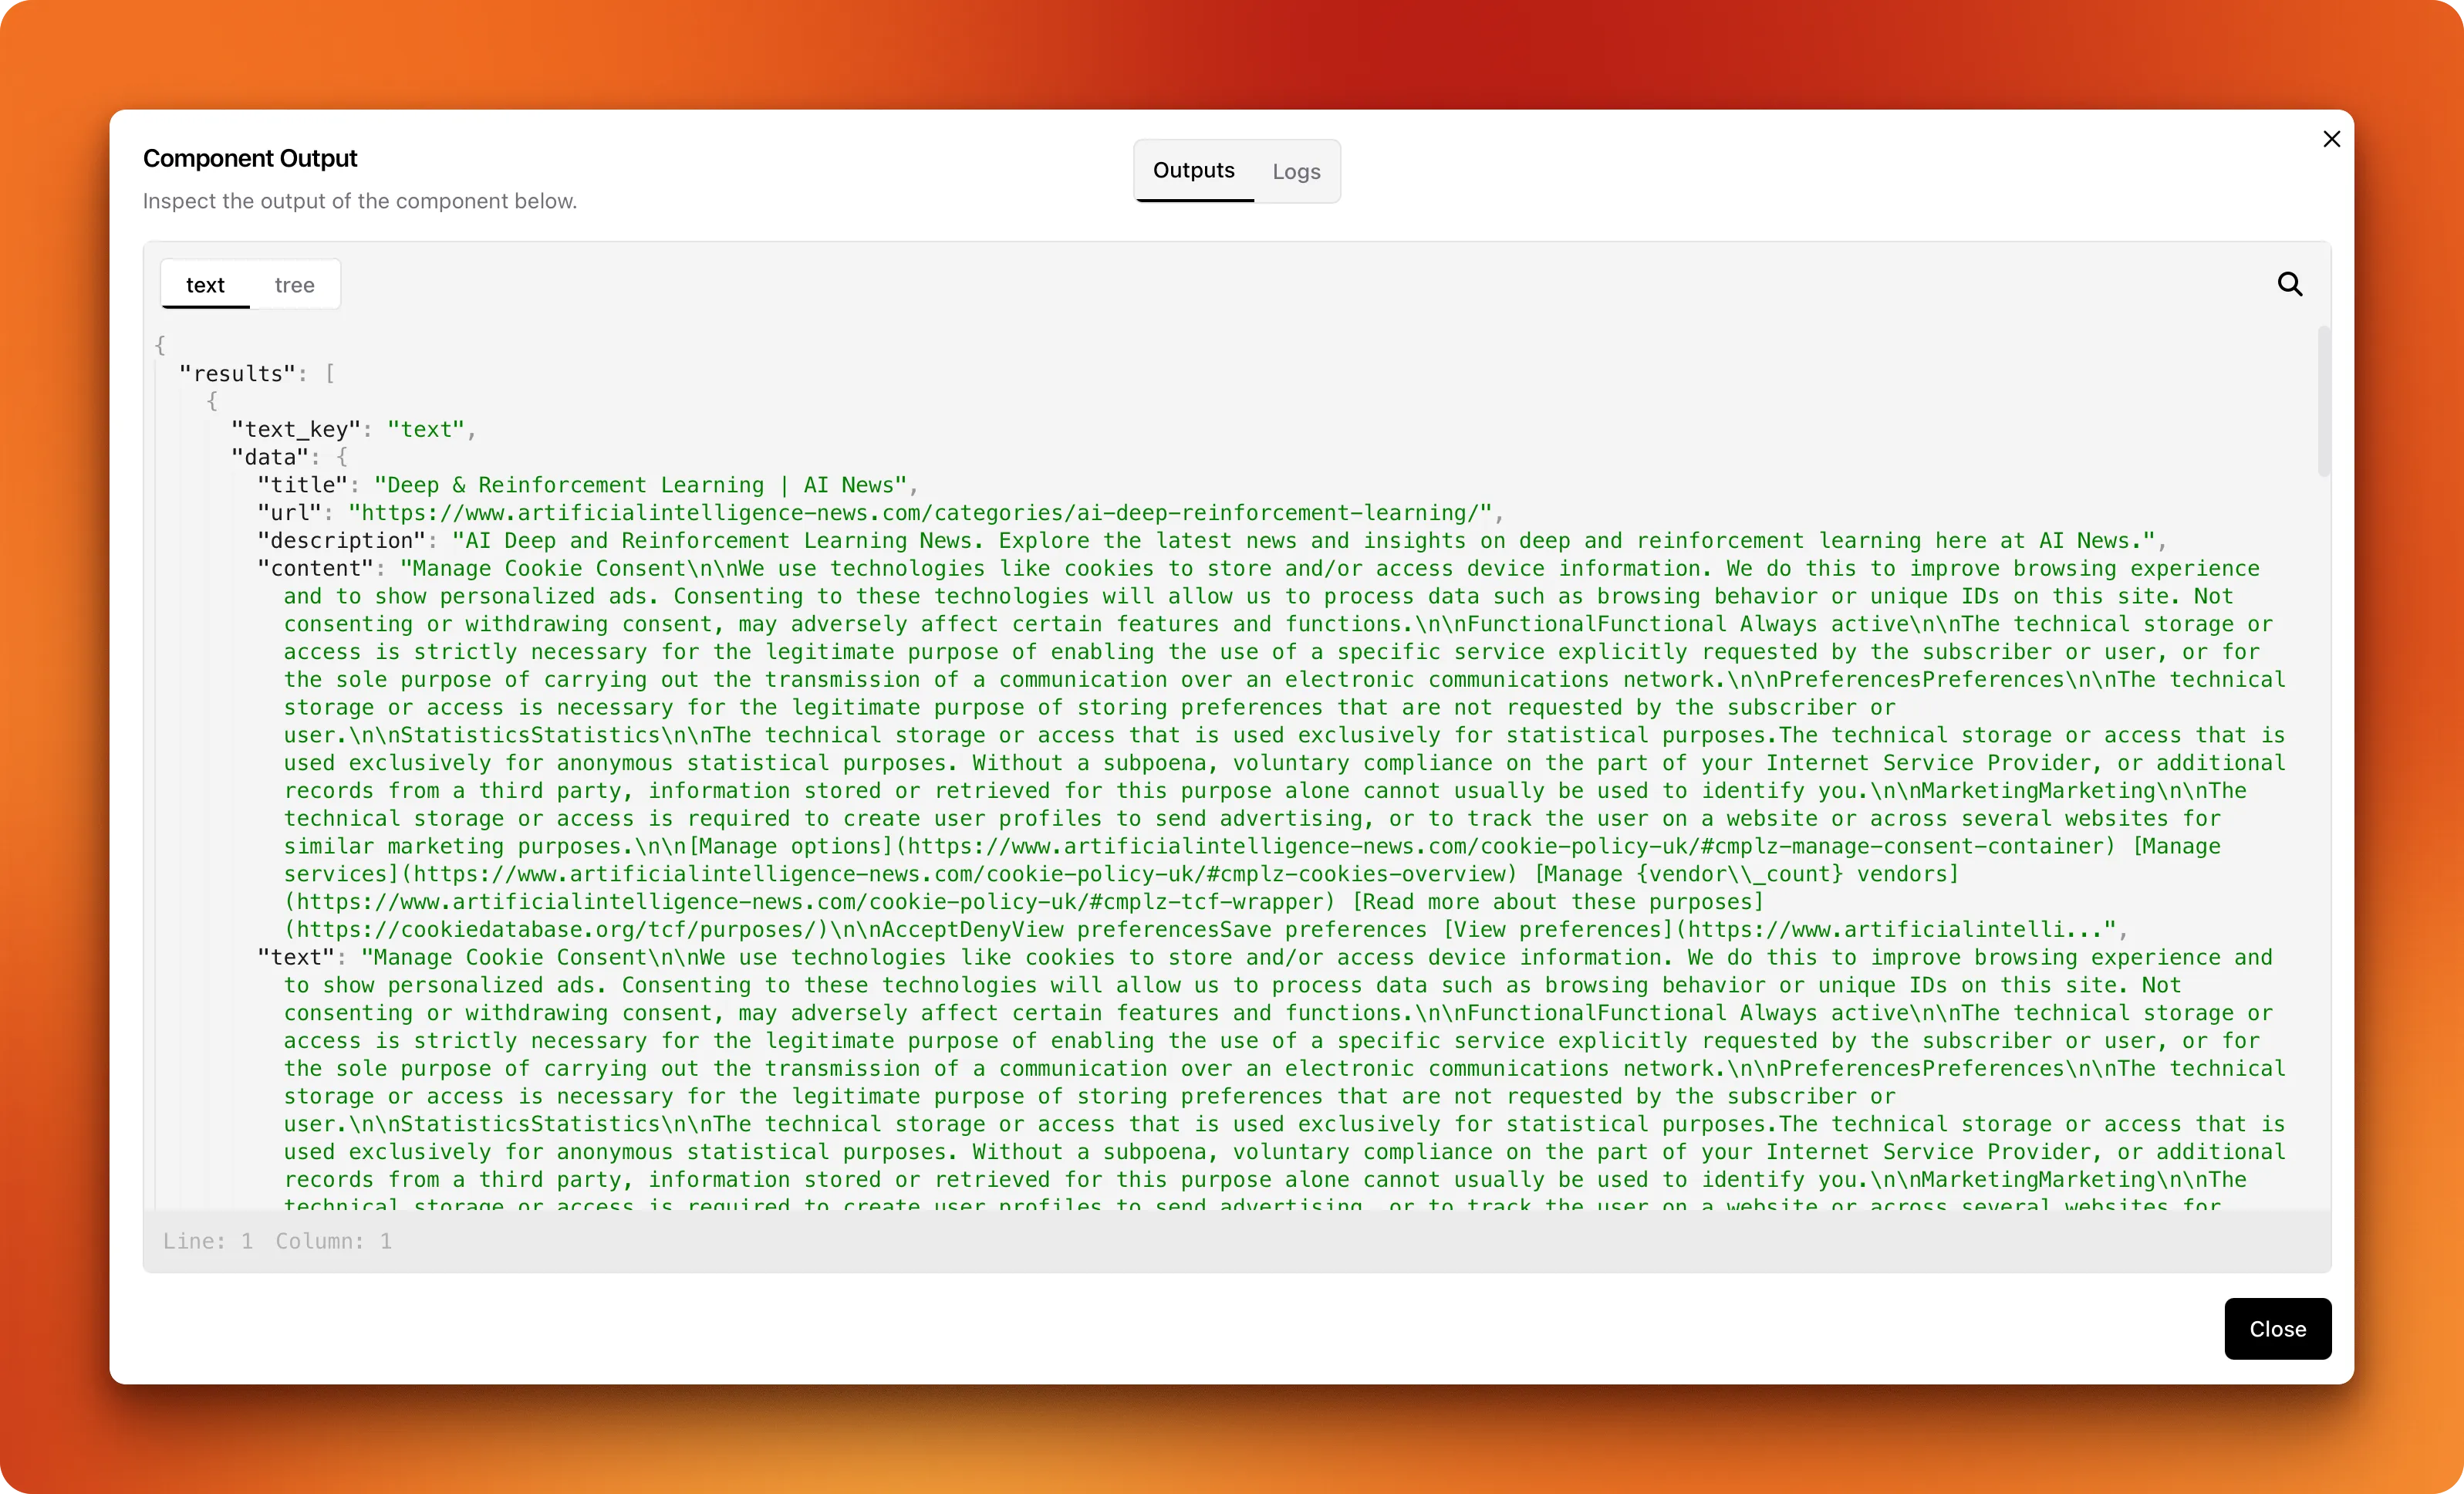
You should see detailed search results.
Using Advanced Controls
When writing our component's code, we included other fields like result limits, search location, time range and an option to scrape full content. By default, these additional fields are hidden when the component is added to the canvas but you can change this behavior by clicking on "Controls" and toggling the "Show" switches on for each field:
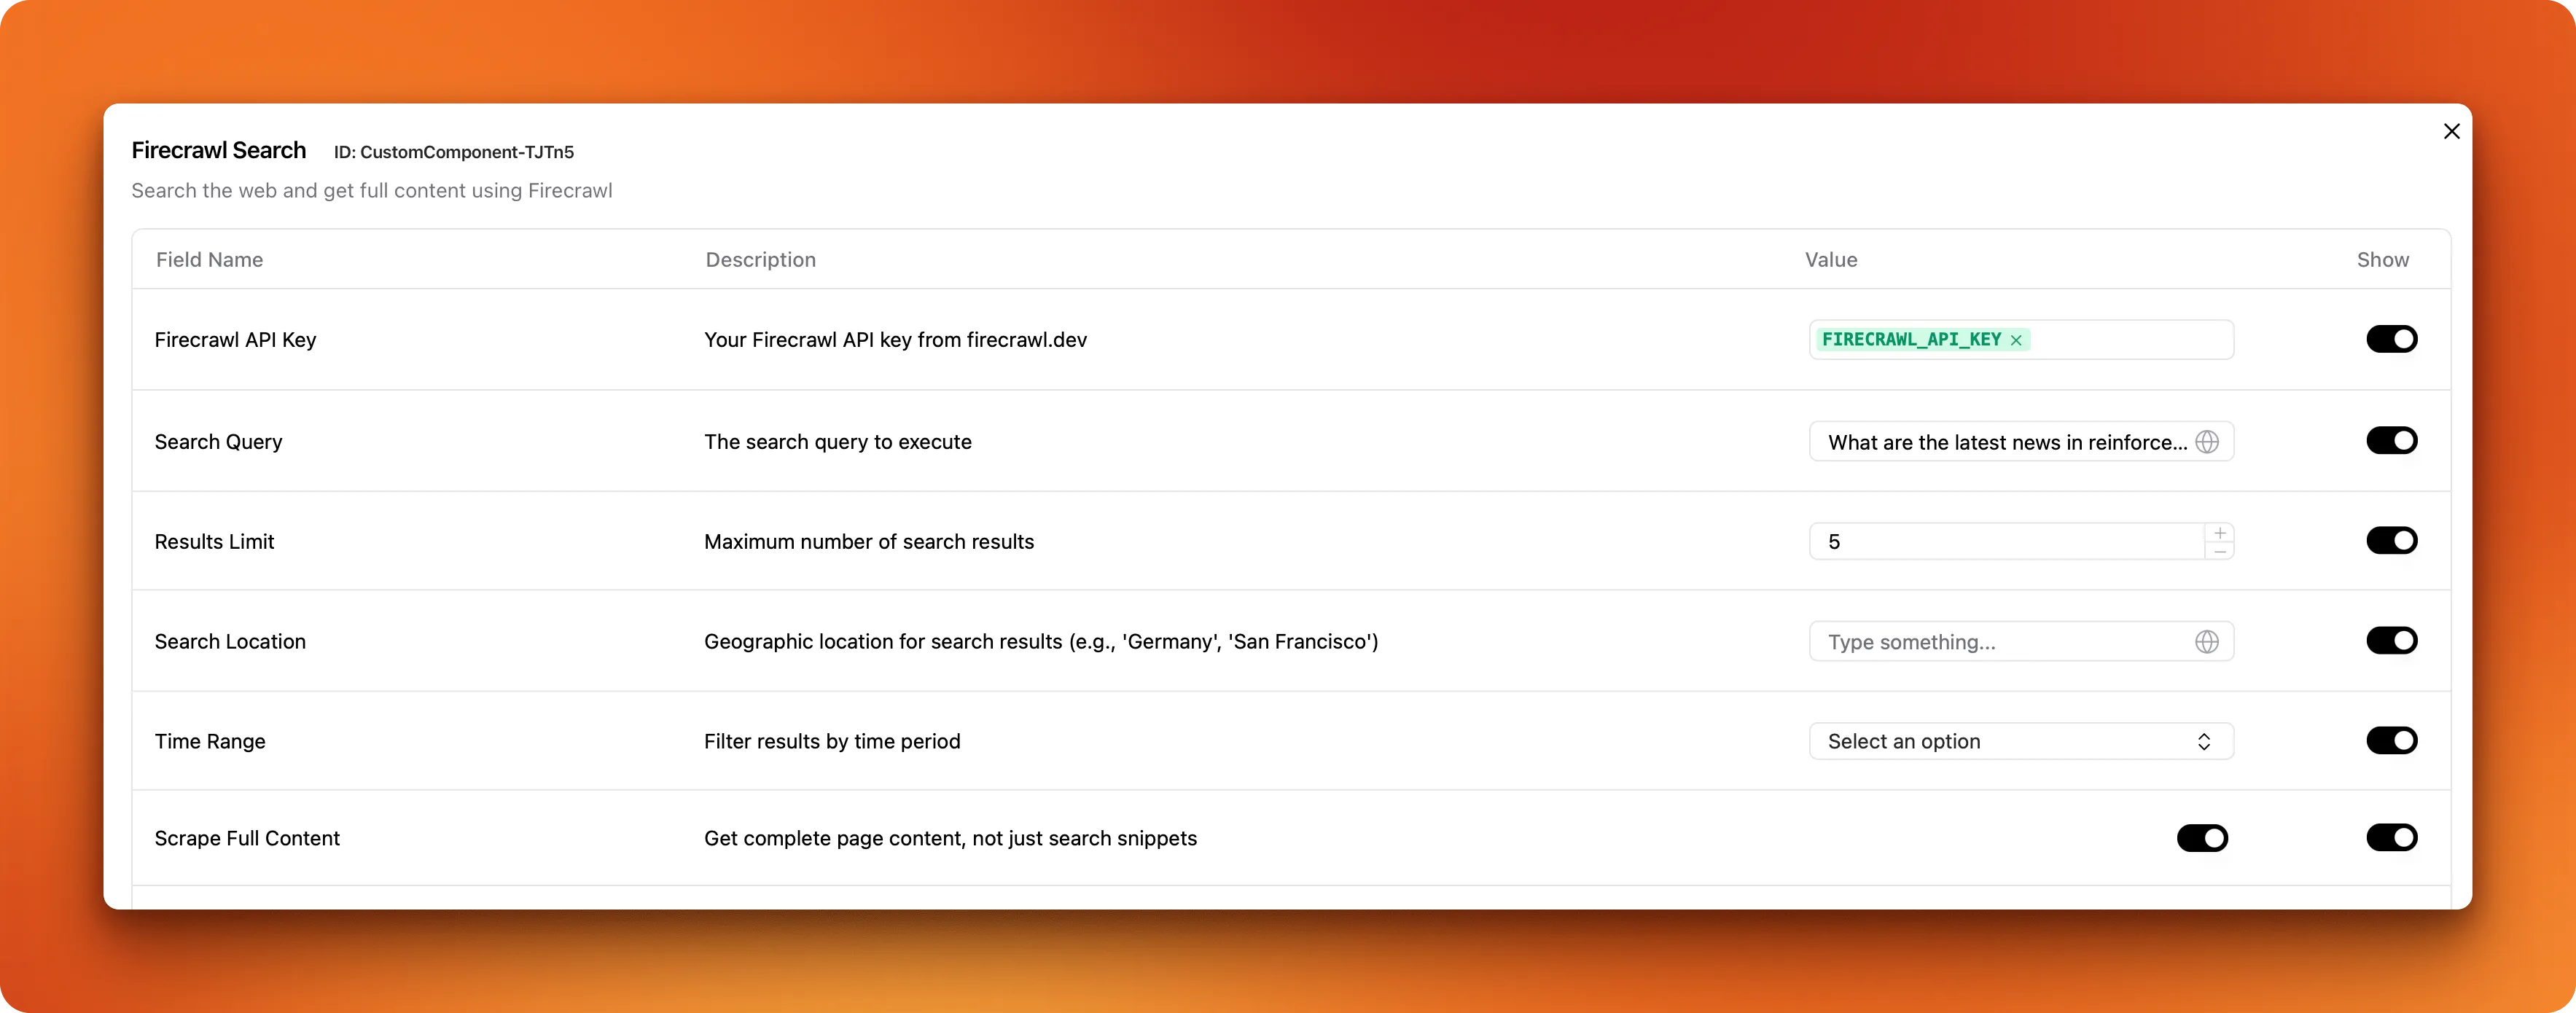
Afterward, the search component must include more visual input fields:
For more detailed information about creating custom components, including advanced features and deployment options, visit the official LangFlow custom components documentation.
Using Custom Components as Agent Tools
Now, let's see how we can give our search component as an agent tool to an agent:
- In a new or existing flow, add a new "Agent" component
- Drag "Chat Input" and "Chat Output" components as well
- Connect them and the Firecrawl Search component in this fashion:
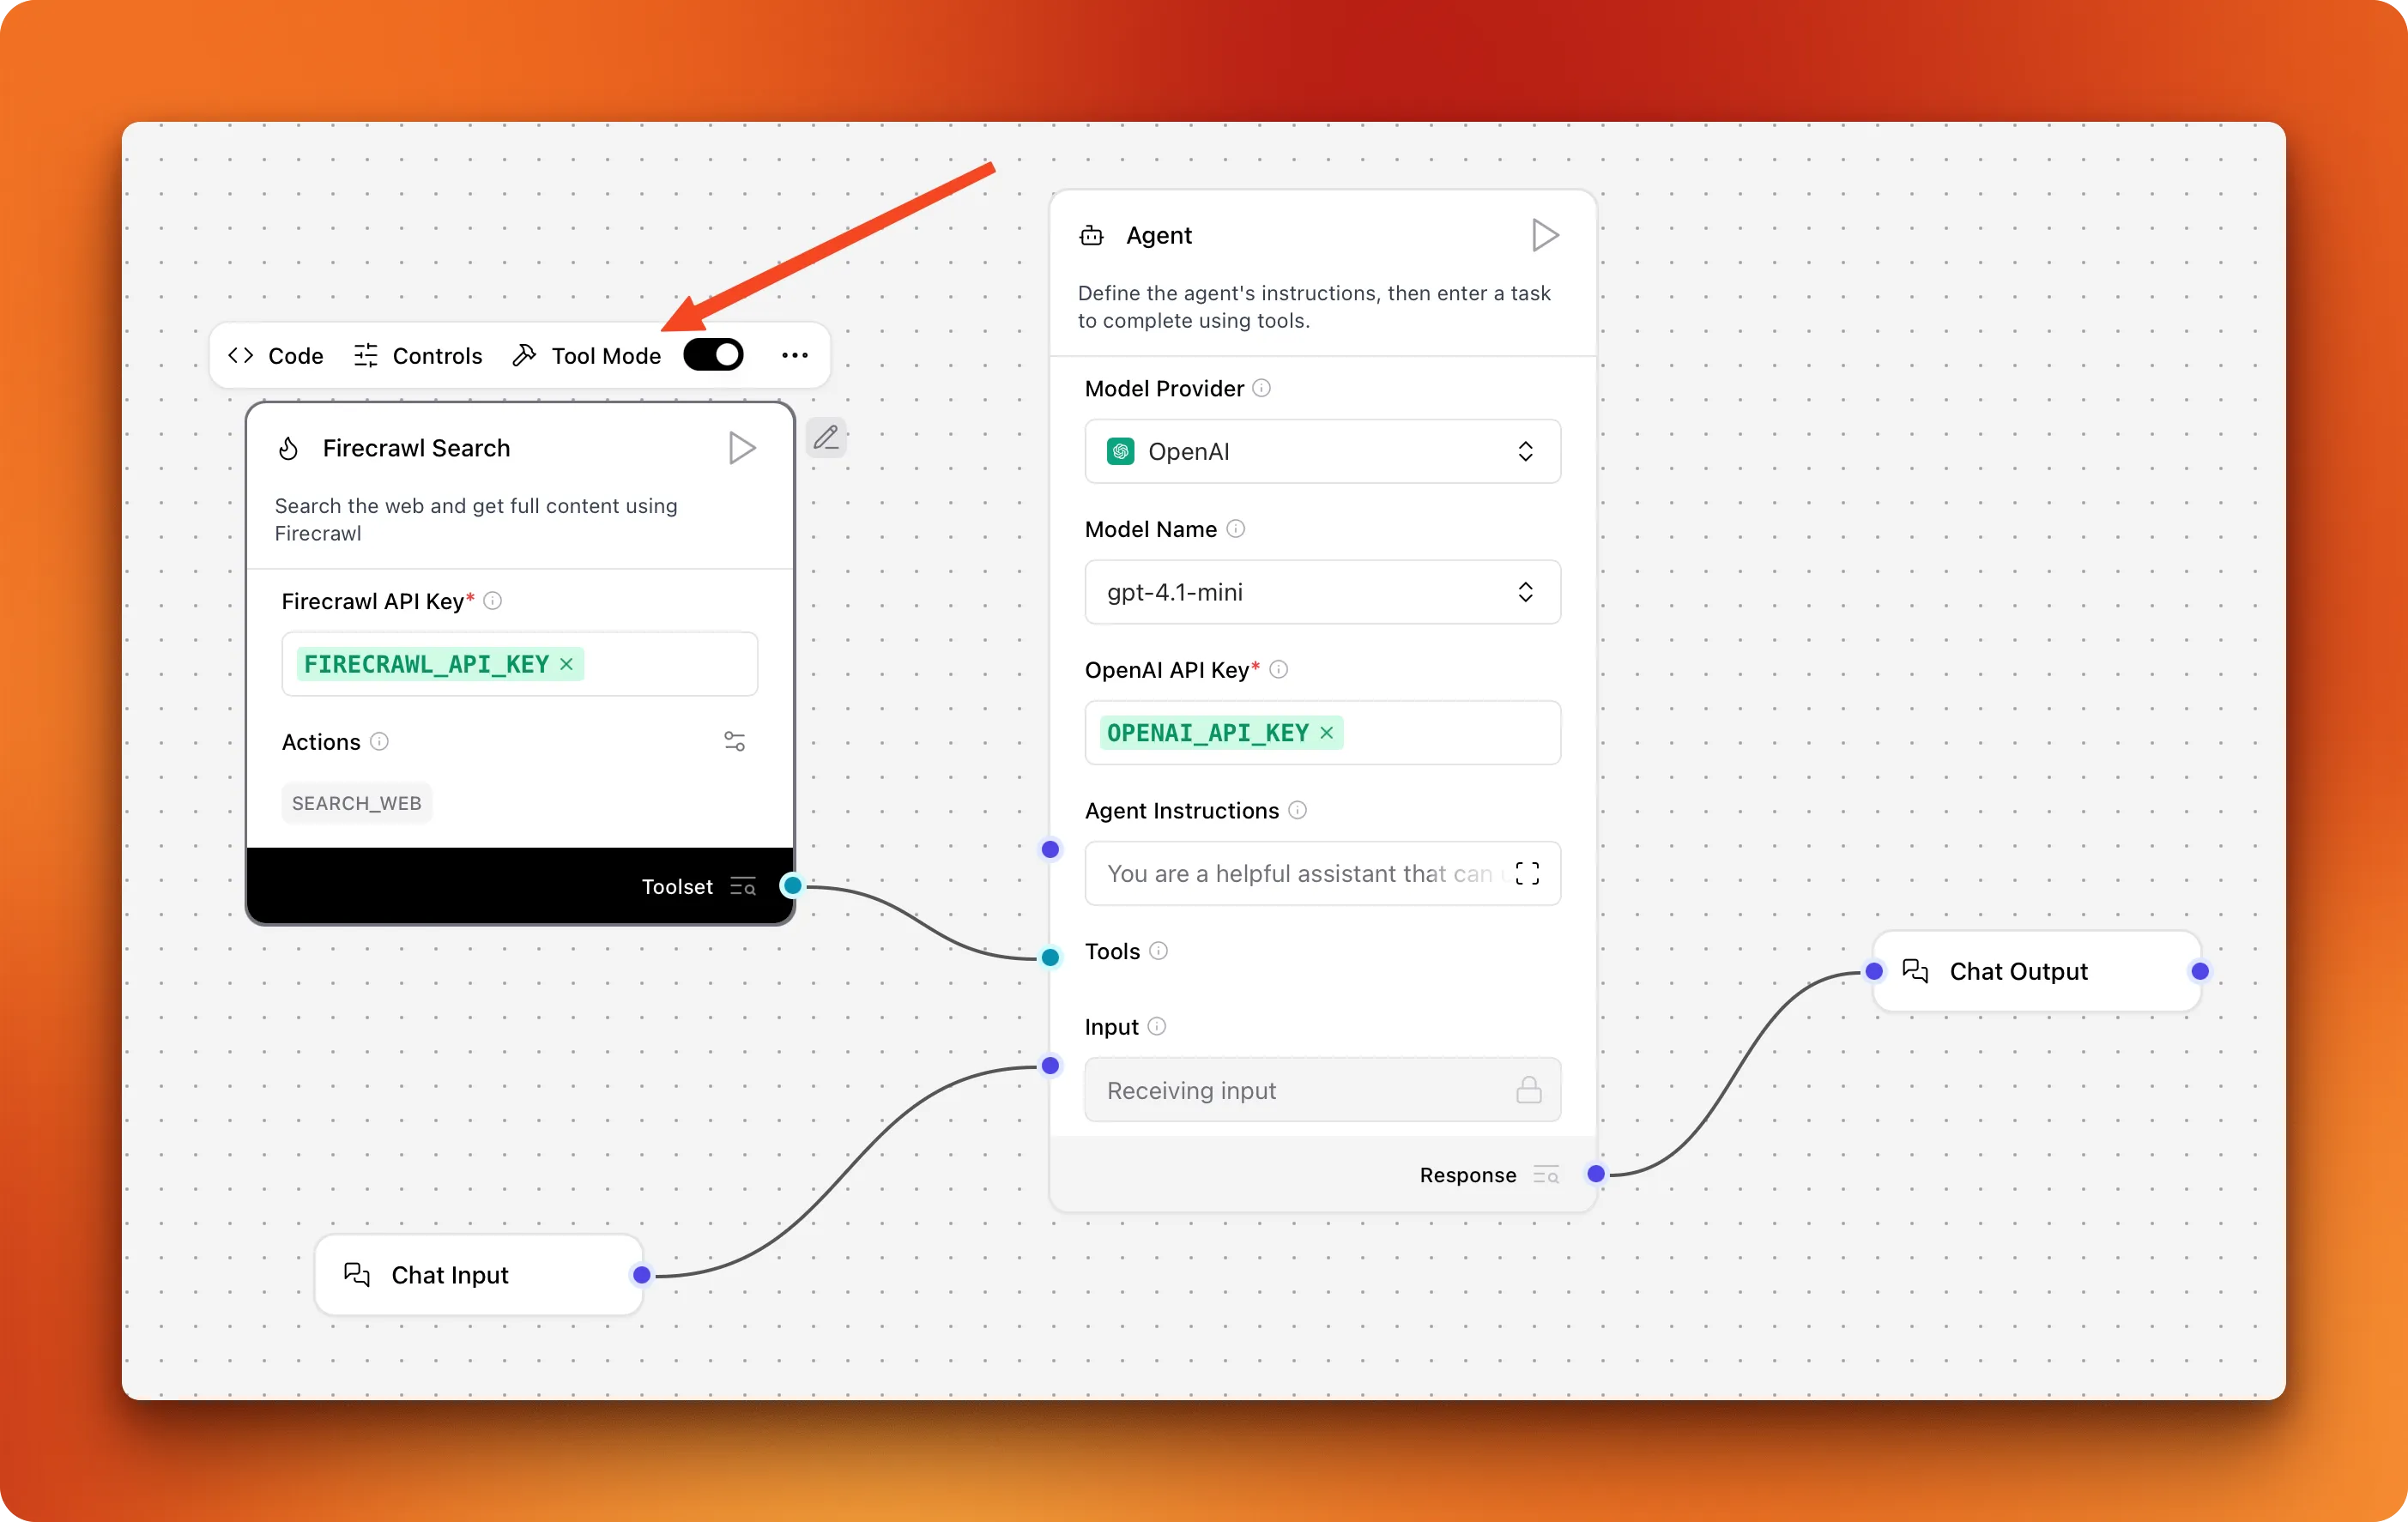
- Configure your API keys as well
Notice how "Tool mode" is enabled for our custom component so that we can connect it to the "Tools" edge of our Agent component. When tool mode is enabled, each method we defined in our component code becomes an individual tool the agent can use. Since our component only includes the search_web function, it corresponds to a single "SEARCH_WEB" action for the agent.
- Click on "Playground" and test with queries that require up-to-date content:
As you can see, the response includes up-to-date news related to the search query. At this point, this simple agentic workflow is only a couple of tools away from turning into a full chat platform:
- Deep research component
- Image generation
- Code execution
As a challenge, try creating custom components for these features around other existing APIs and services.
Deploying LangFlow Applications
If you're building applications just for yourself or small internal teams, LangFlow's local runtime works perfectly well. The browser version at http://localhost:7860 or the LangFlow desktop version provides everything you need for development and testing flows.
But when you want to serve other users or make your flows available to external applications, you need to deploy your LangFlow instance to an external platform. This ensures your flows are always accessible as API services, not dependent on your local machine running.
All flows in LangFlow automatically become REST APIs. You can confirm this by clicking the "Share" button on any flow and opening "API access." This menu also reveals other deployment options: the "MCP server" option serves your flow as an MCP server you can use in clients like Claude or Cursor, the "export" method allows you to share flows with other developers as JSON files, and the "embed" method creates a chat widget for websites.
These deployment features work well for local runtimes and personal use. For flows that will be used by external users, you need to deploy your entire LangFlow instance to different platforms. Deploying doesn't mean exposing individual flows - it means hosting your complete LangFlow environment so the base URL changes from localhost:7860 to something like:
https://UUID.ngrok.app/apihttp://IP_OR_DNS/apihttp://IP_OR_DNS:LANGFLOW_PORT/api
For comprehensive information about LangFlow deployment architecture and options, refer to the official deployment documentation.
Deploying LangFlow on Render
Render is a cloud platform that abstracts infrastructure management while providing production-ready hosting for web applications and APIs. It's particularly appealing for LangFlow deployments because it handles the operational complexity of running persistent services.
What makes Render attractive for LangFlow deployments is its focus on developer experience. You connect your repository, and Render automatically builds and deploys your application. The platform includes built-in features like automatic HTTPS, custom domains, and zero-downtime deployments. For LangFlow applications, Render's persistent storage and managed databases work well for maintaining flow state and user data.
LangFlow requires at least 2GB of RAM to run properly, which means you'll need a Starter instance. Based on the current deployment configuration, a basic LangFlow setup costs approximately $9.50 per month ($7 for the web service plus $2.50 for disk storage). The platform uses predictable pricing: you pay a fixed monthly fee per service plus compute costs prorated by the second. Professional plans start at $19/user/month (plus compute costs) and include team collaboration features and enhanced performance.
To deploy LangFlow on Render:
- Click the deployment button in the official Render documentation
- Enter a blueprint name and select the branch for your
render.yamlfile - Click "Deploy Blueprint" and wait for deployment completion
Render's scaling capabilities work well for growing LangFlow deployments. The platform supports both vertical scaling (upgrading instance types) and horizontal scaling (adding more instances). Paid tiers include autoscaling based on CPU or memory usage, which helps handle variable traffic patterns common in AI applications.
The main limitation of Render for LangFlow deployments is regional availability. Your service runs in one of four regions (Ohio, Oregon, Frankfurt, or Singapore), so you can't deploy the same application across multiple regions for global performance.
Other Deployment Options
-
Google Cloud Platform: Uses a deployment script to set up LangFlow on a VM with spot instances for cost savings. Good for teams needing infrastructure control.
-
HuggingFace Spaces: Easiest deployment by duplicating the LangFlow Space. Perfect for prototypes, though currently experiencing downtime.
-
Railway: Usage-based pricing that scales with demand. Similar simplicity to Render but more cost-effective for variable traffic.
-
Docker: Official images for development and production. Run anywhere Docker is supported. Requires container management skills.
-
Kubernetes: Helm charts for high availability deployments. Best for organizations with existing Kubernetes infrastructure.
-
Ngrok: Creates secure tunnels to share local instances. For development collaboration, not production use.
Choosing the Right Deployment Option
Different deployment methods serve different needs and organizational contexts:
| Platform | Best For | Pricing Model | Pros | Cons |
|---|---|---|---|---|
| Render | Production applications | Fixed monthly + compute | Managed infrastructure, zero-downtime deploys | Limited regions, starts at $9.50/month |
| GCP | Enterprise deployments | Pay-per-use | Full infrastructure control, enterprise features | Requires VM management, spot instances can terminate |
| HuggingFace | Quick prototypes | Free tier available | Easiest setup, community integration | Currently experiencing downtime |
| Railway | Variable traffic apps | Usage-based | Cost scales with usage, simple deployment | Less mature than established platforms |
| Docker | Multi-platform deployment | Infrastructure dependent | Maximum portability, version control | Requires container management skills |
| Kubernetes | Production at scale | Infrastructure dependent | Enterprise-grade scaling, integration | Complex setup, requires Kubernetes expertise |
| Ngrok | Development sharing | Free tier, paid features | Instant sharing, no permanent deployment | Not for production use |
Choose Render if you want managed infrastructure with production features and predictable monthly costs. GCP works well for organizations already using Google Cloud services and needing enterprise-grade deployments. Railway makes sense for cost-conscious deployments with variable usage patterns.
Docker provides the most adaptability if you have existing container infrastructure or want to deploy across multiple environments. Kubernetes is ideal for organizations with existing container orchestration and high availability requirements. Ngrok serves development and collaboration needs when you need to share local work quickly.
Hardware Considerations for LangFlow Instances
For most LangFlow applications that orchestrate API calls, a standard configuration works well: 2-4 CPU cores, 4-8GB RAM, and 20-50GB storage. If you're running local models or intensive data processing, you'll need more: 8+ cores, 16-32GB RAM, GPU support, and 100GB+ storage. Plan for 2-3x your expected load to handle traffic spikes.
Creating Production Streamlit Applications For LangFlow
While LangFlow's built-in playground works well for testing and development, many applications need custom user interfaces that integrate with existing systems or provide specialized user experiences. Building production applications around your LangFlow flows allows you to create polished interfaces while leveraging the visual workflow development you've already completed.
Streamlit provides an excellent framework for quickly building interactive web applications around LangFlow APIs. You can create chat interfaces, data processing dashboards, or specialized tools that use your flows as backend services while providing custom frontends tailored to your users' needs.
This section will show you how to build production-ready Streamlit applications that consume LangFlow flows through REST APIs, handle streaming responses, and provide smooth user experiences.
Getting Familiar With LangFlow REST API
Every flow you create in LangFlow automatically becomes a REST API endpoint. This means you can call your flows from any application that can make HTTP requests - web applications, mobile apps, other services, or command-line tools.
To see your flow's API details, click the Share button in any flow and select API access. This reveals automatically generated code snippets for different programming languages and frameworks. The Python snippet shows the basic structure:
import requests
url = "http://localhost:7868/api/v1/run/bdb3c53c-3529-4793-8eb6-9bc9fb41127d"

payload = {
    "input_value": "hello world!",
    "output_type": "chat",
    "input_type": "chat"
}

headers = {"Content-Type": "application/json"}
response = requests.post(url, json=payload, headers=headers)
The URL structure follows a consistent pattern: {base_url}/api/v1/run/{flow_id}. Your base URL changes depending on where you've deployed LangFlow - localhost:7868 for local desktop versions, localhost:7860 for local OSS installations, or your cloud provider's URL for deployed instances.
The payload structure varies based on your flow's input components. Flows with chat inputs expect input_value containing the user's message, while flows with different input types might need other parameter names. The output_type and input_type parameters tell LangFlow how to format the request and response data.
LangFlow supports streaming responses by adding ?stream=true to the URL. This returns server-sent events instead of a single JSON response, allowing you to display results as they generate. The streaming format sends JSON events line by line:
{"event": "add_message", "data": {"sender": "Machine", "text": "Hello", ...}}
{"event": "add_message", "data": {"sender": "Machine", "text": "! How", ...}}
{"event": "end", "data": {...}}
Each add_message event contains the complete text generated so far, not just new chunks. Your application needs to extract the incremental changes by comparing with previous messages. The sender field helps distinguish between user echoes ("User") and assistant responses ("Machine").
Session management helps maintain conversation context across multiple API calls. Include a session_id parameter in your payload to group related messages:
payload = {
    "input_value": "What did I ask about earlier?",
    "output_type": "chat",
    "input_type": "chat",
    "session_id": "user_123_session"
}
The session ID can be any string that uniquely identifies a conversation thread. LangFlow uses this to maintain context between requests, allowing your flows to reference previous messages and build on earlier conversations.
Building a Streamlit UI For Flows
Creating a Streamlit interface for LangFlow flows requires handling the API communication, managing streaming responses, and providing a smooth chat experience. We'll build an application that connects to any LangFlow flow and provides a polished interface for users.
You can see the full code for the UI in this GitHub gist.
The Streamlit setup includes boilerplate for the page configuration, session state management, and a sidebar for flow configuration:
import streamlit as st
import requests
import json
import uuid
from typing import Iterator, Dict, Any

def setup_streamlit_page():
    st.set_page_config(
        page_title="LangFlow Chat Interface",
        page_icon="🤖",
        layout="wide"
    )
    st.title("🤖 LangFlow Chat Interface")

def initialize_session_state():
    if "messages" not in st.session_state:
        st.session_state.messages = []
    if "session_id" not in st.session_state:
        st.session_state.session_id = str(uuid.uuid4())
    if "flow_config" not in st.session_state:
        st.session_state.flow_config = {
            "url": "http://localhost:7868/api/v1/run/bdb3c53c-3529-4793-8eb6-9bc9fb41127d",
            "stream": True
        }

def show_sidebar():
    with st.sidebar:
        st.header("🔧 Configuration")

        # Flow URL input
        flow_url = st.text_input(
            "Flow URL",
            value=st.session_state.flow_config["url"],
            help="Your LangFlow API endpoint URL"
        )

        # Streaming toggle
        enable_streaming = st.checkbox(
            "Enable Streaming",
            value=st.session_state.flow_config["stream"]
        )

        # Update session state
        st.session_state.flow_config = {
            "url": flow_url,
            "stream": enable_streaming
        }
These functions set up the basic UI structure: page configuration, session state for tracking messages and flow settings, and a sidebar where users can configure their flow URL and toggle streaming.
For the streaming implementation, we need to handle LangFlow's server-sent events format correctly:
def stream_langflow_response(url: str, payload: Dict[str, Any]) -> Iterator[str]:
    """Stream response from LangFlow API"""
    stream_url = f"{url}?stream=true"
    headers = {"Content-Type": "application/json"}

    try:
        response = requests.post(
            stream_url,
            json=payload,
            headers=headers,
            stream=True,
            timeout=60
        )
        response.raise_for_status()

        previous_text = ""
        for line in response.iter_lines():
            if line:
                try:
                    event_data = json.loads(line.decode('utf-8'))
                    if event_data.get("event") == "add_message":
                        # Only process messages from the assistant, not user echoes
                        if event_data["data"]["sender"] == "Machine":
                            current_text = event_data["data"]["text"]
                            if len(current_text) > len(previous_text):
                                new_chunk = current_text[len(previous_text):]
                                previous_text = current_text
                                yield new_chunk
                    elif event_data.get("event") == "end":
                        return
                except json.JSONDecodeError:
                    continue

    except requests.exceptions.RequestException as e:
        yield f"Error: {str(e)}"
This function connects to the LangFlow streaming endpoint. It processes server-sent events, extracts the latest text from the assistant's messages, and yields the new content. This is how we get the token-by-token streaming effect in the UI.
The main chat interface combines message display with streaming response handling. The handle_user_input function manages the conversation flow by adding messages to history, preparing API payloads with session information, and handling both streaming and non-streaming responses. For streaming, it shows a cursor (▌) during generation. Non-streaming requests use a separate make_langflow_request function that extracts the message text from LangFlow's nested JSON response structure.
The complete application ties these pieces together:
def main():
    setup_streamlit_page()
    initialize_session_state()
    show_sidebar()

    # Display conversation history
    for message in st.session_state.messages:
        with st.chat_message(message["role"]):
            st.markdown(message["content"])

    # Chat input
    if user_input := st.chat_input("Type your message here..."):
        handle_user_input(user_input)

if __name__ == "__main__":
    main()
This creates a complete chat interface that works with any LangFlow flow. Users can configure their flow URL, toggle streaming, and have natural conversations that maintain context through session management. The interface provides immediate visual feedback during streaming responses and graceful error handling when API calls fail.
You can extend this foundation by adding file upload capabilities, conversation export features, or custom styling to match your application's branding. For flows with different input types, modify the payload structure to match your flow's expected parameters.
Conclusion And Next Steps
You now have the tools to build production-ready AI applications using LangFlow's visual interface. You've learned how to compare LangFlow with alternatives, set up custom components that extend functionality, deploy workflows as APIs, and create Streamlit interfaces that provide polished user experiences. This foundation gives you the ability to prototype quickly while maintaining the option to customize deeply when needed.
The custom component system you've mastered opens up unlimited integration possibilities. Your Firecrawl Search component demonstrates how to connect external APIs, handle errors gracefully, and make components that work seamlessly with LangFlow's agent system. This same pattern applies to integrating any service - from databases to specialized AI models - while keeping the visual workflow benefits that make LangFlow productive.
Related Resources
- Integrate with MCP servers for enhanced development workflows
- Access models like GLM-4.5 in your LangFlow applications
- Build more complex systems with agent frameworks
- Enhance with RAG frameworks for knowledge retrieval
Your deployment knowledge positions you to scale from development to production. Whether you choose Render for simplicity, Docker for portability, or Kubernetes for enterprise needs, you understand the trade-offs and can make informed decisions. The Streamlit integration patterns you've learned provide a bridge between LangFlow's backend power and custom frontend experiences that your users will appreciate.
To continue building sophisticated applications, consider exploring LangFlow's memory management options for applications that need to remember user preferences and conversation history. For production deployments, review authentication and security to properly secure your applications with API keys and user management. When you need external systems to trigger your flows, webhook integration allows real-time automation and event-driven workflows. For monitoring your applications in production, the API reference provides endpoints for logging and metrics collection that help you understand usage patterns and debug issues.