TL;DR
- Native n8n integration: Firecrawl is now a native node on n8n Cloud — install it from the Nodes Panel, click Connect, and start building without managing API keys
- n8n Cloud credit offer: the launch offer has expired; get 10,000 free credits when you connect Firecrawl through n8n Cloud
- Full API surface in one node: scrape pages, crawl sites, search the web, map URLs, and interact with dynamic pages — all available through the Firecrawl node
- Practical example: this post builds a web-enabled AI chatbot using Firecrawl search, and shows how to add
/agentfor open-ended research tasks
Why use Firecrawl with n8n?
This is the meteoric rise of n8n - an open-source workflow automation platform:
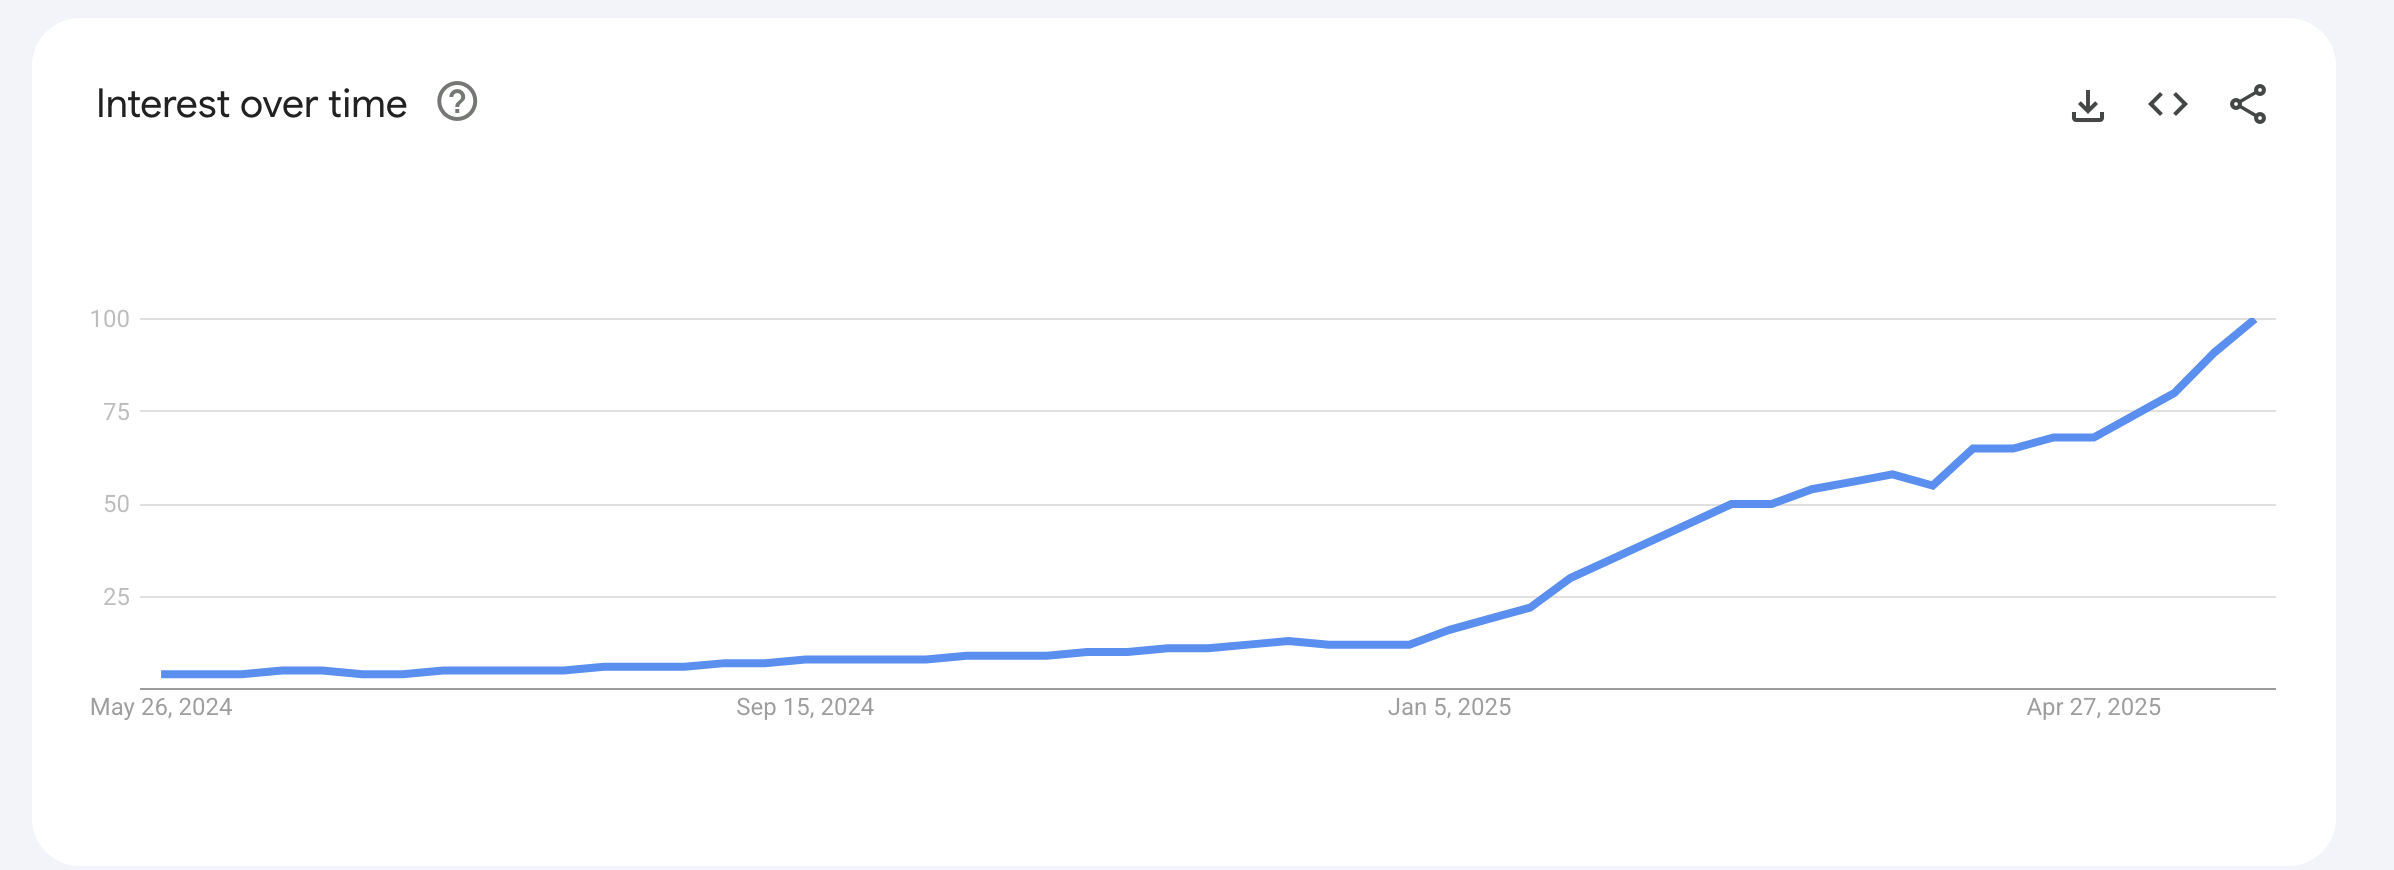
n8n has become the automation platform of choice for technical teams since its 2019 launch. The platform now boasts over 400 integrations and recently raised $60 million in March 2025, saving companies hundreds of hours monthly. While n8n excels at connecting APIs and services, most business workflows need one notoriously difficult thing: fresh, reliable web data. Traditional web scraping breaks when sites update their HTML or fails to handle JavaScript-heavy pages.
Firecrawl handles the web scraping side of this integration. The API service converts entire websites into LLM-ready markdown, managing JavaScript rendering and dynamic content so you get clean, structured data that works directly with n8n nodes. With Firecrawl connected, your n8n workflows can:
- Scrape websites: extract content from any webpage in clean markdown or structured JSON
- Search the web: run searches and pull content from the results in one call
- Interact with pages: click buttons, fill forms, and extract data that only appears after an action using the
/interactendpoint - Map entire sites: automatically discover all URLs across a domain
- Crawl recursively: gather data across entire websites, not just single pages
You also get access to the /agent endpoint for open-ended research and enrichment. This combination lets you pull web content into workflows without custom scraping infrastructure.
Ready for More? Check out our collection of n8n web scraping workflow templates for production-ready examples. For visual AI development, explore our LangFlow tutorial.
This tutorial will show you how to combine these tools through two approaches: HTTP requests and the community node. You'll build a working chatbot that can access live web data, compare both integration methods, and understand which approach fits your automation needs. By the end, you'll have a practical example that you can adapt for competitor monitoring, content aggregation, or /agent-powered enrichment.
This guide assumes you have a basic understanding of Firecrawl's capabilities and API structure. If you're new to Firecrawl, you may want to spend a few minutes with the official documentation to familiarize yourself with the service.
Getting started with n8n
n8n offers one of the most comprehensive documentation experiences in the automation space. You can get up to speed quickly by spending 30 minutes on their quickstart guide and beginner course. This foundation covers 90% of the workflows you'll build.
Let's explore the basics through a real example: a workflow that connects WhatsApp and Slack for bidirectional messaging. You can explore this workflow interactively to see how the pieces fit together.
The first part of the n8n workflow to send Slack messages to WhatsApp
n8n workflows consist of nodes connected by edges that pass data between operations. This first section converts Slack messages into WhatsApp messages and sends them to your specified contact.
The workflow begins with a Slack trigger node that listens for events like new messages in channels, support tickets, or mentions.
n8n provides various trigger types to start workflows: manual triggers, scheduled timers, cron jobs, and application-specific triggers like this Slack example.
After the trigger fires, two nodes retrieve the channel ID where the message was posted. A conditional node then determines whether the message contains only text or includes media files.
For media messages, the workflow downloads the content before sending it to WhatsApp. Text-only messages go directly to the WhatsApp node.
The second part of the workflow to convert WhatsApp messages to Slack
The reverse direction - converting WhatsApp messages to Slack - requires more complexity since WhatsApp frequently includes audio and file attachments.
Notice the "download media" node in the workflow. This demonstrates n8n's HTTP Request node, which can send GET, POST, PUT, and DELETE requests to any API. This node type will be central to our Firecrawl integration later.
You can also notice red warning flags next to the Slack and WhatsApp nodes - these indicate authentication errors. Since these nodes connect to external accounts, you need to set up credentials first.
To configure authentication, select a node and press Enter to open its settings, then click "Create new credential." You can also configure other node settings here, such as filtering by channel ID.
Try the quickstart examples or the templates library before continuing with this tutorial to get hands-on experience with n8n's interface.
Two ways of using Firecrawl with n8n
Now that you understand workflow basics and node types, let's explore how to integrate Firecrawl's AI-powered scraping engine into n8n workflows.
Firecrawl is now a native integration on n8n Cloud. You install the Firecrawl node from the Nodes Panel, click Connect to Firecrawl, and share your email — n8n creates your Firecrawl account automatically and applies 10,000 free credits to your account. The launch offer that included a free Hobby plan and 100,000 promotional credits has expired. On self-hosted n8n, an admin installs the community node via the Admin Panel and anyone on the instance can connect using their API key.
For endpoints like /agent that aren't yet in the node, use an HTTP Request node to call the Firecrawl API directly — this works in both Cloud and self-hosted environments.
Method 1: n8n Cloud (native node or HTTP requests)
On n8n Cloud, the Firecrawl native node is the fastest way to start: one-click connect, no credential juggling. The native node covers scrape, crawl, search, map, and interact operations. For endpoints not yet available in the node (like /agent), add an HTTP Request node alongside it — both work in the same workflow.
When to use this method: Choose n8n Cloud when you want to start immediately without infrastructure setup. Use the native Firecrawl node for most operations, and switch to an HTTP Request node when you need direct API access for advanced endpoints.
We'll build a practical example: a GitHub trending scraper that extracts repositories in your chosen field.
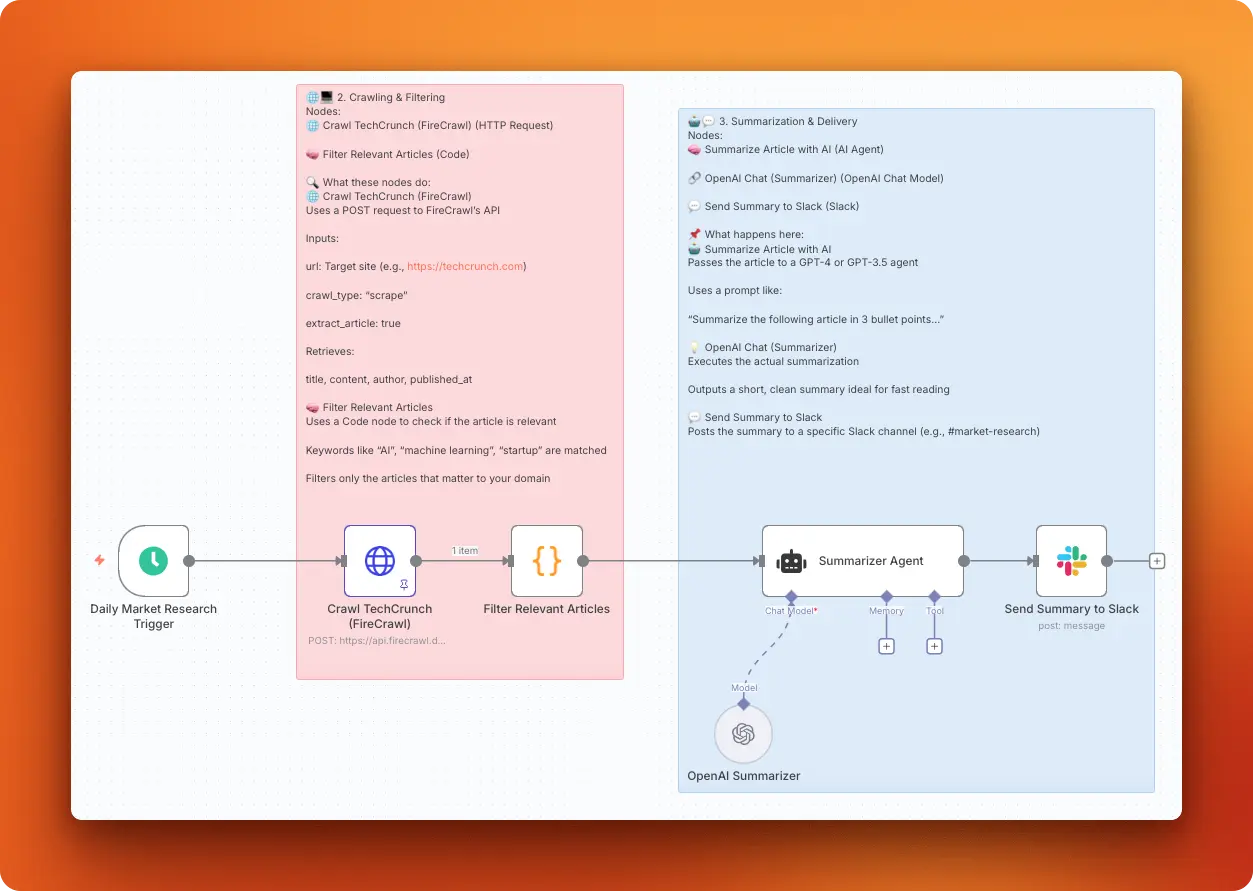
Setting up the workflow
Start by signing up for n8n Cloud and creating a new workflow from your dashboard.
Add the Schedule Trigger:
- Click the plus icon and search for "Schedule Trigger"
- Configure it to run daily at 5 AM
- This node will automatically start your workflow each morning
![]()
Add the HTTP Request Node:
- Search for "HTTP Request" and add it to your canvas
- Connect it to the Schedule Trigger node
- Click on the HTTP Request node to open its settings
The HTTP Request node lets you call any API endpoint. Notice the "Import cURL" button - this feature allows you to copy API calls directly from documentation and paste them into n8n.
The cURL button highlighted in node settings on n8n
Configuring the Firecrawl API call
Navigate to Firecrawl's Agent endpoint documentation to set up your API request.
Firecrawl API reference showing the Agent endpoint
The /agent endpoint runs open-ended research and returns structured results from a single prompt. Click "Try it" to open the interactive API explorer.

API parameters interface for the Agent endpoint
Configure your request:
- Prompt: "Find trending MLOps repositories on GitHub and return name, description, stars, and URL"
- API Key: Add your Firecrawl API key in the Bearer token field
Click "Send" to test your request. If no MLOps repositories are trending, try a broader topic like "Python" to verify the setup works. A 200 response code indicates success.
Importing to n8n
Once your API call works in the documentation:
- Copy the generated cURL command
- Return to your n8n HTTP Request node settings
- Click "Import cURL" and paste the command
- Click "Import" - n8n automatically fills in all parameters
- Click "Execute node" to test the integration
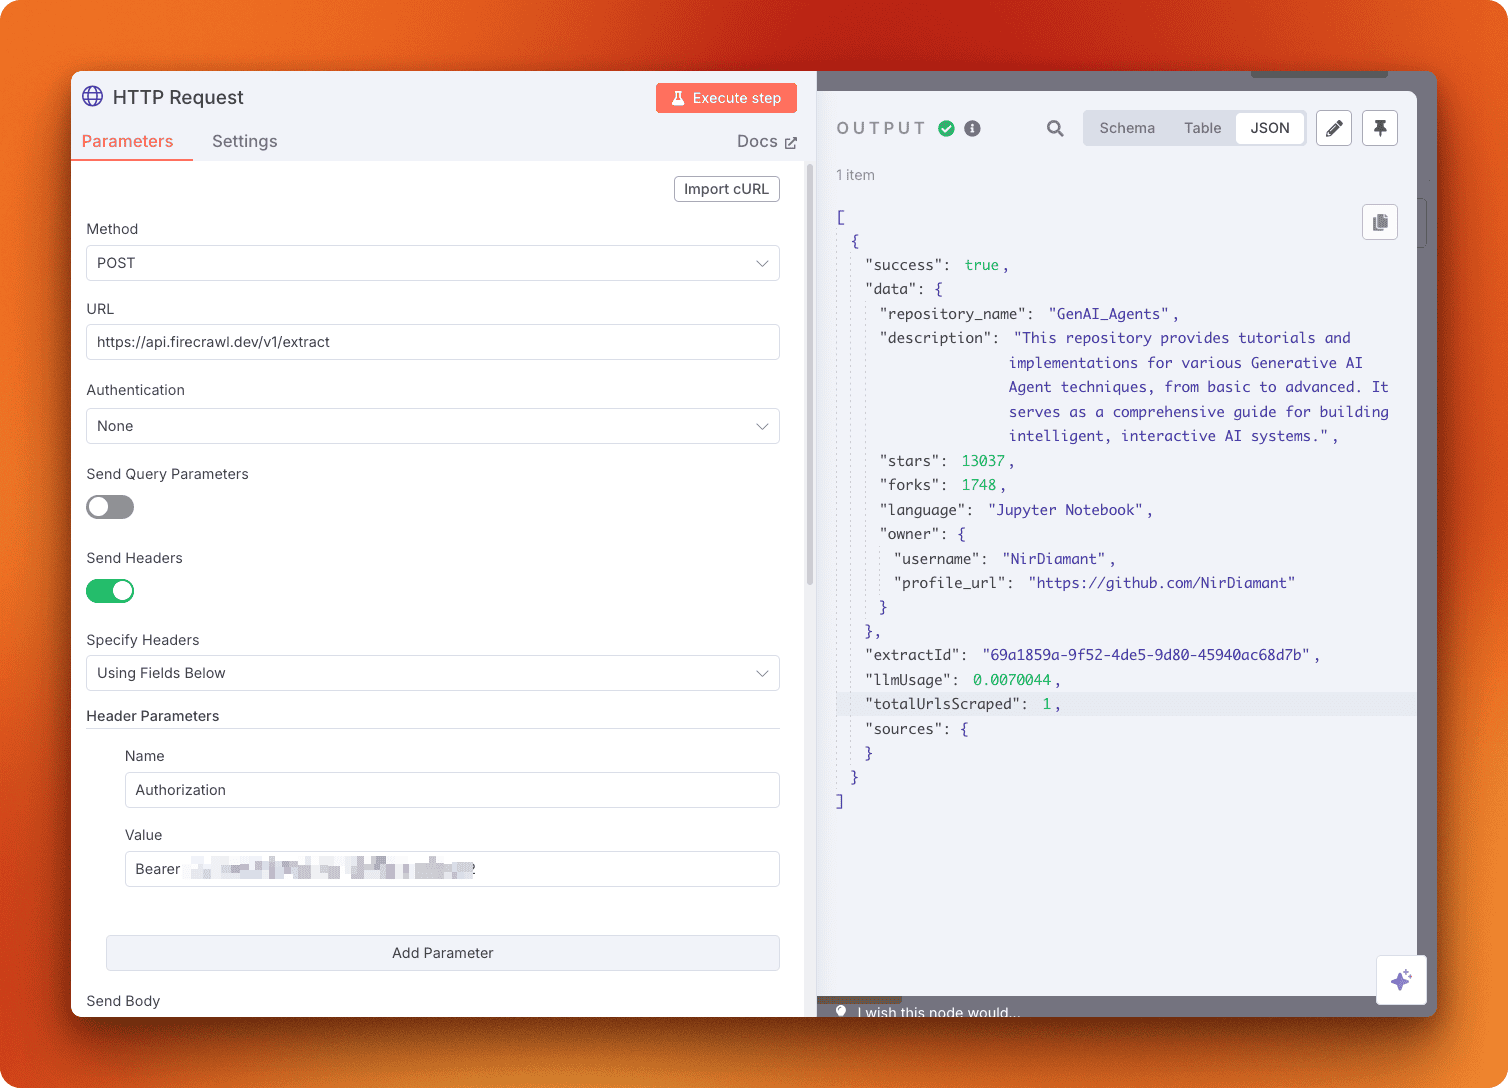
HTTP Request node showing a successful API response
You should see the extracted repository data in the output panel. The HTTP Request node is now configured and ready to run on your schedule.
Expanding the workflow
With the core scraping configured, you can extend this workflow by adding nodes to:
- Filter results for specific criteria
- Send email or Slack notifications
- Store data in databases or spreadsheets
- Compare current trends with historical data
The HTTP Request approach gives you complete control over API parameters and works with any Firecrawl endpoint, an advantage you won't get when using the community-maintained Firecrawl node.
Method 2: Self-hosted n8n + community node
Some automation workflows require complete data control and strict security compliance. Financial institutions processing sensitive customer data, healthcare organizations handling patient records, or government agencies managing classified information often cannot use cloud-based automation platforms. These scenarios demand self-hosted solutions.
When to use this method: Choose the community node approach when you need complete data control, have security compliance requirements that prevent cloud usage, or prefer a simplified interface for basic scraping tasks. This method works best for organizations with existing infrastructure and teams comfortable managing self-hosted applications.
n8n's self-hosted version addresses these requirements while offering an additional advantage: community nodes. These third-party integrations extend n8n's functionality beyond the official node library.
Installing Self-Hosted n8n
If you have Docker Desktop installed, setting up n8n takes just two commands.
First, create a volume to persist your workflow data:
docker volume create n8n_dataThen launch the n8n instance:
docker run -it --rm --name n8n -p 5678:5678 -v n8n_data:/home/node/.n8n docker.n8n.io/n8nio/n8nYour n8n instance will be available at http://localhost:5678. The interface looks identical to the cloud version, but you'll need to register your instance to unlock additional features.
Registering your instance
When you first launch self-hosted n8n, it runs in unregistered mode. To access premium features, navigate to Settings > Usage and Plan, then register with your email to receive a license key.
Registration unlocks:
- Folders: Organize workflows into structured directories
- Debug in editor: Pin and copy execution data during development
- Workflow history: 24 hours of version history for rollbacks
- Custom execution data: Save and annotate execution metadata
Note that even the registered self-hosted version doesn't have the full feature set of n8n Pro or Enterprise.
Installing the Firecrawl Community Node
Self-hosted n8n allows installation of community-created nodes that aren't available in the cloud version. The Firecrawl community node provides a simplified interface for common Firecrawl operations.
Navigate to Settings > Community Nodes and click "Install a community node."
Enter the package name: n8n-nodes-firecrawl and click "Install".
You should see a "Package installed successfully" confirmation message.
Using the Firecrawl node
Return to your dashboard and create a new workflow. Search for "firecrawl" to see the available actions:
Firecrawl node showing available actions
The community node currently supports six operations:
- Submit a crawl job
- Check crawl job status
- Crawl URL with websocket monitoring
- Submit a crawl job with webhook
- Scrape a URL and get its content
- Map a website and get URLs
Configuring the scrape action
Let's configure the most commonly used action: scraping a URL.
- Select "Scrape a URL and get its content"
- Click "Create new credential" to add your API key
Firecrawl credential configuration interface
- Paste your Firecrawl API key and save
- Configure the scrape parameters:
- URL: The webpage you want to scrape
- Format: Choose HTML, Markdown, or Links
- Click "Execute node" to test the configuration
The credentials will be saved for all future Firecrawl nodes in your workflows.
Community node limitations
While the community node simplifies common operations, it doesn't support all Firecrawl API endpoints. The /agent endpoint isn't available. For complete API access, use the HTTP Request method even in self-hosted environments.
The community node works best for straightforward scraping tasks where you need clean, structured data without complex extraction requirements.
Now that you understand both configuration approaches, try building a simple workflow that scrapes a news website or documentation page using the community node. This hands-on practice will help you understand the differences between both methods and determine which fits your workflow needs.
Using the Firecrawl Agent endpoint in n8n
Firecrawl's /agent endpoint is a research agent that can find sources, choose what to fetch, and return structured results from a single prompt. Unlike scrape or extract, you don't need to supply a specific URL or a schema up front. The agent decides which pages to visit and how to structure the output.
With the agent, you can run open-ended research tasks from a single prompt: it finds sources, navigates across pages, and returns structured results without requiring a URL list or schema. With the updated /agent endpoint, you only provide the prompt and Firecrawl handles everything end to end. This makes it ideal for enrichment workflows (e.g., filling spreadsheet columns with founder names, roles, funding rounds, or product categories) and for tasks where the required sources aren't known ahead of time.
You can also use the async variant to kick off long-running research and later fetch results when they're ready, or use the sync variant when you want a single node that waits for completion. In n8n, the agent pairs well with downstream nodes that filter, transform, or route the structured output to CRMs, sheets, or data warehouses.
Now with parallel processing, this gets even more powerful. Parallel Agents let you run hundreds or thousands of /agent prompts at once, so enrichment and research workflows that used to take hours can finish in minutes. This is especially exciting for batch workflows like lead enrichment, market research, or catalog cleanup where you want fast, structured results at scale.
Finally, the agent can be used alongside other Firecrawl tools in n8n AI Agent workflows. Combine search, scrape, and agent steps to handle both predictable extraction and more exploratory research in one automation.
Using the /interact endpoint in n8n
The /interact endpoint extends scraping into full browser control. After scraping a page, you stay in that session and tell Firecrawl what to do next: click a button, fill a form, navigate to the next page, extract data that only appears after an action.
This is useful in n8n workflows that hit paginated results, trigger search forms, or need to act on dynamic content before extracting it. In n8n, add an HTTP Request node after your scrape call and POST to /v2/scrape/{scrapeId}/interact with a natural language prompt. Sessions last up to 10 minutes with a 5-minute inactivity timeout, so you can chain multiple interaction steps, including browser automation actions, within one automation run.
Practical example: chatbot with web access
Let's build a complete example that demonstrates both technologies working together: an AI chatbot that can search the web in real-time using Firecrawl's search capabilities, then escalate to /agent when a request needs deeper research or enrichment.
Read More: How Credal Extracts 6M+ URLs Monthly to Power Production AI Agents with Firecrawl
This example uses Method 1 (HTTP requests with n8n Cloud) to showcase the full integration potential.
Building the core workflow
To get started, create a new workflow in n8n Cloud. The foundation requires two essential components that work together to create an interactive AI experience:
- "When chat message received" trigger - This creates an interactive chat interface
- "AI Agent" node - Connect this to your trigger node
Two nodes connected in the workflow canvas
The AI Agent node implements a ReAct (reason + act) pattern. This approach gives your chatbot the ability to think through problems step by step and use tools when needed to find answers, including Firecrawl search, scrape, and /agent calls.
Configuring the AI agent
Before the chatbot can function, the AI Agent needs three connections configured. Each connection handles a different aspect of the chatbot's capabilities.
Chat Model Setup:
Start by clicking the "+" next to "Chat Model" and adding your preferred language model provider. Configure it with your API credentials and select a model like gpt-4o-mini for cost-effective performance.
Memory Configuration: Next, add "Simple Memory" which stores conversation history on n8n's servers. This allows the chatbot to remember previous messages in your conversation. For production workflows, consider external databases like MongoDB, Redis, or PostgreSQL for better persistence and control.
Workflow showing AI Agent with model and memory configured
Once configured, test your basic chatbot by clicking "Open chat" and sending a few messages. This testing step serves two purposes: it verifies the setup works and exposes the chatInput field that we'll need for the Firecrawl integration.
Adding web search capabilities
With the basic chatbot working, we can extend it with web search capabilities for AI agents through Firecrawl's Search endpoint. Click the "Tools" edge and add an HTTP Request node to create this connection.
Navigate to Firecrawl's Search endpoint documentation and configure a test request to understand the API structure:
Search endpoint configuration interface
Copy the generated cURL command and import it into your HTTP Request node. The specific query parameter value doesn't matter at this stage since the AI Agent will populate it dynamically based on user questions.
Configure the Tool Description: The AI Agent needs instructions about when to use this tool. In the node description field, add:
Use this tool to search the web for real-time information.This description guides the AI Agent's decision-making process about when to search the web.
Set Dynamic Query Parameter: The final step connects user input to the search functionality. Scroll to the JSON configuration section and switch from "Fixed" to "Expression" mode:
JSON configuration showing Fixed option selected
Replace the static query with the dynamic chatInput by dragging it from the available fields:
Dragging chatInput to the query parameter
Testing your web-enabled chatbot
Return to the canvas and open the chat interface. Your chatbot can now access live web information through Firecrawl's search engine.
Chat interface showing response with web search results
The AI Agent automatically evaluates each user question and decides when to search the web. This gives users access to current, accurate information that goes beyond the model's training data. You can adapt this same pattern for any workflow where AI agents need access to fresh web content or specific domain knowledge.
Conclusion
This tutorial demonstrated two distinct approaches for integrating Firecrawl's web scraping capabilities with n8n workflows. The HTTP Request method offers complete API access (including /agent) and works well with n8n Cloud, making it suitable for most automation workflows. Meanwhile, the community node approach provides a simplified interface for self-hosted environments where data control and security compliance are priorities.
For most workflows, Method 1 (HTTP Requests with n8n Cloud) offers the best balance of functionality and ease of use. You get immediate access to all Firecrawl endpoints, can import API calls directly from documentation, and avoid infrastructure setup. The chatbot example shows how this approach handles complex integrations with minimal configuration and leaves room to add /agent for research-heavy steps. Method 2 works best when your organization requires on-premises data processing or when you're building simpler scraping workflows that don't need advanced extraction features.
Continue your automation journey
- Explore web scraping libraries for custom implementations
- Learn about browser automation tools for complex interactions
- Build AI agents with our agent frameworks guide
- Convert websites to llms.txt files for LLM training
Frequently Asked Questions
What is the native Firecrawl integration on n8n Cloud?
Firecrawl is now a native node on n8n Cloud. You install it from the Nodes Panel, click Connect to Firecrawl during node setup, and share your email — n8n creates your Firecrawl account automatically. No separate sign-up, no API keys to track down.
What is included in the current n8n Cloud credit offer?
The launch offer that included a free Hobby plan and 100,000 credits has expired. The current offer gives you 10,000 free credits when you connect Firecrawl through n8n Cloud. Scraping costs 1 credit per page, search costs 2 credits per 10 results, and browser interaction costs 2 credits per minute.
What does the Firecrawl /agent endpoint do in n8n?
It runs open-ended research from a single prompt, discovers sources, and returns structured results without you having to define a URL list or schema. Use an HTTP Request node to call it from any n8n environment.
Do I need to provide URLs or a schema for /agent?
No. With the /agent endpoint, you only provide the prompt and Firecrawl handles source discovery and structure for you.
Does the Firecrawl node support /agent?
The Firecrawl node exposes scrape, crawl, search, map, and interact operations. The /agent endpoint requires using an HTTP Request node pointed at the /agent API endpoint directly.
What can I do with the /interact endpoint in n8n?
The /interact endpoint lets you take actions in a browser session after scraping a page — click buttons, fill forms, navigate paginated results, and extract data that only appears after an interaction. In n8n, add an HTTP Request node after your scrape call and POST to /v2/scrape/{scrapeId}/interact with a natural language prompt or Playwright code.
How do Parallel Agents make /agent faster at scale?
Parallel Agents let you run hundreds or thousands of /agent prompts at once, which is ideal for batch enrichment or research. See the Parallel Agents announcement at firecrawl.dev/blog/introducing-parallel-agents.
Does the Firecrawl node work on self-hosted n8n?
Yes. On self-hosted n8n, an admin needs to enable community nodes in the Admin Panel and install the n8n-nodes-firecrawl package. Once installed, anyone on the instance can connect by adding the node to a workflow and entering their Firecrawl API key.