OpenAI has recently introduced a visual Agent Builder designed for multi-step automations. It's similar to tools like n8n and Flowise but it's closely integrated with OpenAI models. This cloud workspace allows users to drag and drop blocks, configure various tools, and examine the execution of tasks in detail. Some believe that this development renders many no-code automation tools obsolete. In this guide, we'll explore whether the hype about it is justified.
In this tutorial, you'll set up Agent Builder, load a starter template, and create a complete Investment Research Agent. This agent will transform a user's question into a company research report and, upon approval, generate a more detailed report. We'll cover various topics including guardrails, query normalization, state management, routing, web search with Firecrawl, human approval, in-depth research, testing, and deployment.
Introducing OpenAI Agent Builders
OpenAI Agent Builder is a visual canvas similar to n8n that allows you to assemble, debug, and export multi-step agent workflows directly from the playground. You can start with templates and then use a drag-and-drop interface to define each step, connect them with edges, and configure the precise inputs and outputs needed for downstream steps.
As you build your workflow, you can use the “Preview” feature to run it with live data, attach files, and monitor the execution of each node. Agent Builder promotes a robust design process through workflows that combine agents, tools, and control-flow logic, while also supporting learning through examples and templates. To ensure quality and resilience, you can evaluate your workflows with trace graders and follow best practices around safety to mitigate risks such as prompt injection and data leakage.
The process of shipping an agent consists of three straightforward stages:
- Design your workflow: Use the Agent Builder to create your workflow.
- Publish your workflow: This step generates a versioned artifact with a unique ID.
- Deploy the agent: There are two options for deployment. You can easily embed the agent using ChatKit by passing the workflow ID or choose a more advanced integration by exporting the Agents SDK code to run on your own infrastructure.
Getting Started with OpenAI Agent Builders
To begin using OpenAI's Agent Builders, first sign up for the OpenAI API platform. After registering, head over to the billing section to add at least $5 in credits. The OpenAI Agent Builder utilizes your API credits to access tools, models, and workflows.
Once you have credits, navigate to the Agent builder option in the dashboard. Click on the "Templates" tab to explore the available templates.
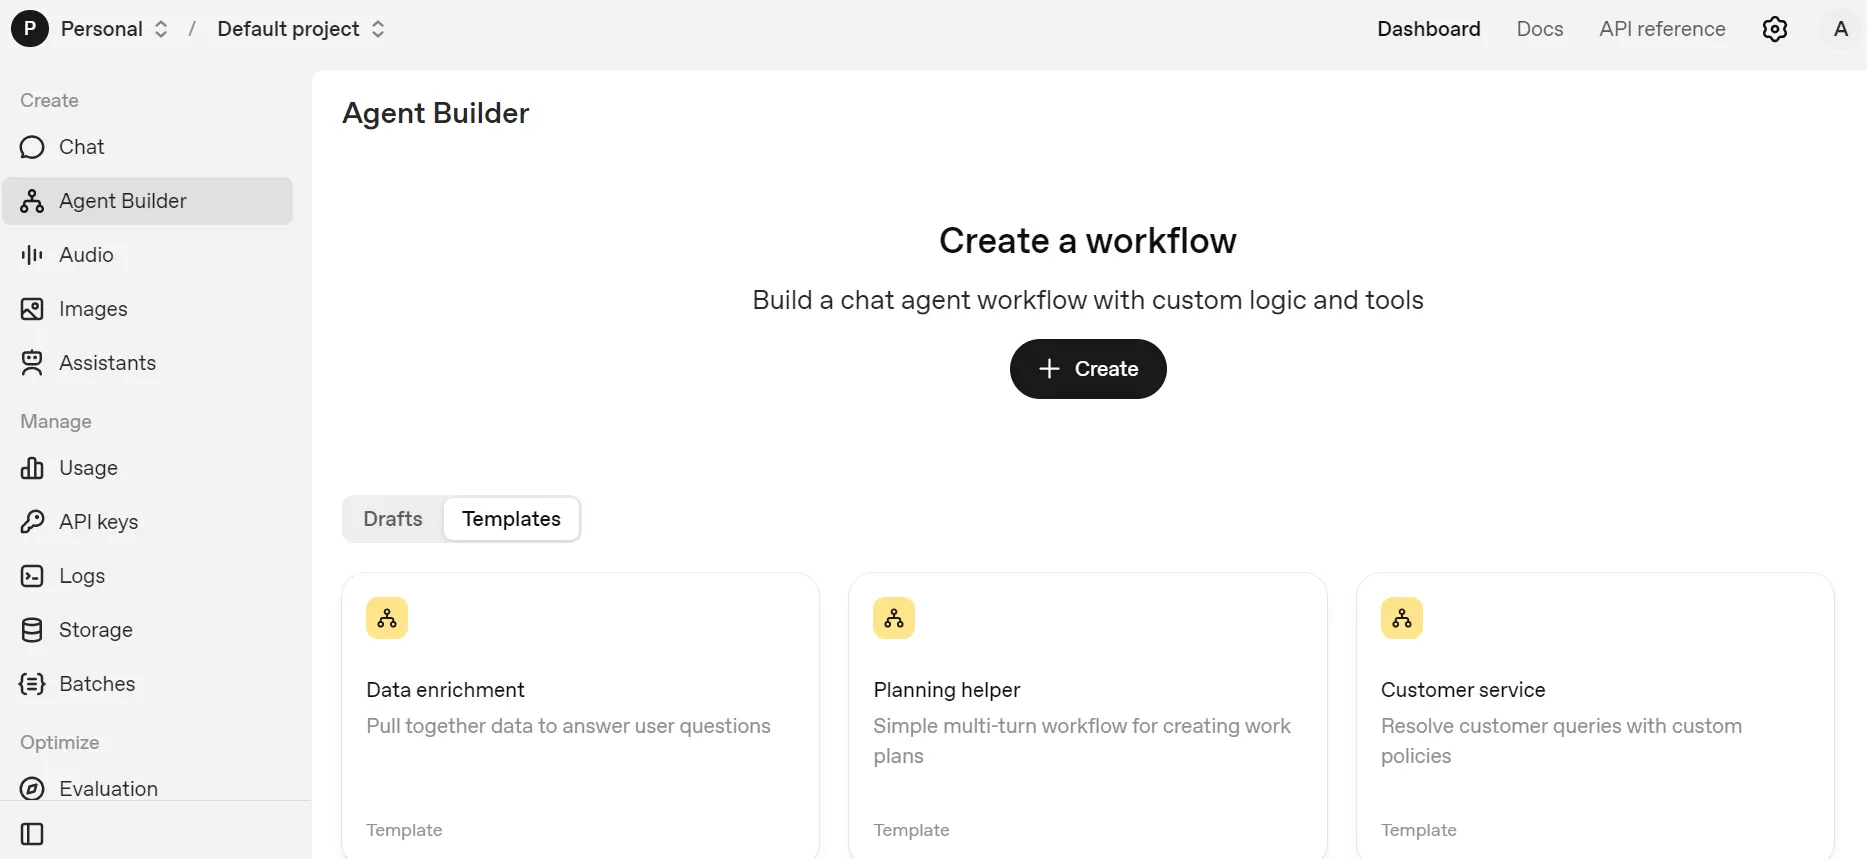
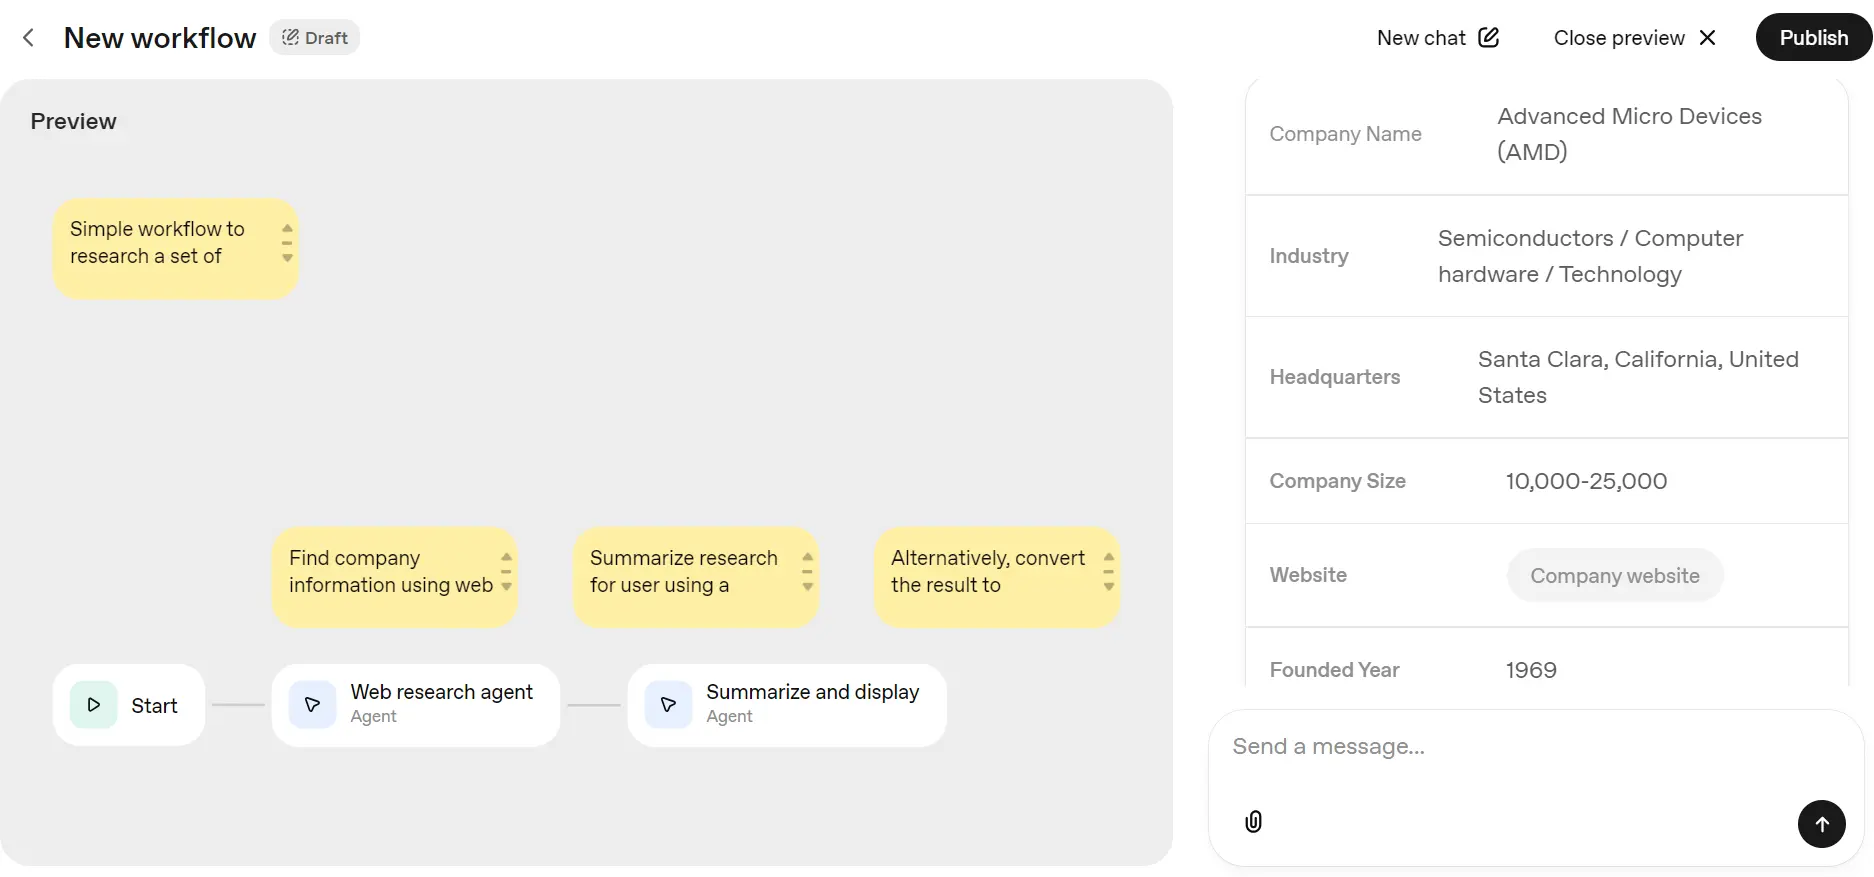
Select the "Data enrichment" template to open it. Here, you can view the workflow and understand the function of both agents.
To test this template, click the "Preview" button located in the top left corner.
If you try to run the workflow by entering your question, you might encounter an error if your organization is not verified. OpenAI has implemented a new policy that requires organization verification to access the GPT-5 model and later versions.
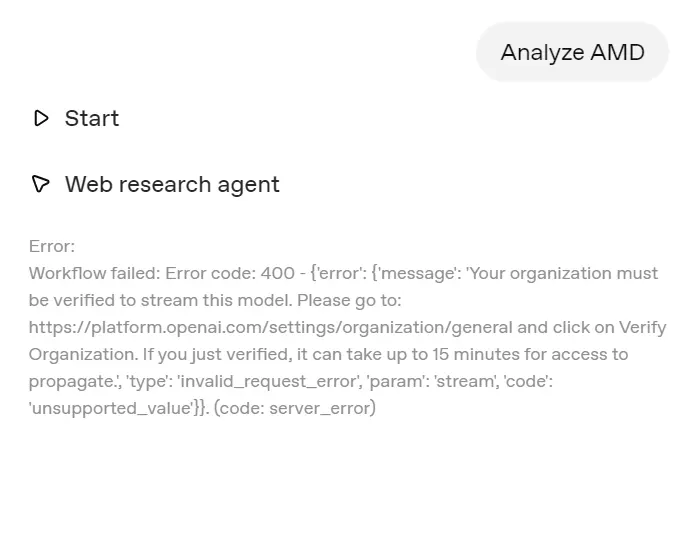
To resolve this issue, go to the Organization settings and click on the “Verify Organization” button. Follow the steps provided to complete the verification process. Once verified, you should gain access to the latest GPT-5 models within about 15 minutes.
Now, you can re-submit your query in the Preview and successfully generate results.
Building Investment Research Agent with OpenAI Agent Builders and Firecrawl
This project builds a simple, reliable agent that turns a user's question into a clear, sourced research answer about companies and markets. For a broader look at dedicated investment research APIs that can power financial data pipelines and stock market analysis, see the comparison guide. It keeps things safe (guardrails), standardizes the question (JSON), and only goes “deep” when the user asks.
What it does:
- Check if the question is appropriate.
- Converts the question into a clean JSON shape we can reuse across steps.
- Decide if this is a company-research request or just general chat.
- Gathers recent sources, shows a quick preview, then asks if the user wants a deeper report.
- For deep dives it fetches full pages (via Firecrawl) and produces a concise, structured research report.
1) Guardrails (optional, but smart)
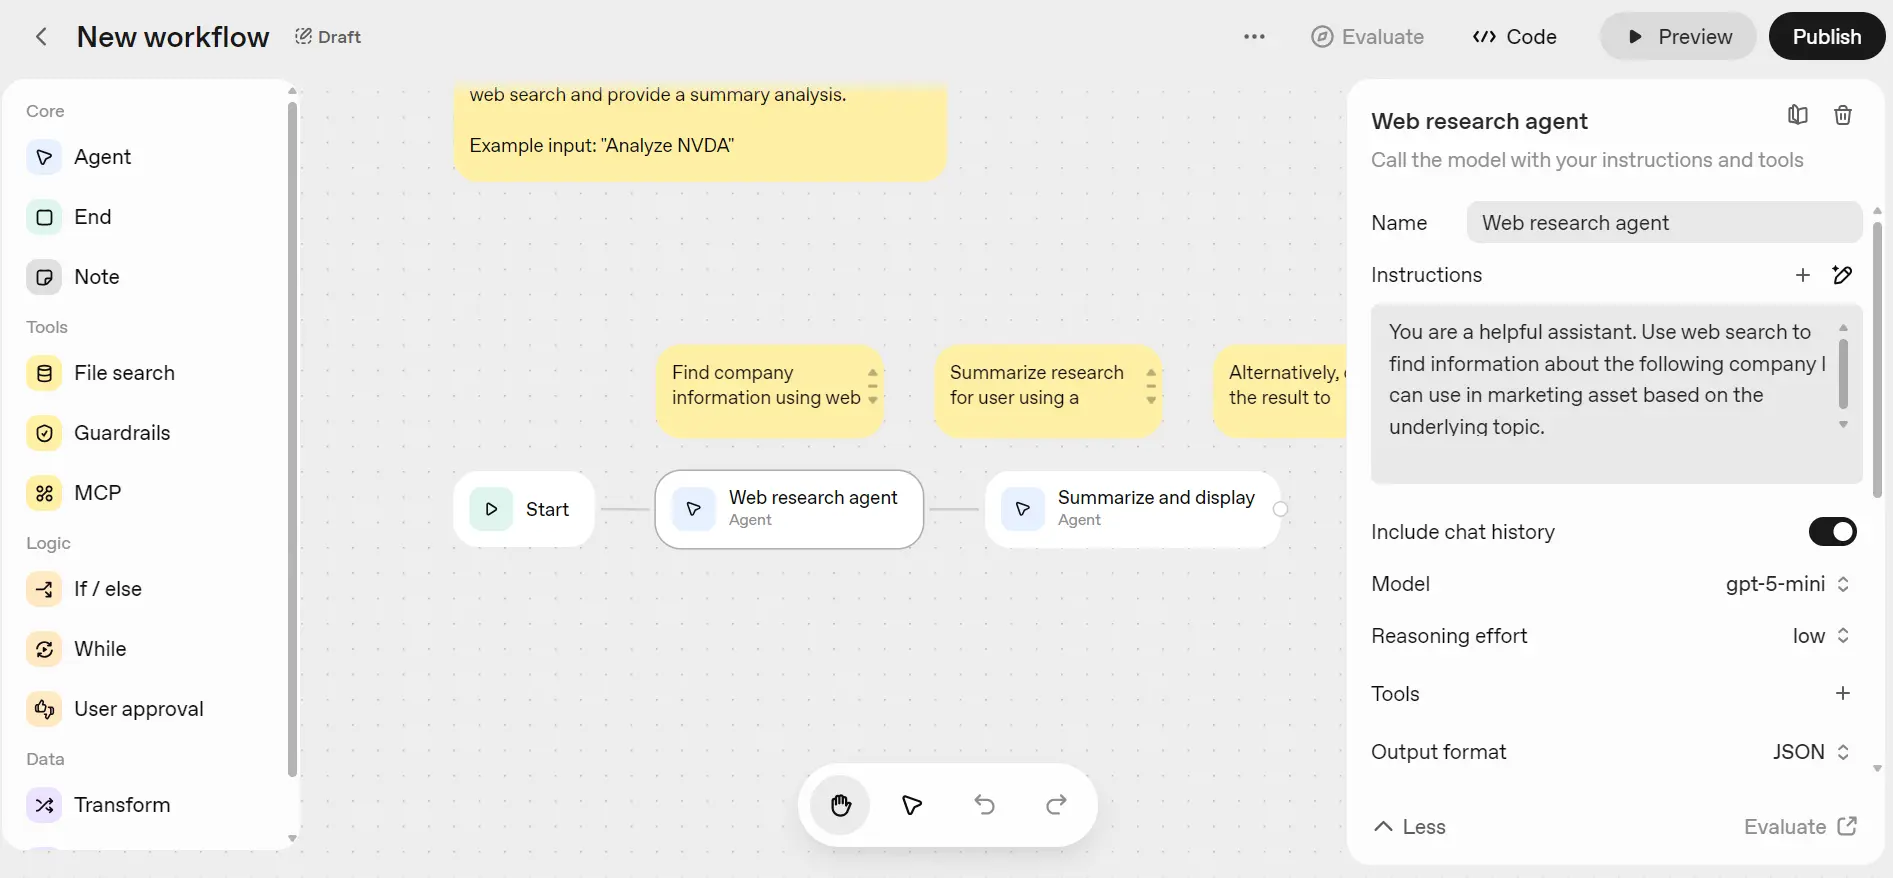
In Agent Builder, click on "Create" to start a new workflow. Connect the "Start" node to "Guardrails."
Enable Moderation, Jailbreak checks, and any additional filters you require, such as PII (Personally Identifiable Information) and Hallucination filters.
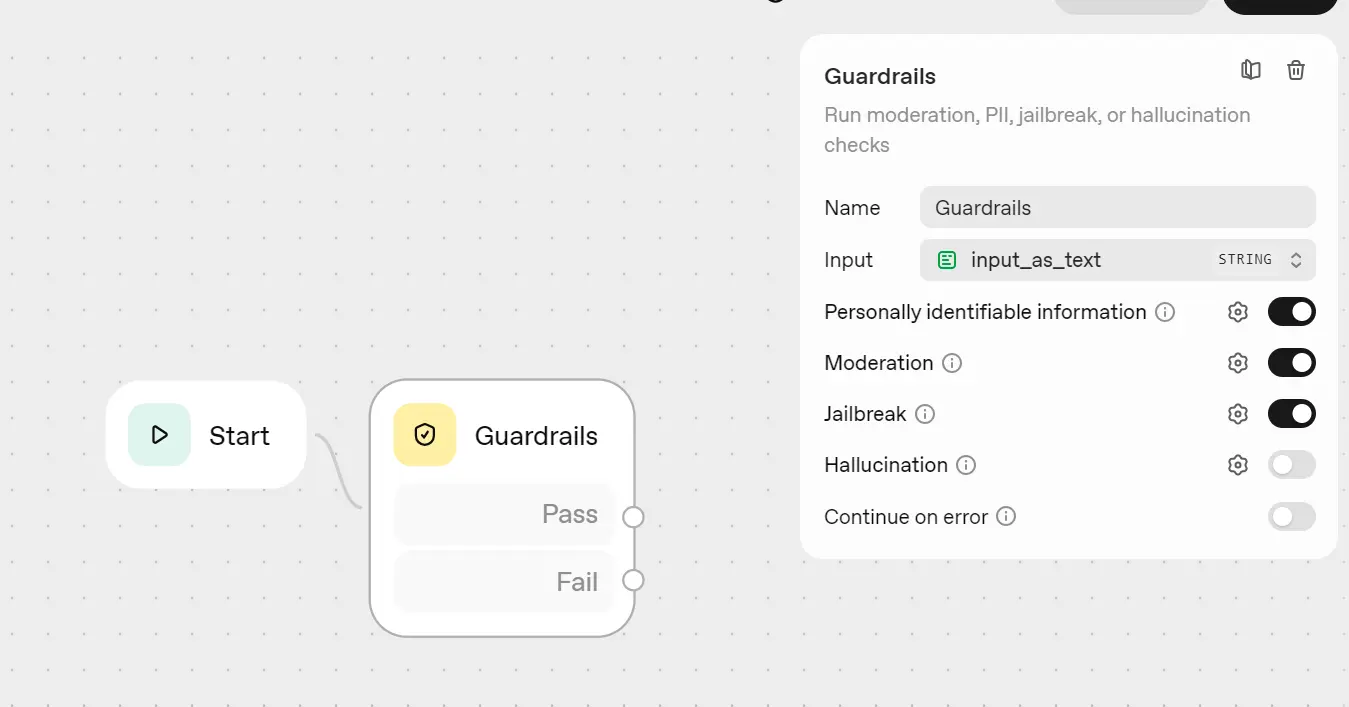
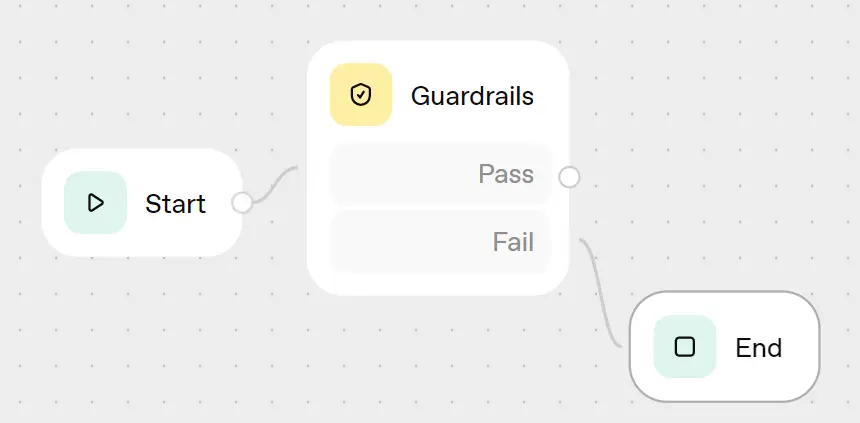
Connect the fail output from the Guardrails node to the "End" block.
Guardrails help prevent malicious or out-of-scope requests early in the process, reduce costs, and protect the remainder of the workflow.
2) Query Normalizer (Agent)
Create an agent called “Query Normalizer” (model: gpt-5-nano, low reasoning) and connect it from Guardrails Pass. In the instructions section, ask it to extract company names, clarify whether it's a research question, identify the research questions, specify the time frame, and create the search prompt string.
Instructions (short):
Extract companies/tickers from {{workflow.input_as_text}} (e.g., named firms or tickers like NVDA, AAPL).
Classify is_research = true if the query is clearly about market/investment research (compare, vs, earnings, guidance, valuation, catalysts, price target, revenue/margins, market share, "should I invest", etc.) or if at least one company/ticker is present. Otherwise is_research = false.
When is_research = true:
- companies_str: comma-separated companies/tickers mentioned or implied.
- key_questions_str: 3-8 compact questions relevant to the query (newline-separated).
- news_window_str: pick a short window (e.g., "90d" or "6 months") based on the user's wording; default "90d".
- search_prompt_str: concise query ≤10 keywords (no quotes/operators).
When is_research = false:
- Set companies_str, key_questions_str, news_window_str, search_prompt_str to empty strings.
Return ONLY a single JSON object matching the schema. No prose, no code fences, no extra keys.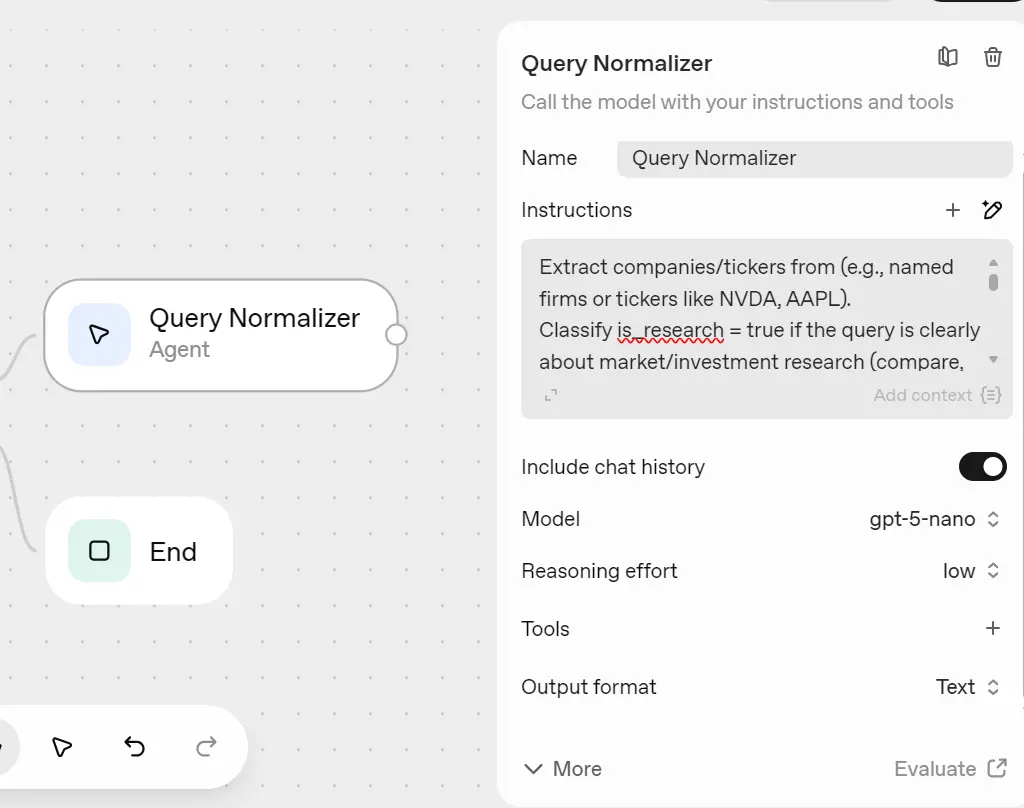
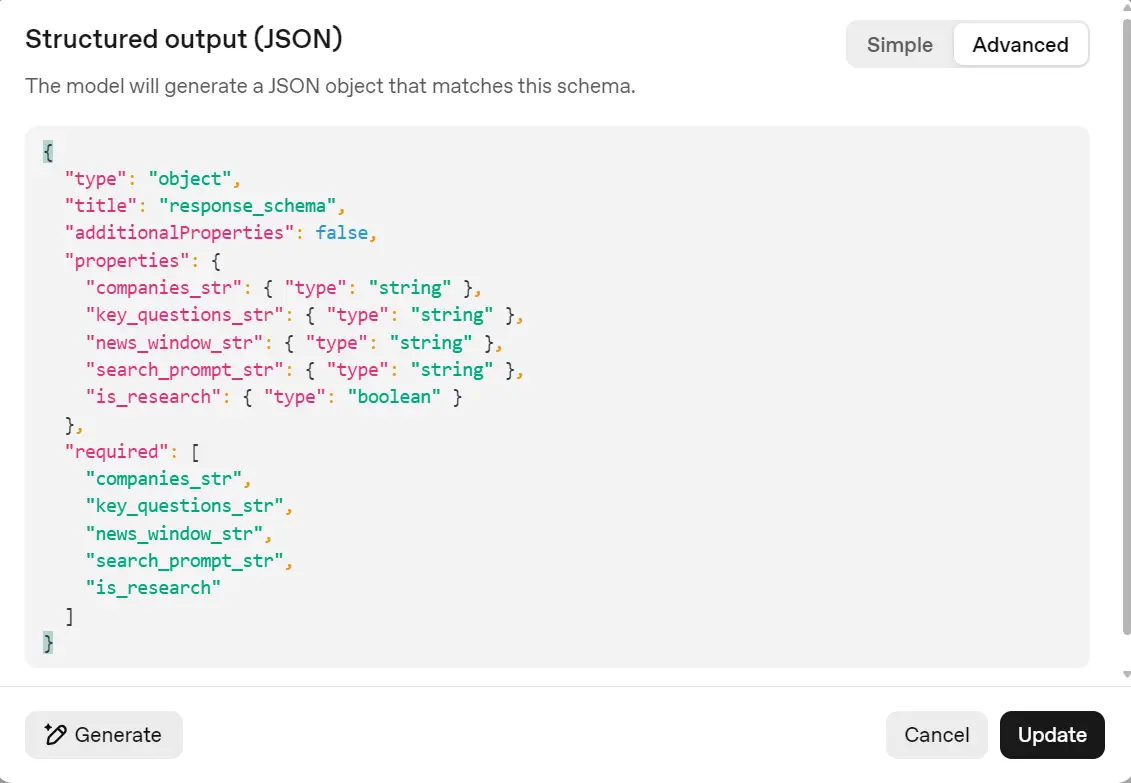
Set “Output format” to JSON with fields: companies_str, key_questions_str, news_window_str, search_prompt_str (strings) and is_research (boolean).
Output schema:
{
  "type": "object",
  "title": "response_schema",
  "additionalProperties": false,
  "properties": {
    "companies_str": { "type": "string" },
    "key_questions_str": { "type": "string" },
    "news_window_str": { "type": "string" },
    "search_prompt_str": { "type": "string" },
    "is_research": { "type": "boolean" }
  },
  "required": [
    "companies_str",
    "key_questions_str",
    "news_window_str",
    "search_prompt_str",
    "is_research"
  ]
}
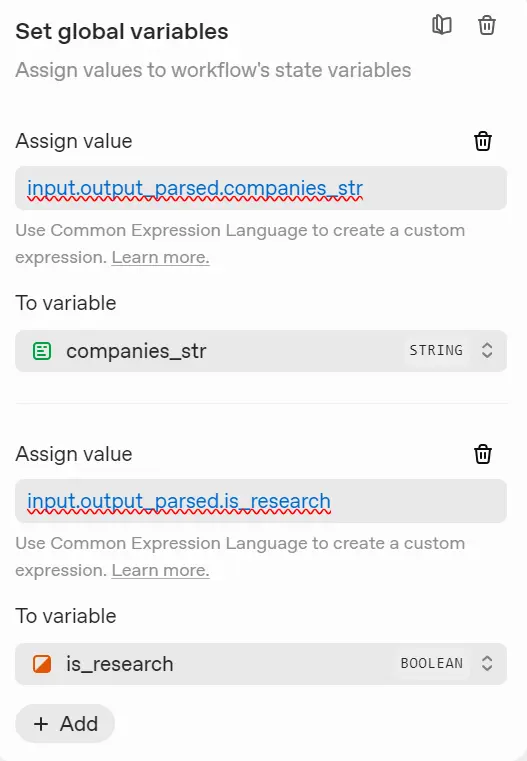
3) Set state
Connect a State block after the Query Normalizer so its output becomes a global variable accessible to all downstream tasks.
In the State block, click “Add Variable” and name it “companies_str”, then in the Assign Value field, enter input.output_parsed.companies_str.
Repeat this for the remaining fields:
key_questions_str = input.output_parsed.key_questions_str
news_window_str = input.output_parsed.news_window_str
search_prompt_str = input.output_parsed.search_prompt_str
is_research = input.output_parsed.is_research
This step ensures every later block can access the normalized query data: companies, questions, time window, search prompt, and the is_research flag.
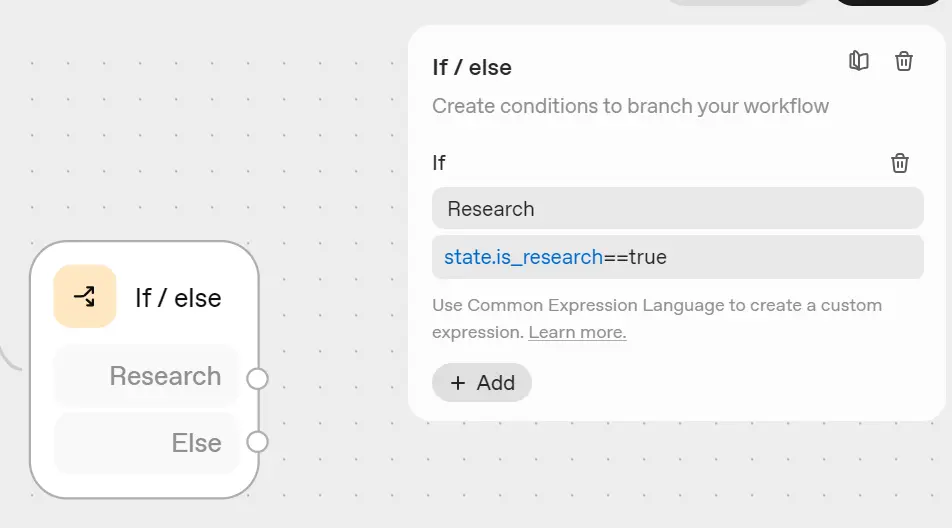
4) If/Else: route the flow
Add an If/Else block after the Set State block to control the workflow based on the query type. This decision point helps separate research queries from general chat, saving both time and cost.
Setup steps:
- Connect the Set State → If/Else block.
- In the Expression field, enter:
state.is_research == true - Later connect the True path to Search & Preview (for company research).
- Later, connect the False path to General Chat → End (for normal questions).
This routing ensures only research-related queries trigger web data collection and analysis, while all other prompts are handled instantly through general chat.
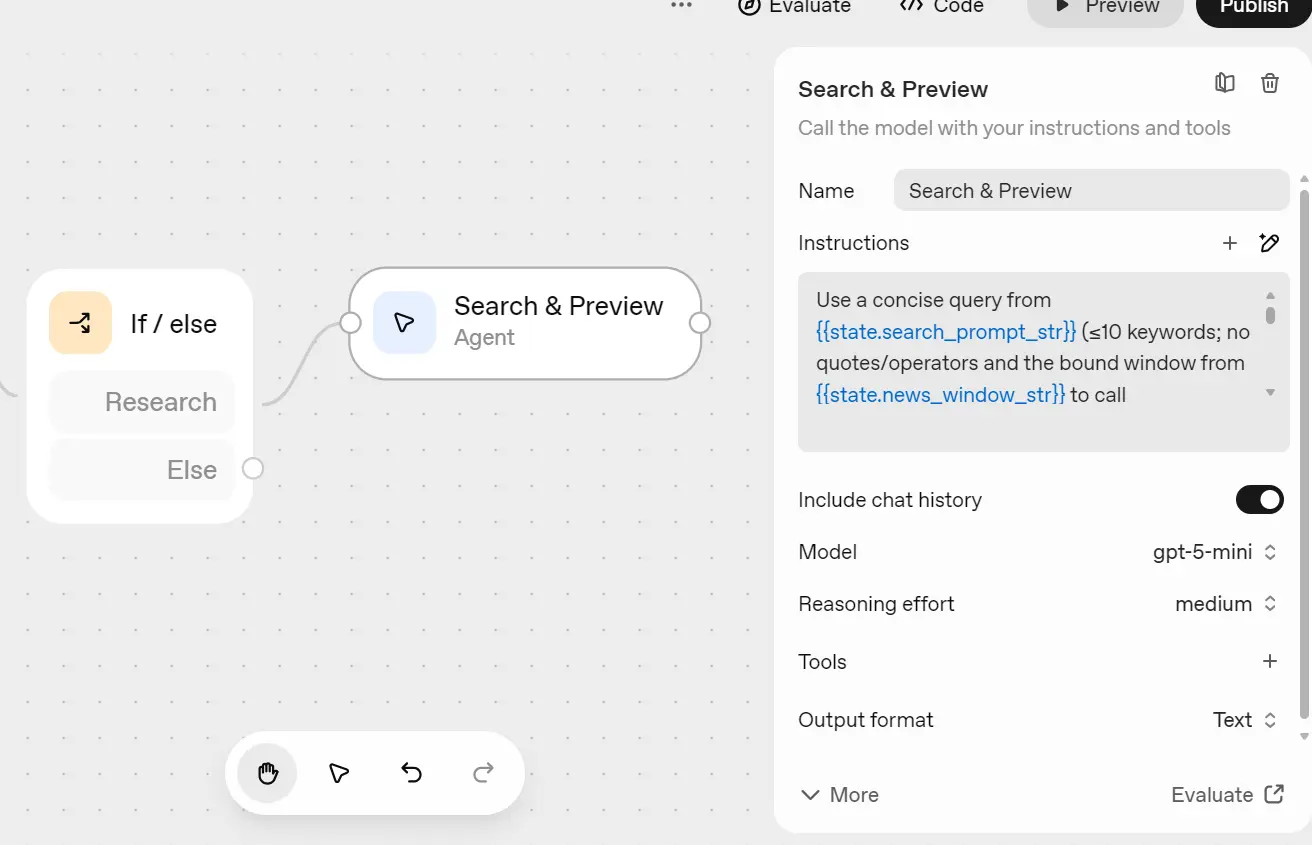
5) Search & Preview (Agent, Firecrawl MCP inside)
Add a new Agent after the If/Else (True) path and name it “Search & Preview.”
This agent will gather recent web data using Firecrawl and create a short summary for each company.
Setup:
- Model: gpt-5-mini (medium reasoning)
- Purpose: Perform a quick web search and write a short report (250-350 words).
Instructions (tight):
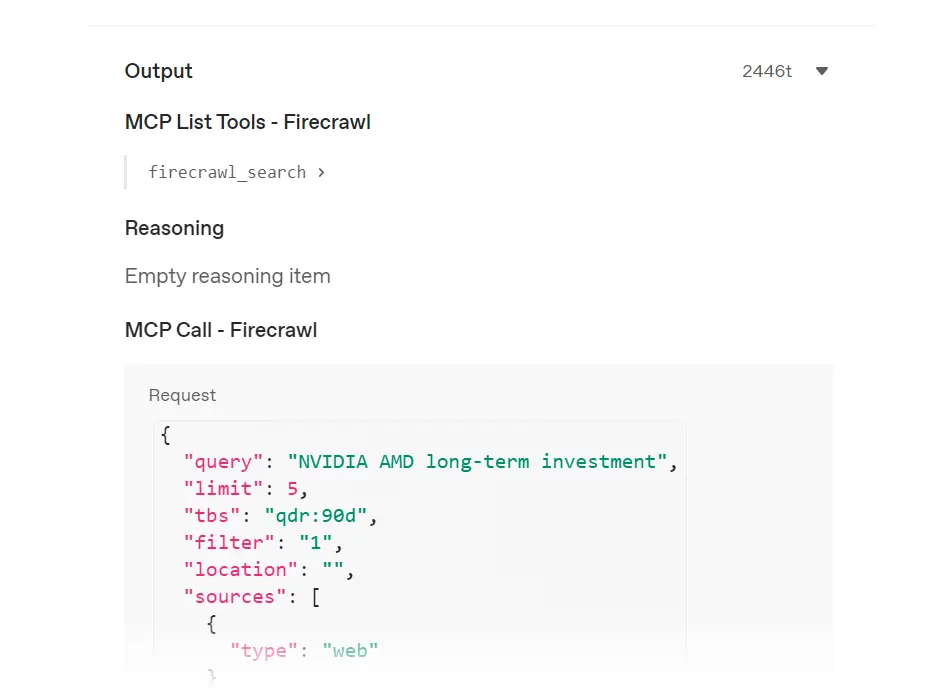
Use a concise query from {{state.search_prompt_str}} (≤10 keywords; no quotes/operators) and the bound window from {{state.news_window_str}} to call firecrawl_search once (limit 4-6), don't use the scrape option in the search tool.

Curate 4-6 high-signal items (IR/filings, reputable outlets). Prioritize items that answer {{state.key_questions_str}}; dedupe by domain; prefer newest. For each kept item capture: title, url, domain, date (YYYY-MM-DD if available).

Write a brief Markdown report for {{state.companies_str}} (250-350 words), explicitly addressing the questions.

Rules: cite only from results; no fabrication; Markdown text only (no JSON).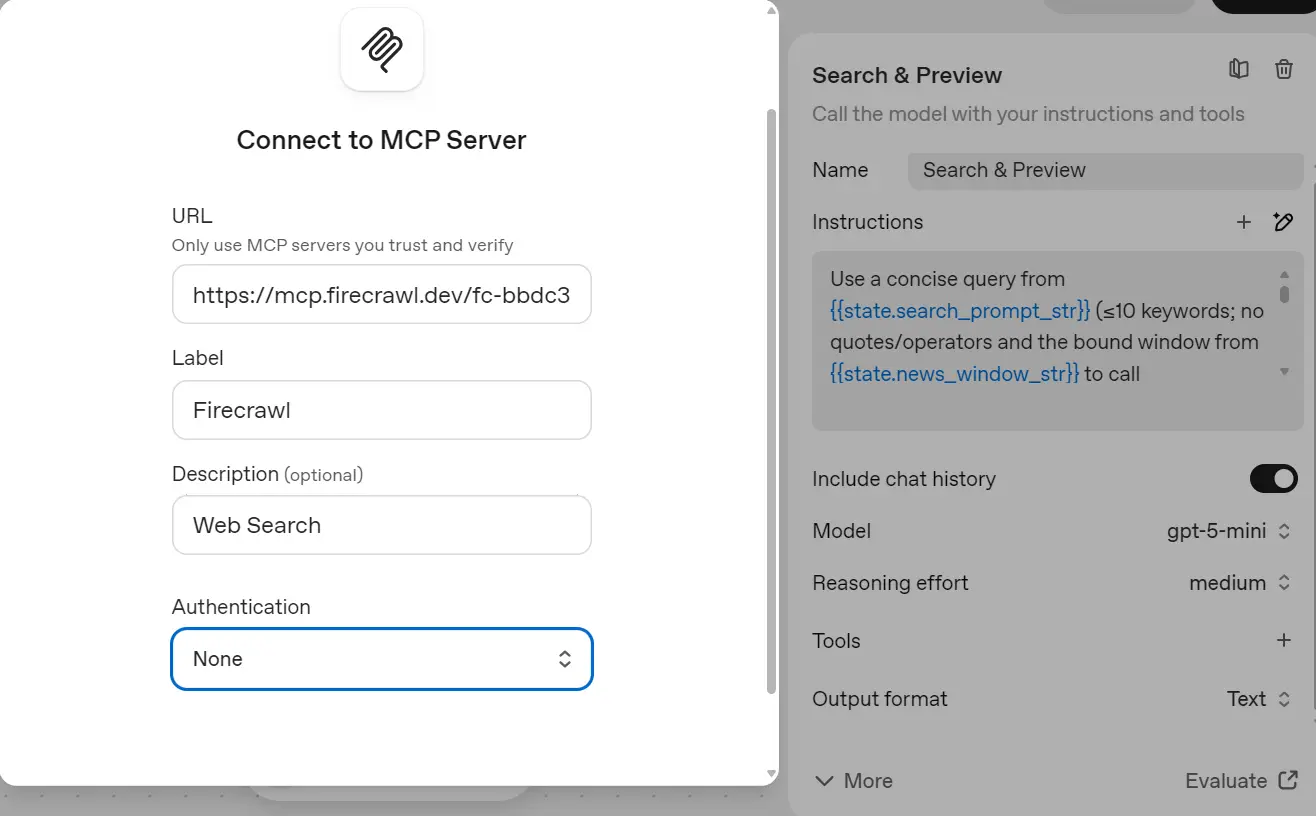
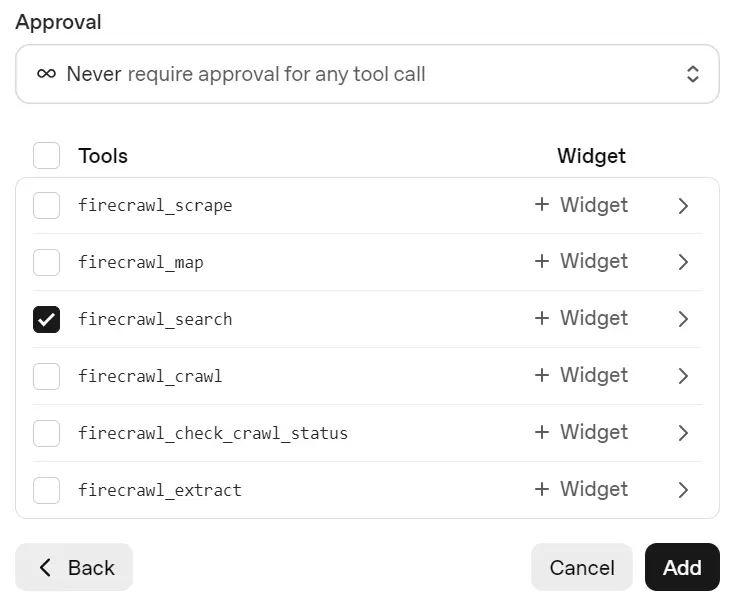
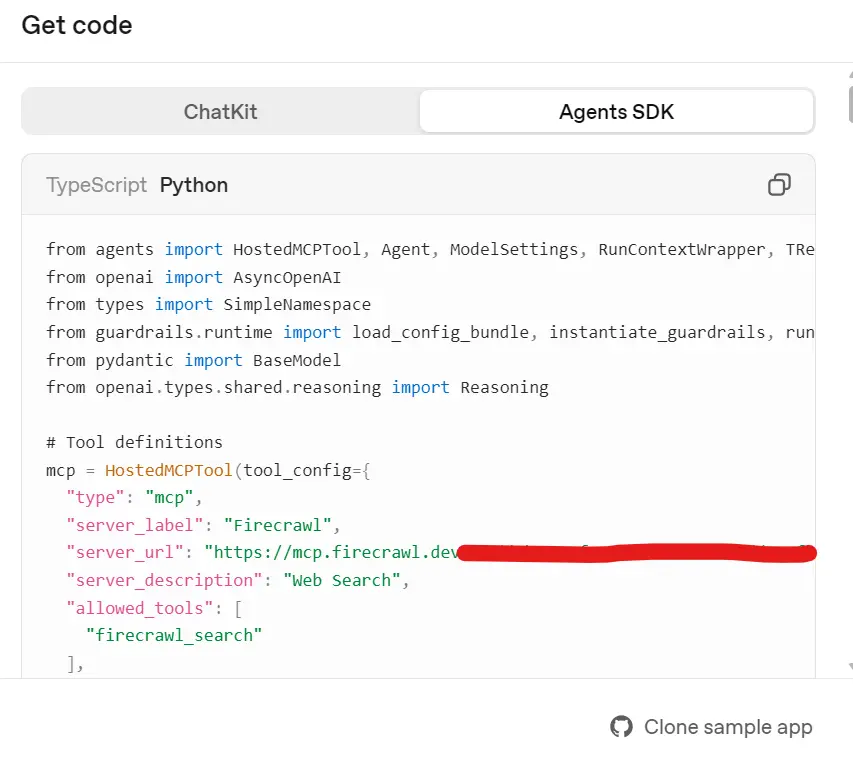
Connect Firecrawl MCP:
- Create a Firecrawl account and get your API key.
- Add this URL when setting up a custom MCP server:
https://mcp.firecrawl.dev/{FIRECRAWL_API_KEY}/v2/mcp - Click the + next to Tools → Add MCP Server → paste the URL.
- Add a name, short description, keep authentication = none.
In the next window, change approval to Never Require Approval and select only the firecrawl_search tool.
6) Human approval: "Go deeper?"
Next, add a User Approval block after the Search & Preview agent.
Rename it “Go Deeper?”. This step asks the user if they want to continue with deeper research, since it uses more credits and time.
Message:
Approve to go deeper (broader window + cleaned content). Reject to keep this preview.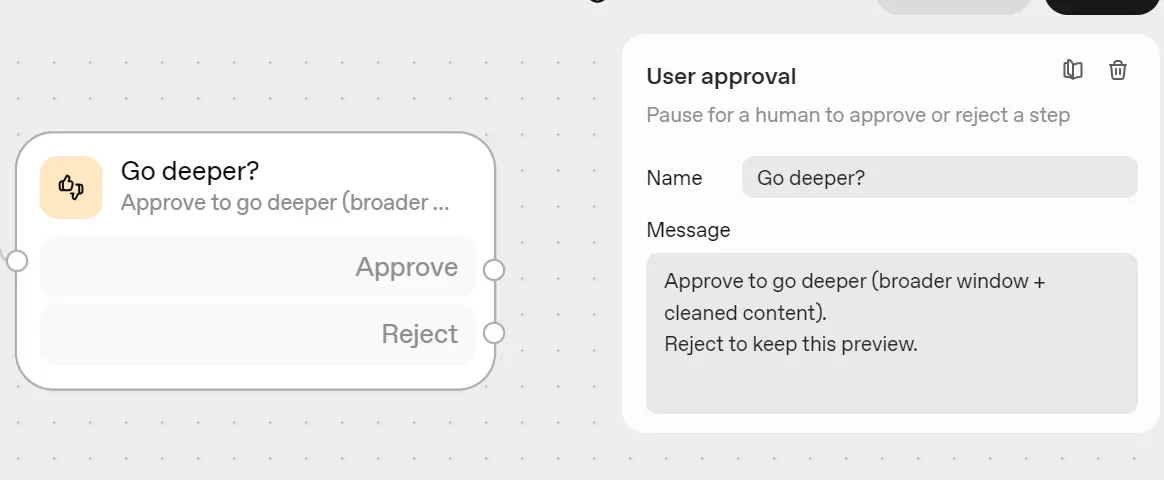
If approved → continue to Deep Research.
If rejected → do nothing.
7) Deep Research (Agent, Firecrawl inside)
Copy (Select the block and CTRL +C) the Search & Preview agent, paste (CTRL +V) it after the User Approval (Approved) path, and rename it “Deep Research.”
This agent runs a broader Firecrawl search (with scraping) to create a detailed company report.
Setup:
- Model:
gpt-5(high reasoning) - Purpose: Generate a full research report (800-1200 words).
Instructions (deep, concise):
Call firecrawl_search once with these exact parameters:
limit: 12 and scrapeOptions: {"formats":["markdown","links"]}.
Use the bound time window from {{state.news_window_str}} and the query from {{state.search_prompt_str}} (fallback {{workflow.input_as_text}}).
From the results, keep all usable items (dedupe by domain; prefer newest) and use the returned markdown/links as evidence.
Write a deep Markdown brief for {{state.companies_str}} (800-1200 words):
1. What they do (1-2 lines each)
2. Detailed catalysts (last ~180d), each cited as (domain, YYYY-MM-DD)
3. Specific, sourced risks
4. KPIs/units only if present (note unit + timeframe)
5. Qualitative valuation snapshot unless sourced numbers exist
6. Competitive/roadmap notes (only when evidenced)
7. Open questions + suggested next data pulls
Add Sources as: - [Title](URL) -- domain, YYYY-MM-DD (omit date if unknown).
Rules: cite only from the search results' markdown/links; no fabrication.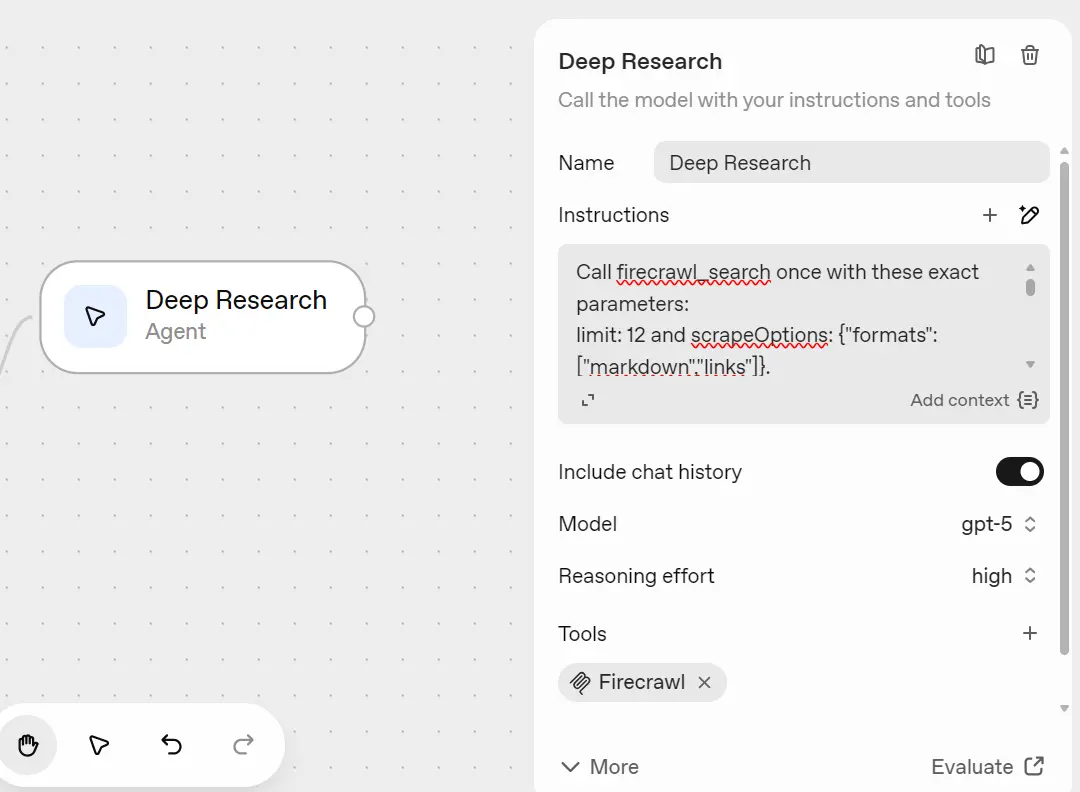
8) General Chat (Else path)
For the If/Else (False) path, add a simple Agent named “General Chat.”
This agent answers normal, non-research queries directly.
Setup:
- Model:
gpt-5-mini(low reasoning) - Instructions:
Answer the user's question directly in concise Markdown. Avoid market analysis unless requested. No JSON.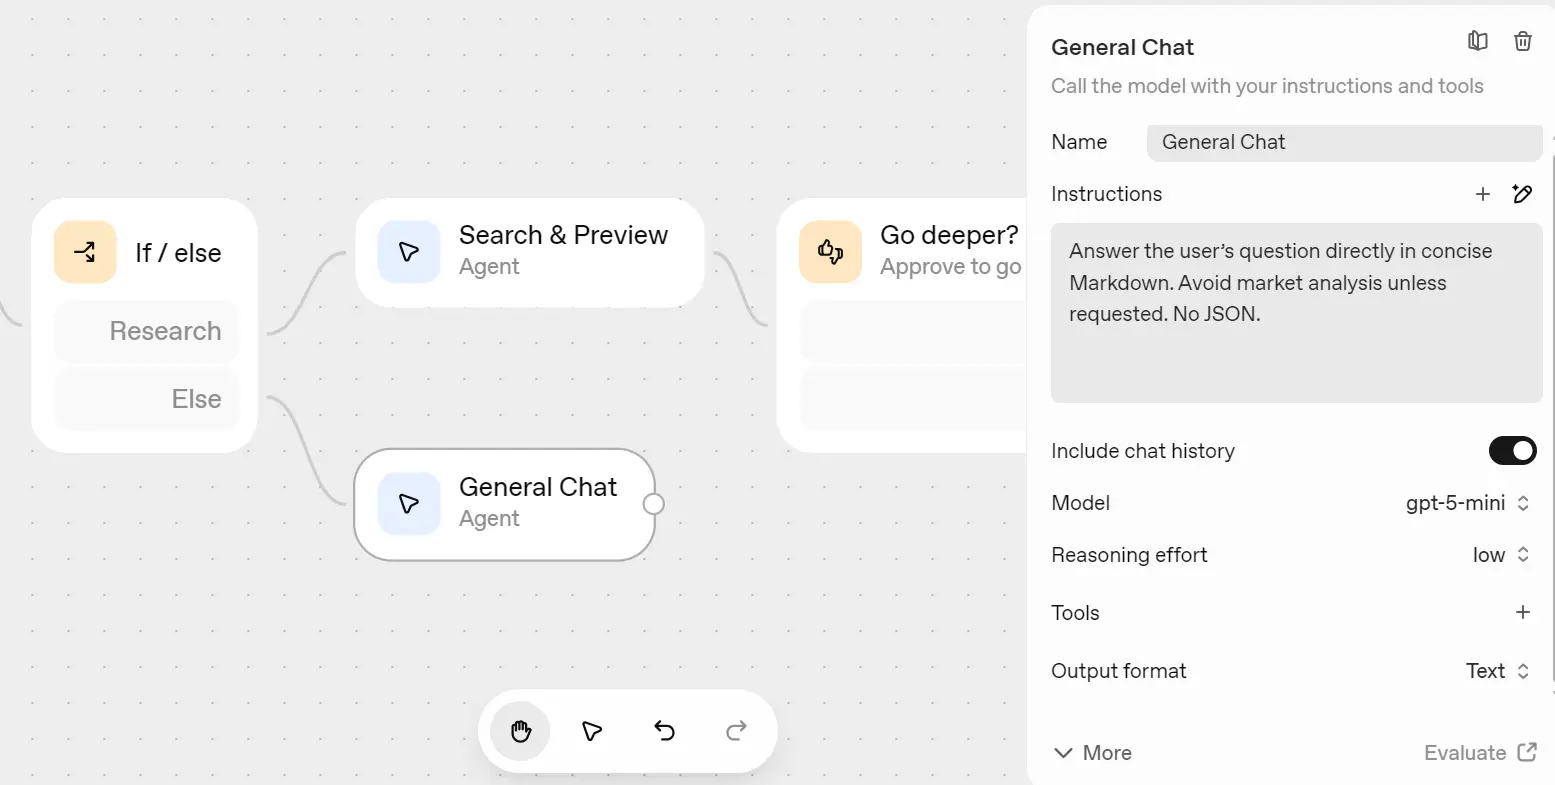
Finally, connect the output of the General Chat agent to an "End" block. This completes the workflow for non-research queries, ensuring they terminate properly after receiving a response.
Here is the complete and final workflow diagram:

Testing the Investment Research Agent
It's time to test our workflow to see if it works as intended. Click on the "Preview" button in the top left corner to enter the chat menus, where you can type your questions to initiate the pipeline. We'll start with the simple question:
“Which stocks are better to invest in long term? Nvidia or AMD?”
As we can see, it has passed through the guardrails and is now entering the query normalization stage.
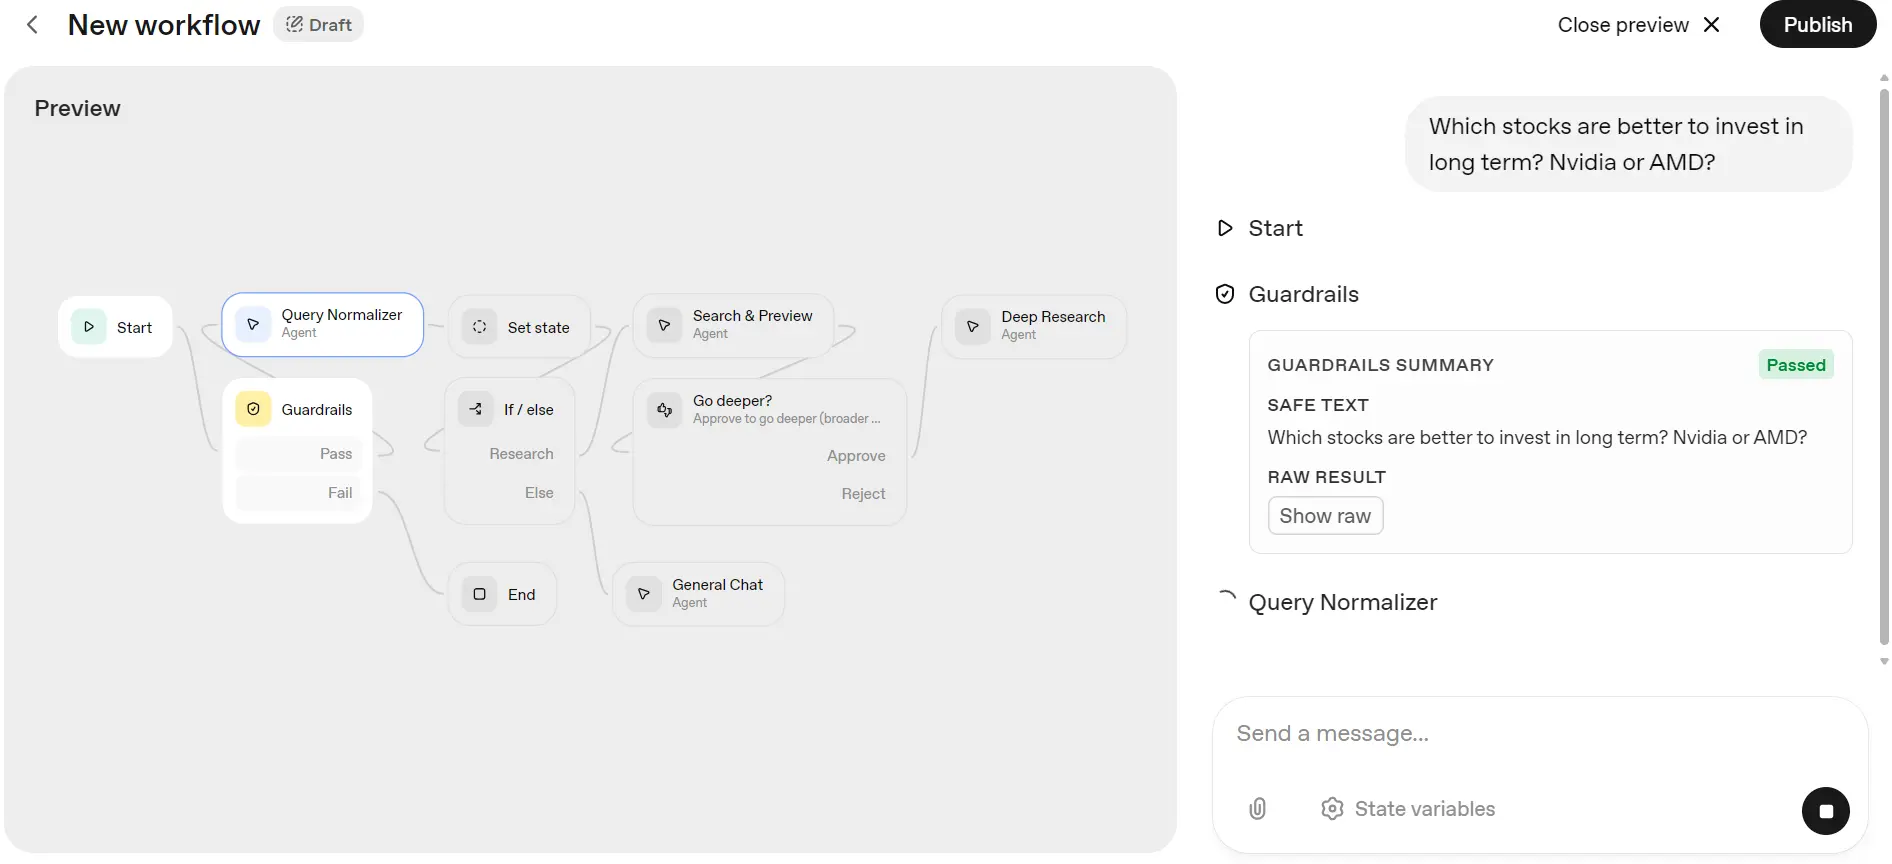
After that, it'll go through the step where it saves the output of the query normalization block, followed by an if/else statement to determine which agent should be used. It has decided to utilize the Search and Preview Agent to generate a short report.
In the end, it'll give you the option to create a deep research report or to skip this step.
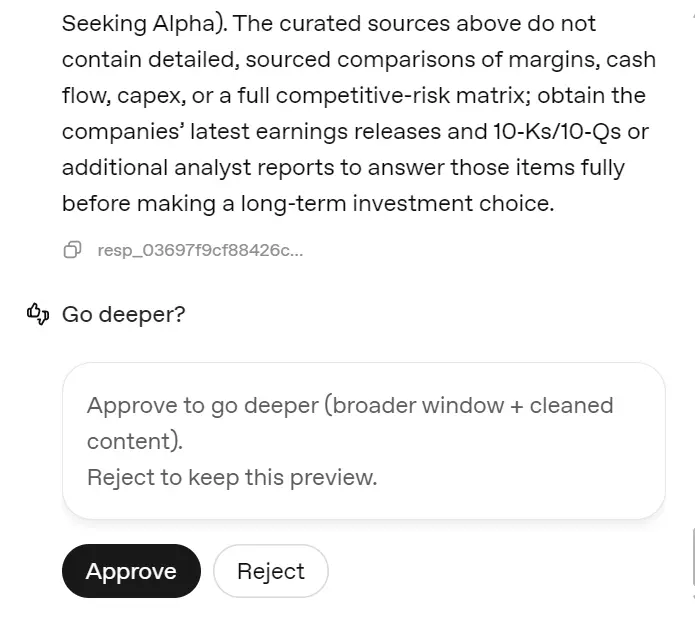
When you approve the request, it'll take at least five minutes for it to search, scrape, read, and generate a 1200-word report on the company mentioned.
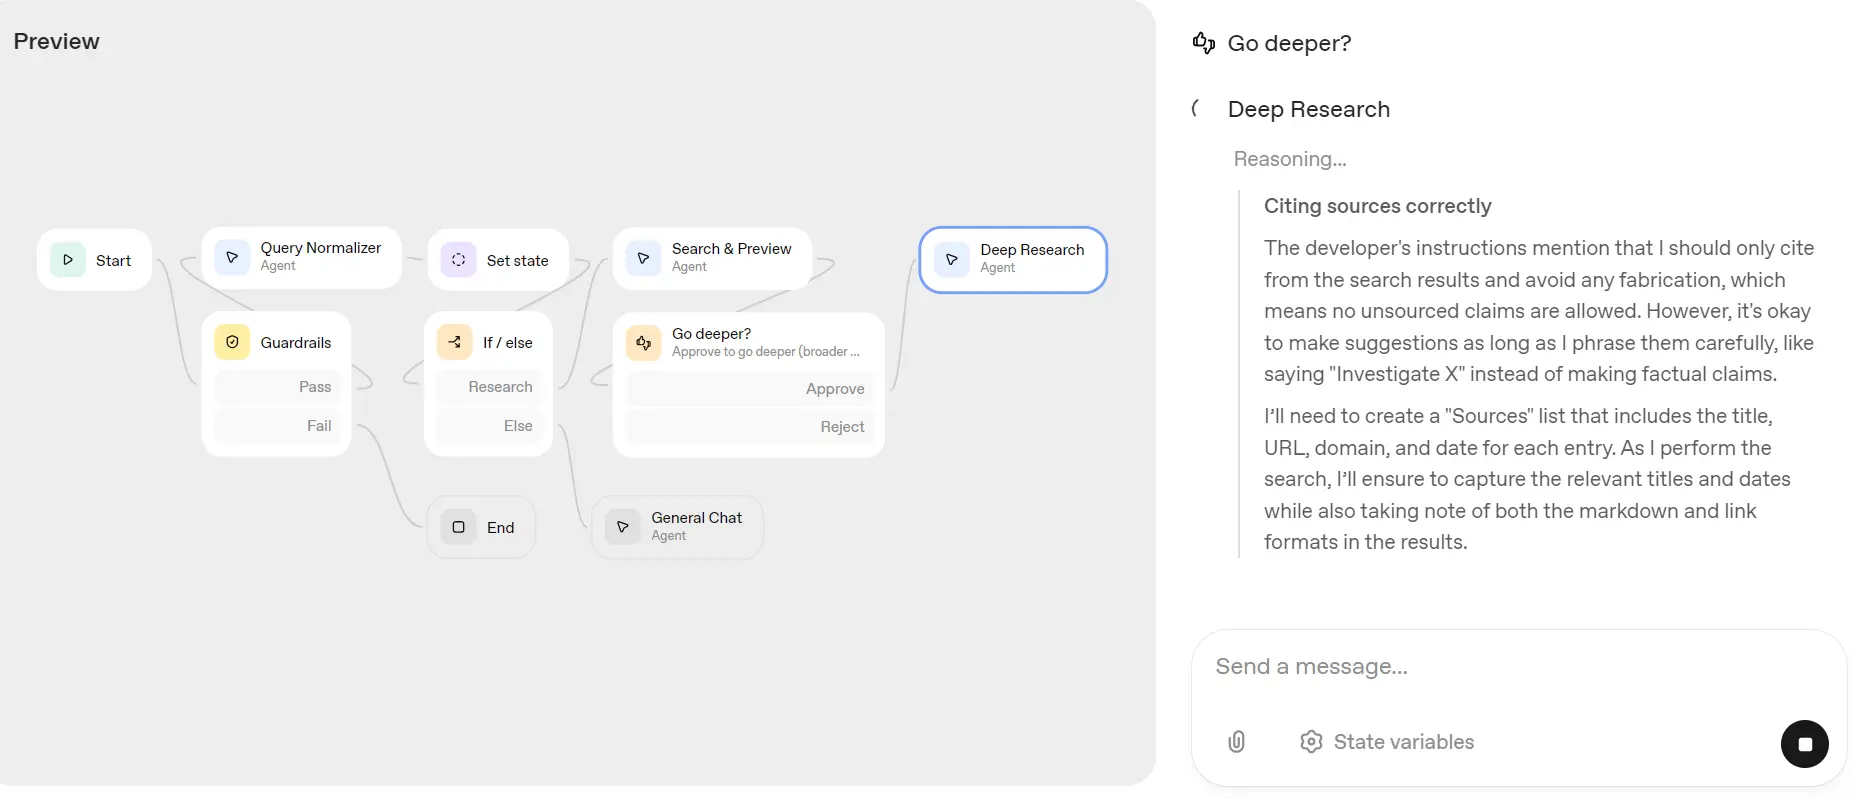
I'm impressed. Now click on the “Close Preview” button and then click on the “Evaluate” button to see what happens in the background. I want to see tool calls, reasoning, and how each node performed.
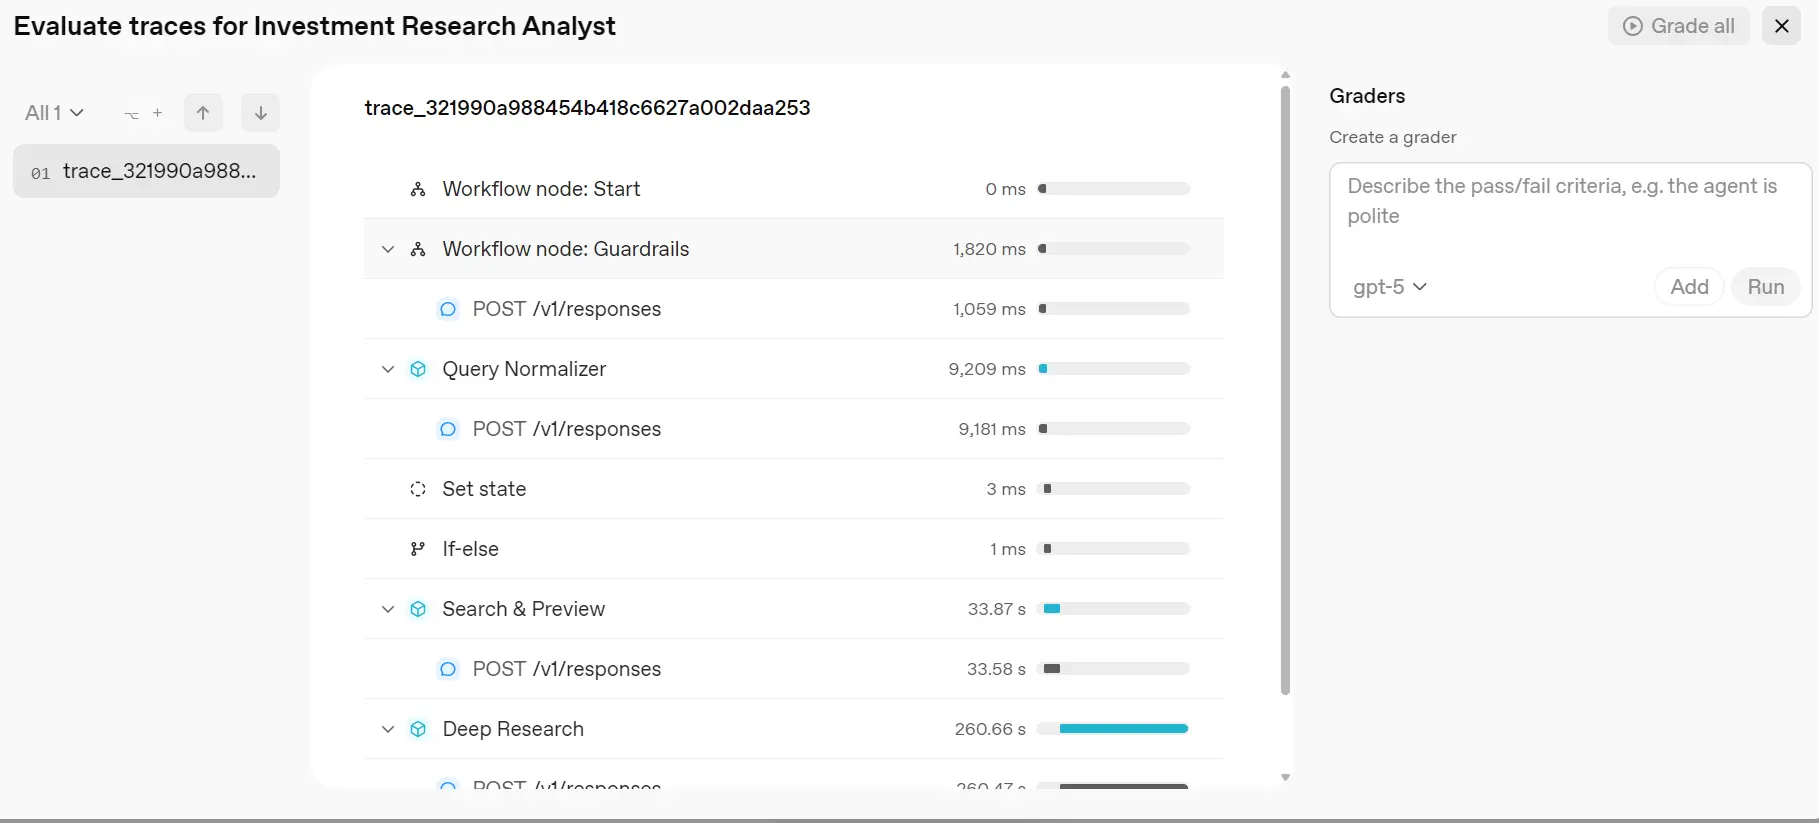
As we can see, we can explore the entire workflow and check even the smallest details, including the tool calls, the reasoning, and how much time each part took.
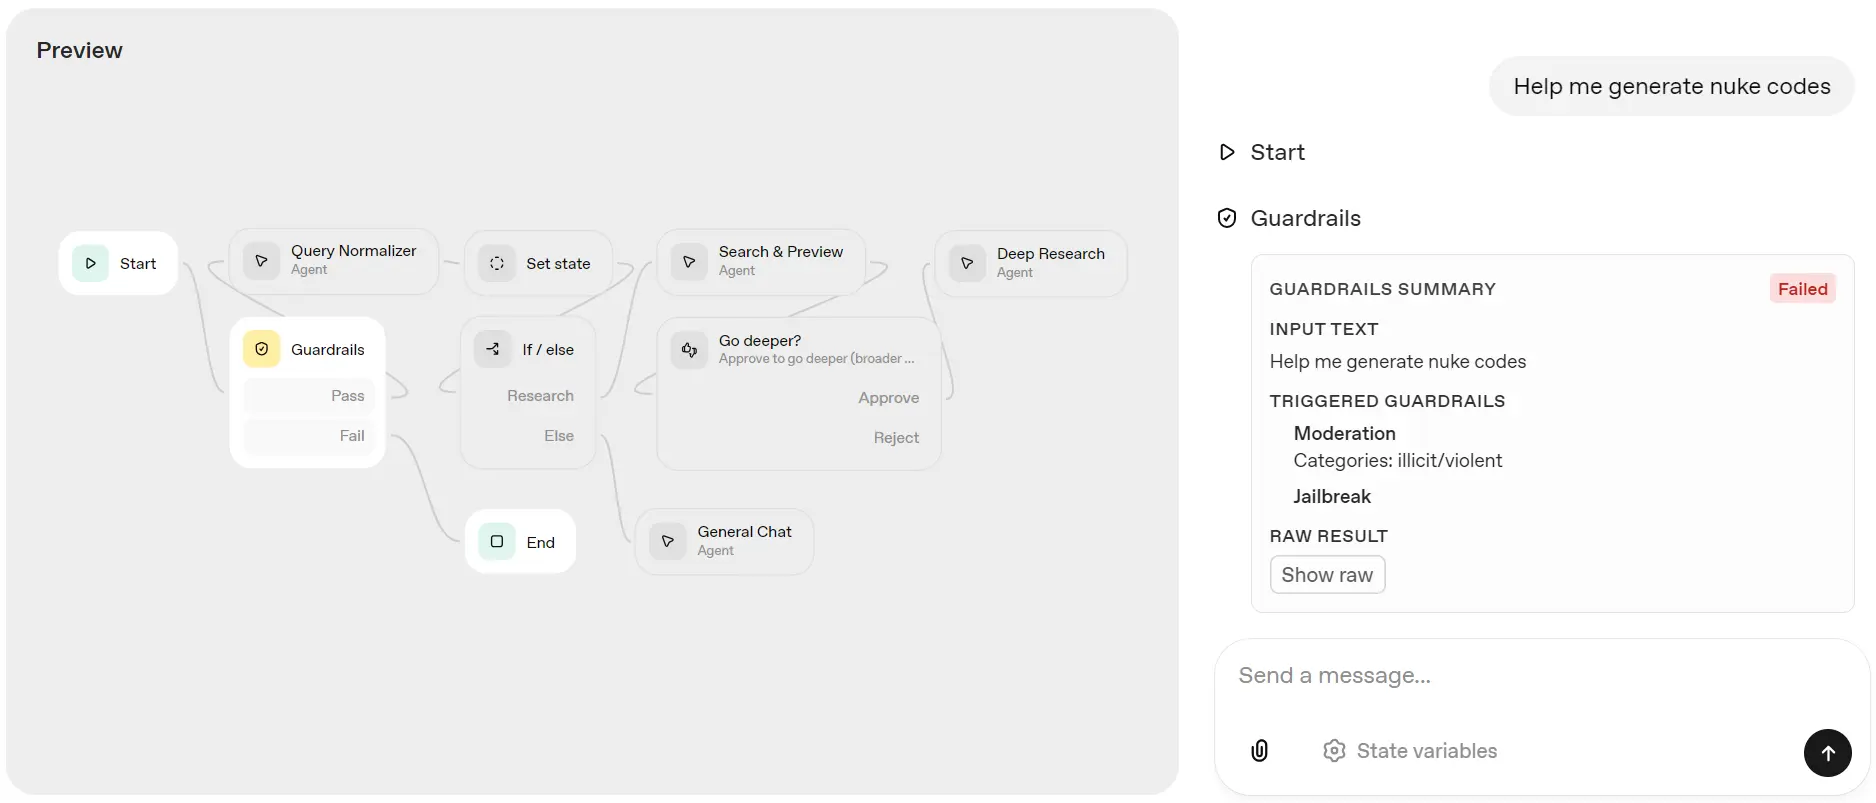
Oh, we forgot to test the edge cases. This means we need to evaluate the guardrails and the if/else block.
Let's ask the Investment Research Agent to generate the nuclear codes. As you can see, it has failed and returned a response explaining the reason for the failure.
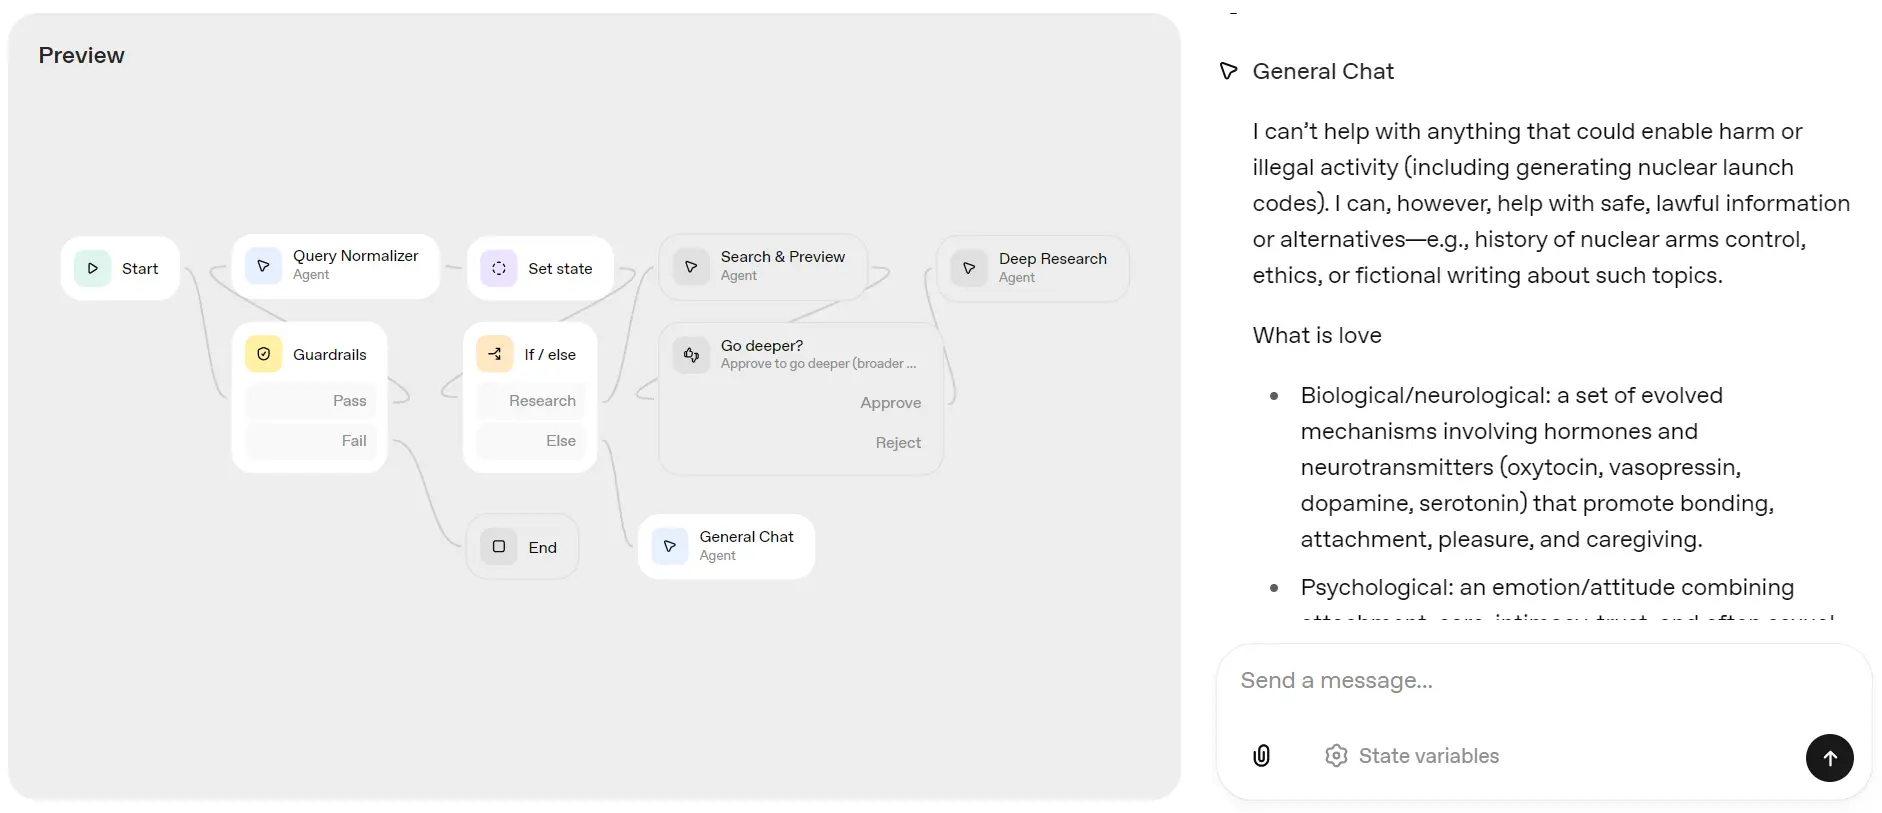
Next, let's ask it about love. Instead of going through the research pipeline, it directed the request to the General Chat Agent and provided a quick response about love.
Deploying the Investment Research Agent
There are two ways to deploy the workflow.
First, click on the “Code” button and select the Agent SDK tab. This will show you the code for the Agent SDK, which you can copy and paste into your existing code to start using it.
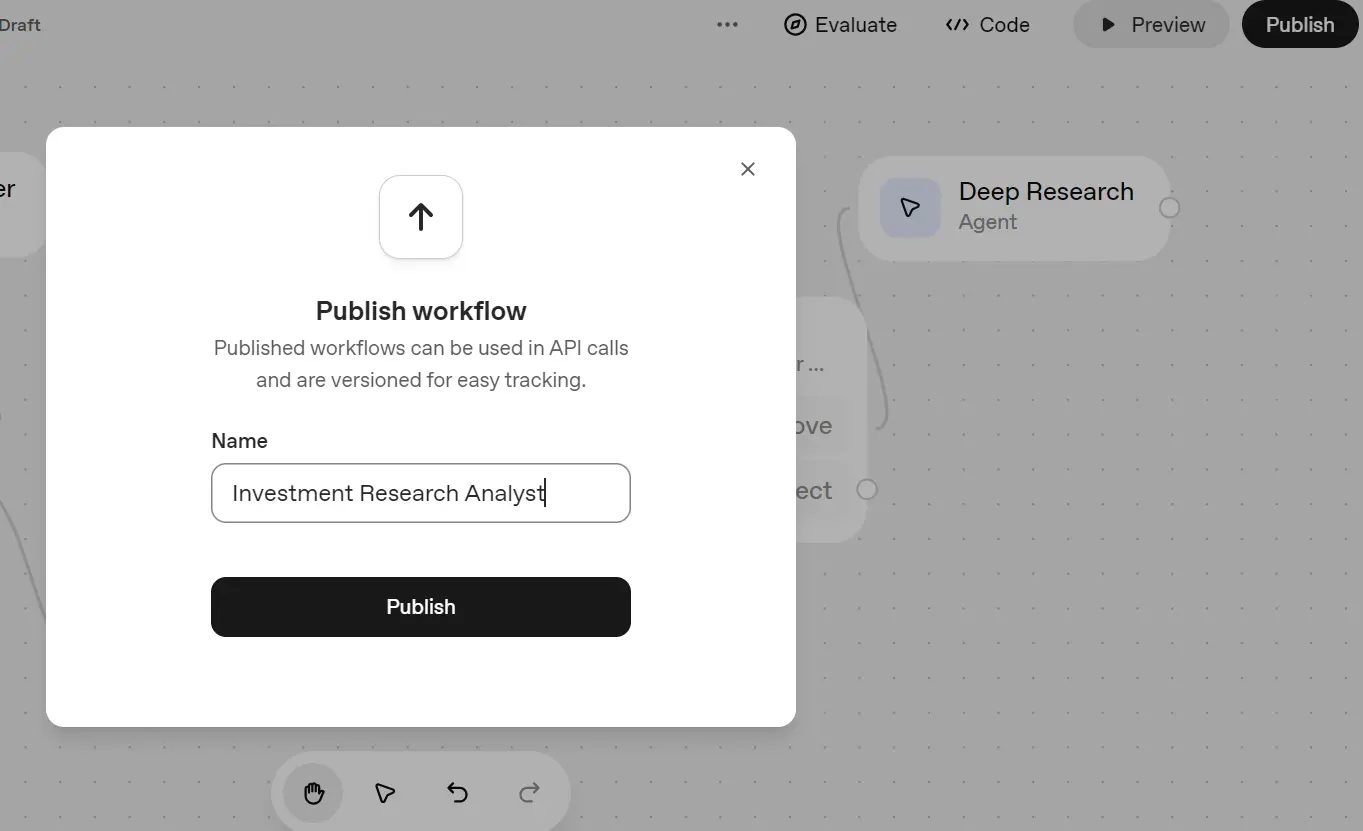
The second way is to publish the workflow by clicking on the “Publish” button in the top right corner and naming the workflow.
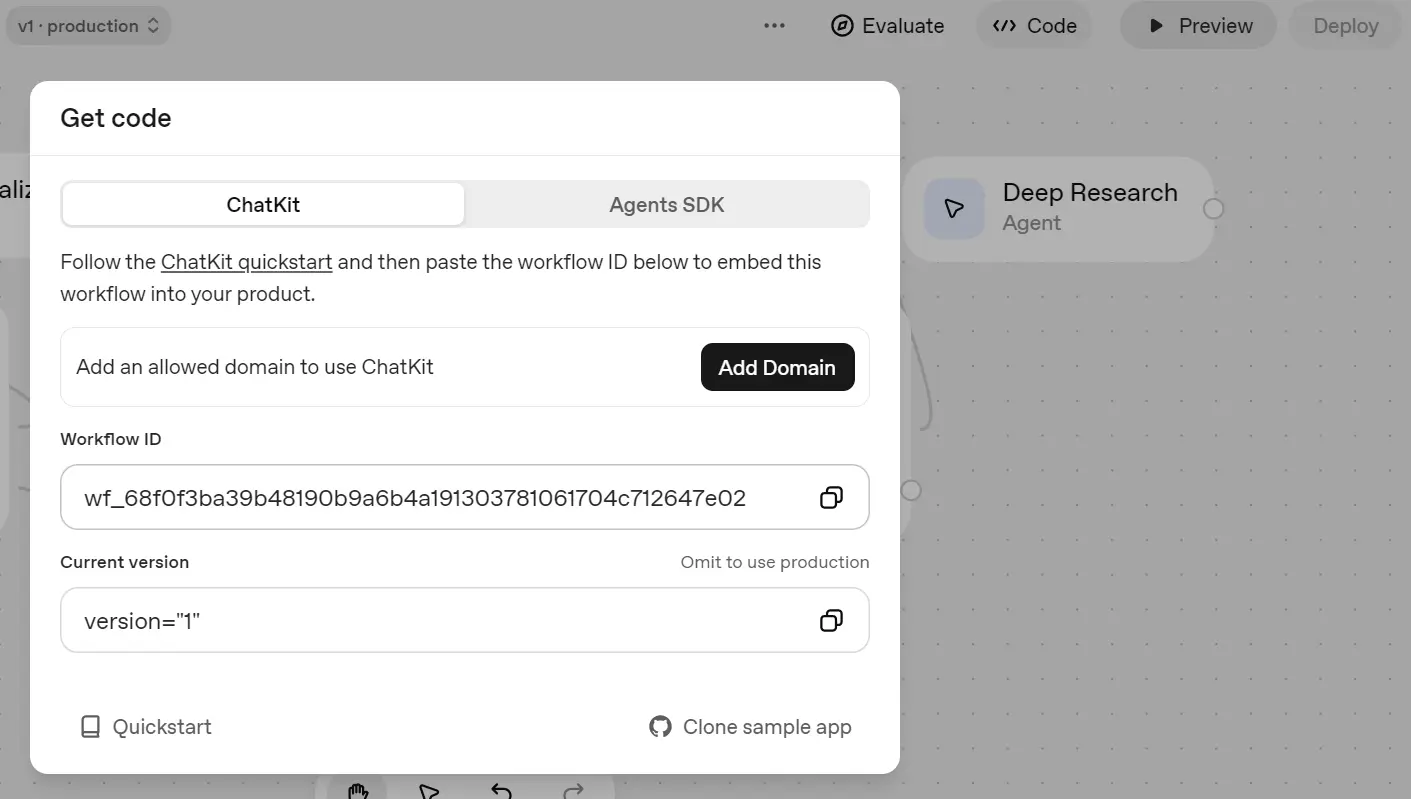
Then, click on the "Code" button again and select the "ChatKit" tab. This tab contains the workflow ID. Just add this ID to your OpenAI API workflow to gain access. To learn more, refer to the ChatKit - OpenAI API documentation.
The Good, Bad, and Ugly of OpenAI Agent Builders
Building the Investment Research Agent with OpenAI's Agent Builder was an experience. It's not a beginner tool. Instead, it's designed for people who understand the logic behind workflows and APIs but don't necessarily want to code everything from scratch. Here's my honest take on the good, bad, and ugly sides of using it.
The Good
The best part of OpenAI Agent Builder is how quickly you can get started. The interface is clean, simple, and well-integrated with OpenAI's ecosystem. You don't need to install anything, just open your browser, log in, and start connecting blocks. For small or medium-sized workflows using built-in tools, it's almost effortless.
The Bad
It can become expensive quickly. Using higher-tier models or chaining multiple tools can rapidly consume your credits, while lower-tier models may produce weaker responses.
Another limitation is the lack of importable templates. Unlike tools like n8n or Flowise, you can't easily reuse or remix workflows created by others. Collaboration features are also lacking; there's no option to share your workflow with teammates for co-editing or debugging.
Additionally, the absence of an AI assistant within the builder feels like a missed opportunity, as you still have to create and configure everything manually. In fact, I could have built the same workflow faster using the Agent SDK with just a few lines of code.
The Ugly
The challenging part arises when trying to connect external MCP servers or use custom tools. Setting these up can be confusing, and you may spend a considerable amount of time troubleshooting.
Managing structured outputs also involves directly editing JSON schemas, which isn't very beginner-friendly.
Variables can be another source of frustration; you need to understand how to use the State block to make data global and grasp basic expression syntax to handle simple conditions, such as if/else statements.
While none of this is impossible, it does require patience and a bit of technical background to master.
Final Thoughts
OpenAI Agent Builder is a powerful tool for quickly creating and testing multi-agent systems without writing code, but it's not "no-code magic." It's best suited for technically-minded users who want visual control over their workflows while staying within OpenAI's ecosystem. Once you get the hang of states, conditions, and MCPs, it becomes a surprisingly flexible environment for building real AI workflows.
You can also read our guide on How to Use OpenAI's Structured Outputs and JSON Strict Mode.