
LLMs have training cutoffs. Frameworks don't. When you need current syntax for a library's latest version, an outdated LLM won't help. The solution? Build an agent that accesses live documentation instead, giving you accurate, up-to-date code examples every time.
We're using LangGraph for agent orchestration and Firecrawl for web scraping. The result is a Streamlit app that turns any documentation site into an interactive assistant. This approach powers many AI agent projects that need intelligent web content interaction.
You'll build this from scratch, learning LangGraph's ReAct pattern for smart retrieval decisions, real-time token streaming for responsive UX, and Firecrawl integration for scraping clean markdown. The final application understands context and always cites its sources.
Understanding the Architecture: Agentic RAG with LangGraph
Before we start building, you need to understand what makes this system work. We're creating an agent that accesses live documentation, and the architecture underneath determines its intelligence.
Why agentic RAG matters for this project
Documentation assistants need RAG: retrieving relevant chunks from a vector database and feeding them to an LLM. Basic RAG stops after one retrieve-generate cycle, failing on complex queries that need multiple pieces of information.
Agentic RAG solves this. The agent searches, evaluates results, and searches again with refined queries if needed. It processes chunks across multiple tool calls until it has enough information, rather than stopping after a single retrieval.
Take the question "How do I configure batch scraping with custom headers?" A basic RAG system retrieves chunks about batch scraping and generates an answer from those chunks alone. An agent retrieves chunks about batch scraping, recognizes it needs header-specific information, searches again for "Firecrawl custom headers configuration," then synthesizes both searches into a complete answer. This iterative capability is why we're using agents instead of a basic RAG pipeline.
The ReAct pattern
The agent follows ReAct (Reasoning + Acting): when you ask a question, it reasons about what it needs to do, takes an action like calling a search tool, observes the results, then reasons again about whether it has enough information. This loop continues until the agent can generate a complete answer.
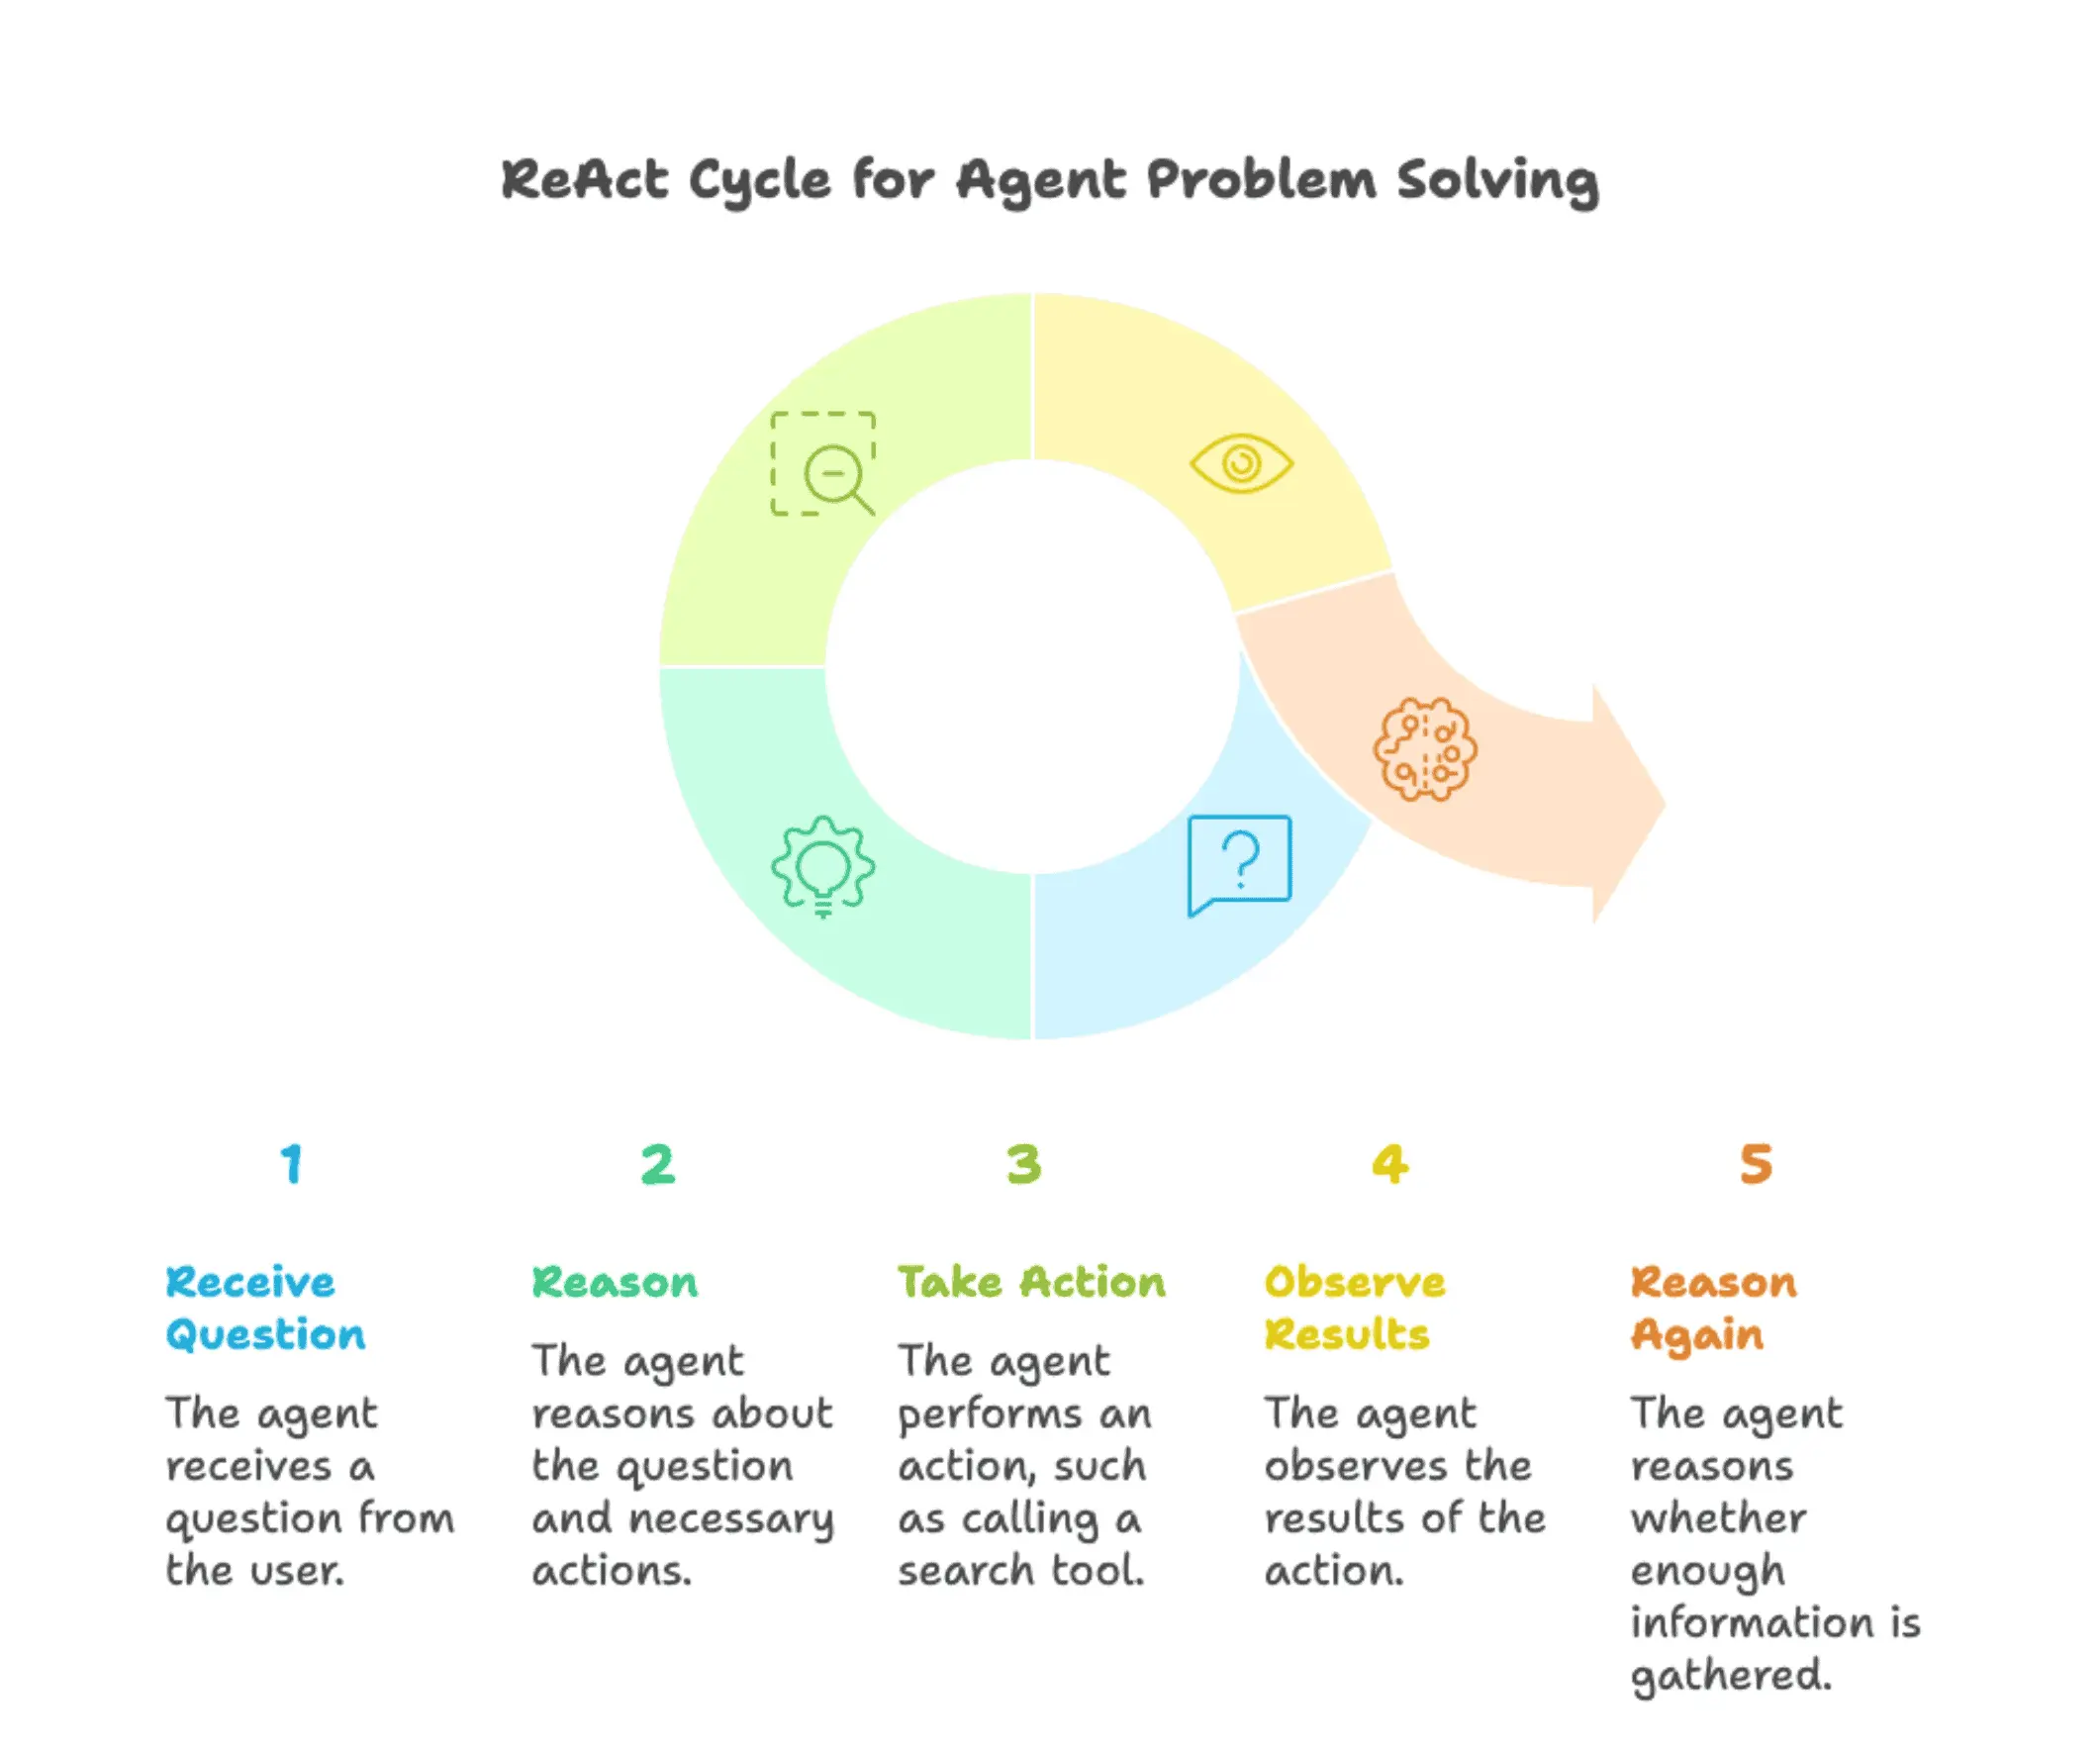
LangGraph implements this through create_react_agent(). You define tools (like our documentation search) and write a system prompt explaining when to use them. LangGraph handles the reasoning loop automatically. The agent decides when to call tools, when to call them again, and when to stop and respond. The LangGraph startup validator tutorial shows how agents make complex decisions across multiple tool calls.
Architecture overview
Our system has five main components. Firecrawl handles web scraping and converts documentation pages into clean markdown. The vector store (Chroma) holds embedded document chunks and handles similarity search. The LangGraph agent manages everything, deciding when to search and how to respond. OpenAI provides both the embeddings for semantic search and the LLM for generating answers. Streamlit wraps it all in a web interface.
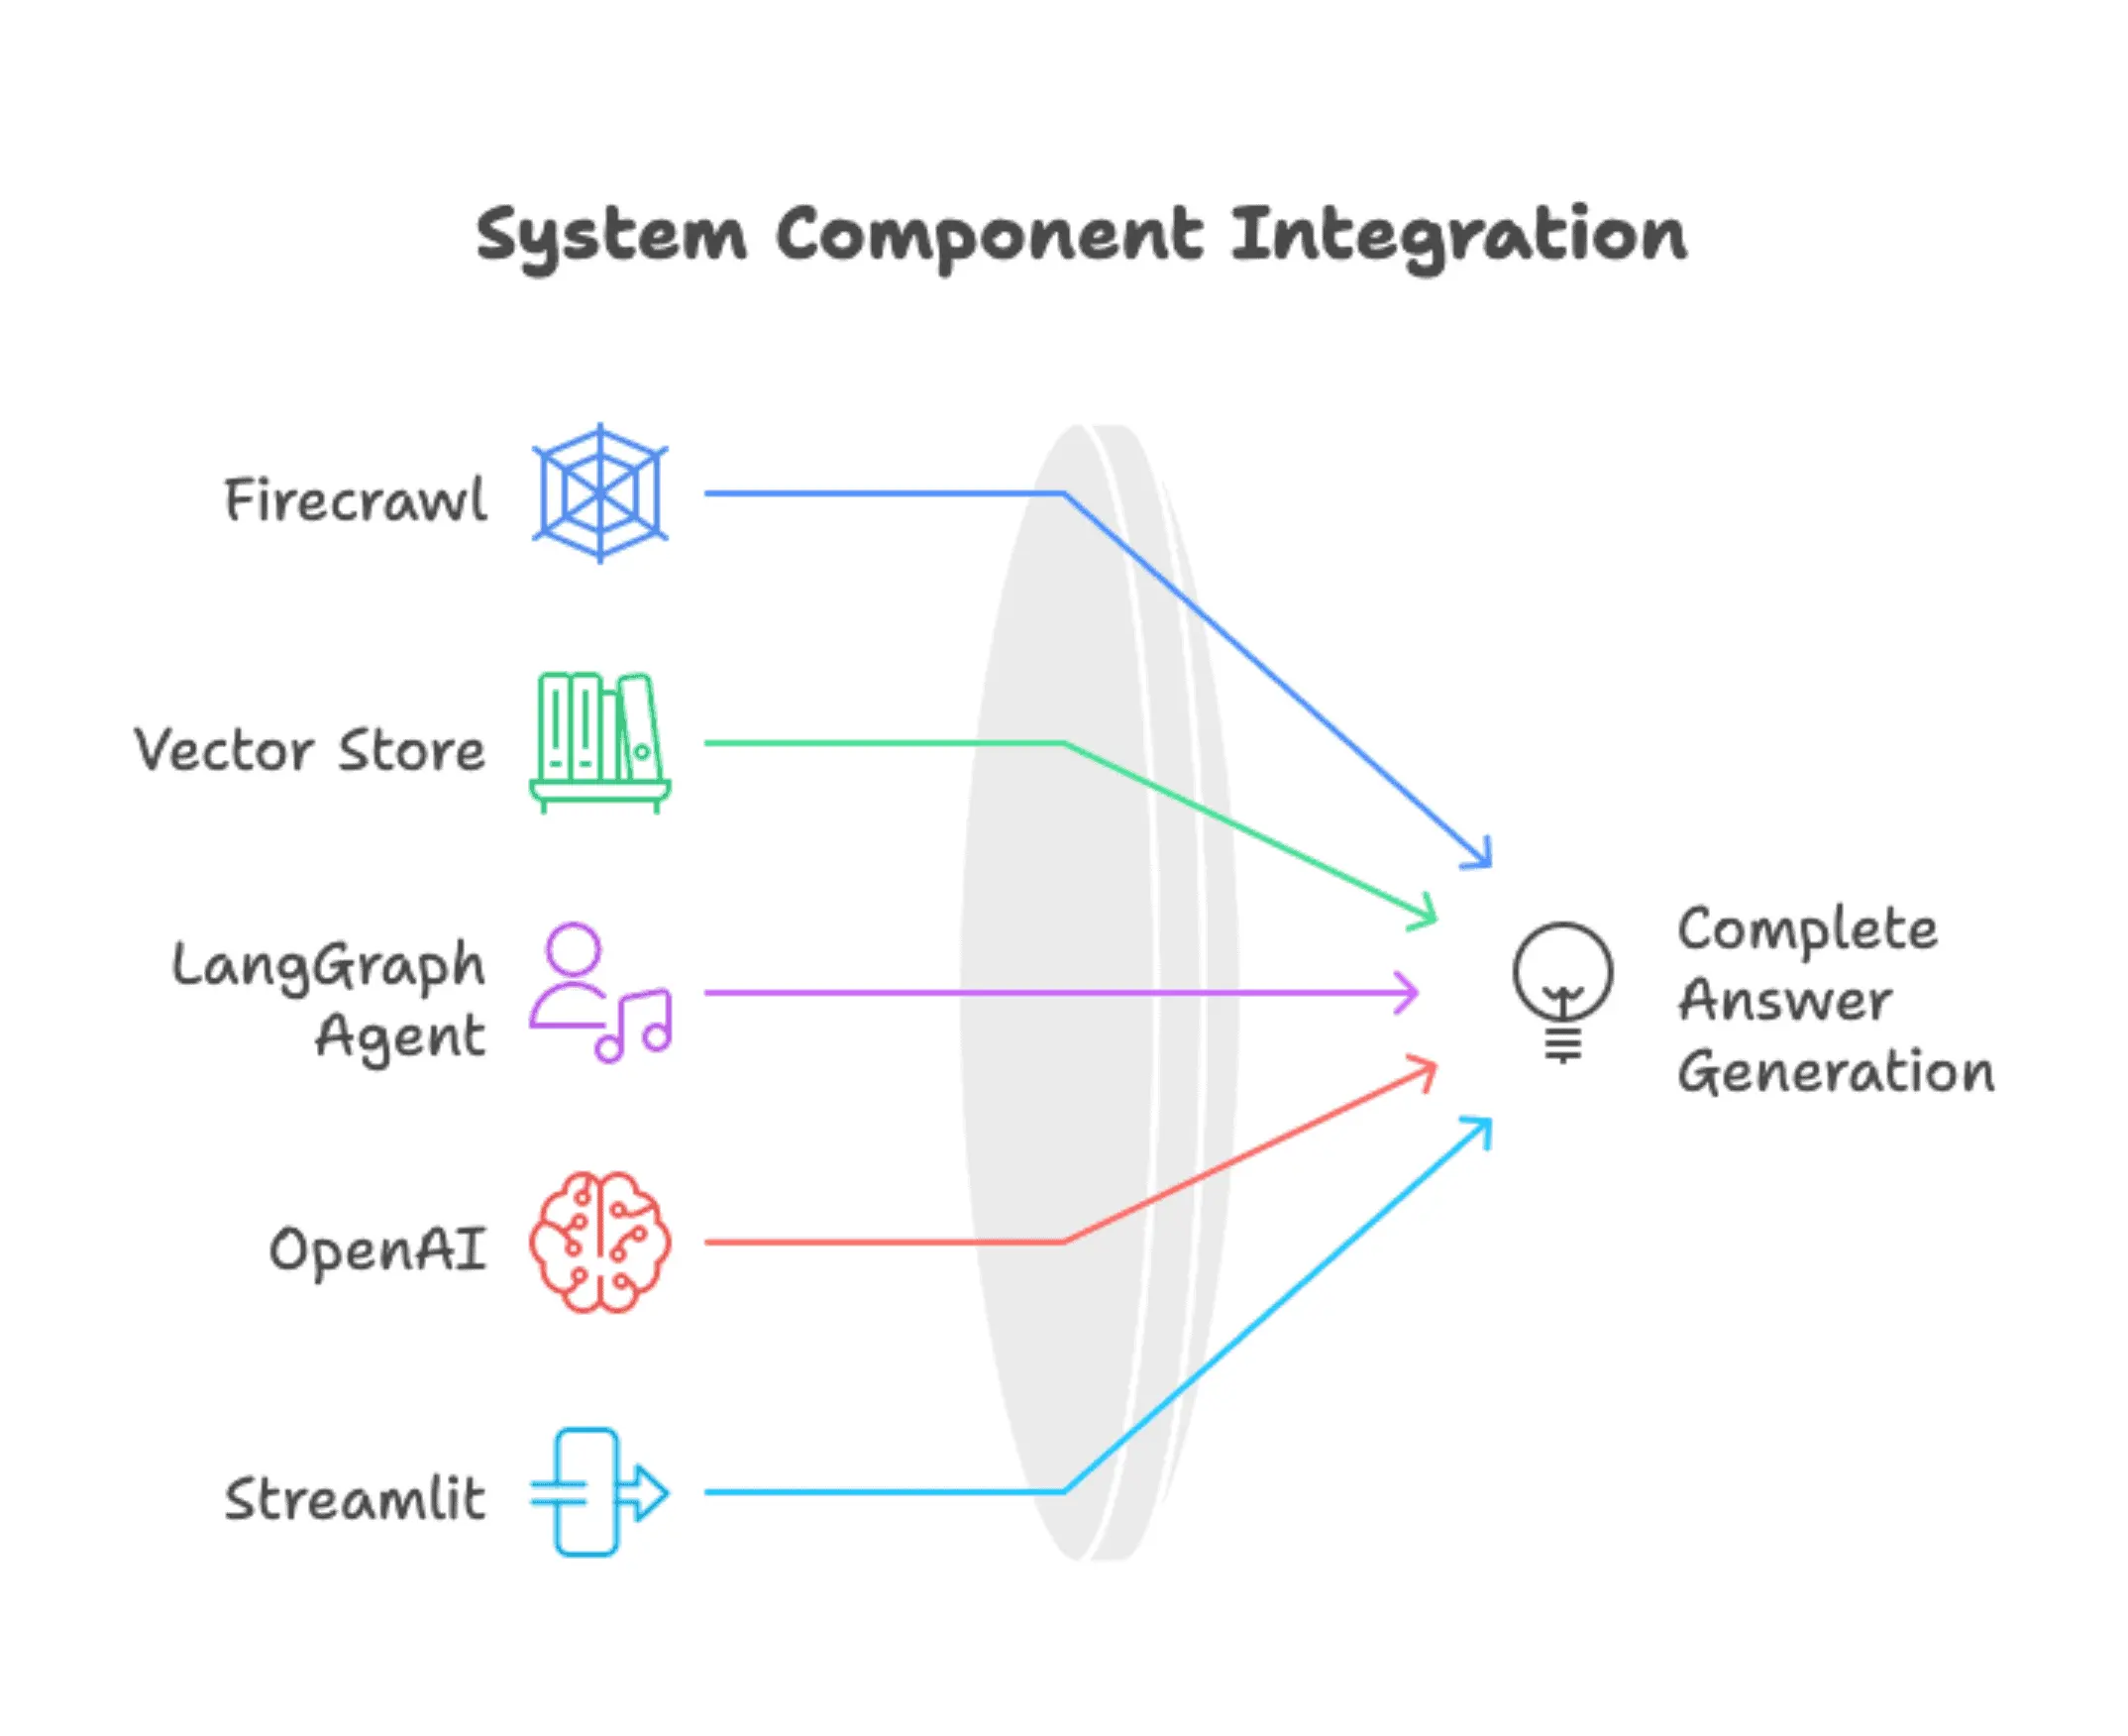
Data flows through the system in two phases. During setup, Firecrawl's /map endpoint discovers documentation pages, batch scraping pulls content in parallel, the content gets split into chunks and converted to vectors via OpenAI embeddings, then Chroma stores them for fast retrieval. During conversation, user questions go to the LangGraph agent, which decides whether to call the search tool. When it does, the tool queries Chroma for relevant chunks and the agent synthesizes answers from the retrieved information.
Project Setup and Prerequisites
Before building the agent, you need to set up your environment. This section walks you through the prerequisites, project structure, and installation steps.
Prerequisites
Here's what you need before starting:
- Python 3.10 or higher: The code uses features that won't work on older versions
- Basic LLM knowledge: Understanding what embeddings are and how vector databases work for semantic search will help you follow along
- Environment variables: Familiarity with creating and using
.envfiles to store API keys - OpenAI API key: Get one from platform.openai.com for embeddings and chat completions
- Firecrawl API key: Get one from firecrawl.dev for web scraping
Both OpenAI and Firecrawl offer free tiers you can use to test the application.
Project structure
docs-to-agent/
├── app.py                 # Main Streamlit application
├── src/
│   ├── crawler.py        # Firecrawl integration
│   ├── vectorstore.py    # Vector DB management
│   ├── tools.py          # Agent tools
│   └── agent.py          # LangGraph agent setup
├── requirements.txt      # Dependencies
├── .env                  # API keys (not committed)
└── .env.example         # Template
Installation
Create a requirements.txt file with these dependencies:
firecrawl-py>=0.0.16
langchain>=0.3.0
langchain-openai>=0.2.0
langgraph>=0.2.0
langchain-chroma>=0.1.0
streamlit>=1.28.0
python-dotenv>=1.0.0
chromadb>=0.4.22
tiktoken>=0.5.0
Install the dependencies:
pip install -r requirements.txtNext, set up your API keys. Create a .env.example file as a template:
OPENAI_API_KEY=your-openai-key-here
FIRECRAWL_API_KEY=your-firecrawl-key-here
Copy it to .env and add your actual API keys:
cp .env.example .env
# Edit .env and add your real API keysNote: The sections below break down each script into focused chunks to explain the implementation details. For the complete picture, we recommend opening the GitHub repository for this project in a separate tab while following along.
Building the Documentation Crawler
View the complete script: src/crawler.py
The first step in building our agent is getting the documentation content. Firecrawl handles this with two endpoints: /map for discovering URLs and batch_scrape for extracting content. We'll wrap both in a DocumentationCrawler class that lives in src/crawler.py.
Setting up the crawler module
Start by creating the file structure. Inside your project directory, create a src folder and add an __init__.py file to make it a Python package:
mkdir src
touch src/__init__.py
Now create src/crawler.py and add the imports:
"""
Firecrawl integration for discovering and crawling documentation sites.
"""
import os
from typing import List, Dict
from firecrawl import FirecrawlApp
from langchain_core.documents import Document
The imports bring in the Firecrawl client, LangChain's document structure, and Python's type hinting utilities for clear function signatures.
Initializing the crawler class
With the imports in place, add the class definition and initialization method:
class DocumentationCrawler:
    """Handles all Firecrawl interactions for documentation crawling."""

    def __init__(self):
        """Initialize the Firecrawl client."""
        api_key = os.getenv("FIRECRAWL_API_KEY")
        if not api_key:
            raise ValueError("FIRECRAWL_API_KEY not found in environment variables")
        self.app = FirecrawlApp(api_key=api_key)
The initialization loads the API key from environment variables and raises a clear error if missing, helping catch configuration problems early.
Understanding Firecrawl's map endpoint
Firecrawl's /map endpoint discovers all URLs on a website without scraping content. It maps site structure in 2-5 seconds for 100 URLs, letting you filter to specific sections (API references, tutorials) before scraping.
Here's how to implement URL discovery. Add the discover_urls() method to your class:
    def discover_urls(self, base_url: str, limit: int = 100) -> List[str]:
        """
        Discover all URLs on a documentation site using the /map endpoint.

        Args:
            base_url: The base URL of the documentation site
            limit: Maximum number of URLs to discover

        Returns:
            List of discovered URLs
        """
        print(f"🔍 Discovering URLs from {base_url}...")

        try:
            response = self.app.map(base_url, limit=limit)

            # Extract URLs from response
            if hasattr(response, 'links'):
                urls = []
                for link in response.links:
                    if isinstance(link, str):
                        urls.append(link)
                    elif hasattr(link, 'url'):
                        urls.append(link.url)
                    else:
                        urls.append(link.get('url'))
            else:
                urls = response.get('links', [])

            print(f"✅ Found {len(urls)} URLs")
            return urls

        except Exception as e:
            print(f"❌ Error discovering URLs: {str(e)}")
            raise
The method handles multiple response formats (strings, objects, dictionaries) and logs errors before re-raising them for debugging.
The mastering the crawl endpoint guide explains how Firecrawl's crawling strategies work and when to use /map versus /crawl.
Batch scraping documentation
Firecrawl's batch_scrape() processes multiple URLs in parallel and returns clean markdown instead of raw HTML.
Add the crawl_documentation() method:
    def crawl_documentation(self, urls: List[str], max_pages: int = 50) -> List[Document]:
        """
        Crawl the provided URLs and return LangChain Document objects.

        Args:
            urls: List of URLs to crawl
            max_pages: Maximum number of pages to crawl

        Returns:
            List of LangChain Document objects
        """
        # Limit the number of URLs to crawl
        urls_to_crawl = urls[:max_pages]
        print(f"📄 Crawling {len(urls_to_crawl)} pages...")

        documents = []

        try:
            # Use batch scrape for efficiency
            result = self.app.batch_scrape(
                urls_to_crawl,
                formats=['markdown']
            )
Markdown format preserves document structure while remaining LLM-readable. Firecrawl processes URLs in parallel on their servers.
Converting scraped data to documents
            # Convert to LangChain documents
            if hasattr(result, 'data'):
                scraped_data = result.data
            else:
                scraped_data = result.get('data', [])

            for item in scraped_data:
                # Extract content and metadata
                if hasattr(item, 'markdown'):
                    content = item.markdown
                    # Get metadata
                    if hasattr(item, 'metadata'):
                        meta = item.metadata
                        url = meta.url if hasattr(meta, 'url') else meta.get('url', '')
                        title = meta.title if hasattr(meta, 'title') else meta.get('title', '')
                    else:
                        url = ''
                        title = ''

                    metadata = {'url': url, 'title': title}
                else:
                    content = item.get('markdown', '')
                    metadata = {
                        'url': item.get('metadata', {}).get('url', ''),
                        'title': item.get('metadata', {}).get('title', '')
                    }

                if content:
                    doc = Document(
                        page_content=content,
                        metadata=metadata
                    )
                    documents.append(doc)

            print(f"✅ Successfully crawled {len(documents)} pages")
            return documents

        except Exception as e:
            print(f"❌ Error crawling documentation: {str(e)}")
            raise
The code handles both object-style and dictionary-style responses, extracting markdown content and metadata into Document objects for source citations. Learn more in the mastering Firecrawl scrape endpoint guide.
Setting Up Vector Storage with Chroma
View the complete script: src/vectorstore.py
Your crawler now transforms documentation sites into structured Document objects with clean markdown and metadata. Raw documents need conversion to embeddings for semantic search. Chunking splits them into searchable pieces, embeddings capture meaning, and vector storage enables retrieval without hitting token limits.
Why document chunking matters
Documentation pages are 3,000-5,000 characters. Chunking splits them into 1,000-character pieces for precise semantic search without losing context.
See more in our piece on Chunking Strategies for RAG Systems.
Create src/vectorstore.py and add the imports and class initialization:
"""
Vector store management for document storage and retrieval.
"""
from typing import List
from langchain_core.documents import Document
from langchain_text_splitters import RecursiveCharacterTextSplitter
from langchain_openai import OpenAIEmbeddings
from langchain_chroma import Chroma


class VectorStoreManager:
    """Manages document chunking, embedding, and vector storage."""

    def __init__(self):
        """Initialize the vector store manager."""
        self.embeddings = OpenAIEmbeddings(model="text-embedding-3-small")
        self.text_splitter = RecursiveCharacterTextSplitter(
            chunk_size=1000,
            chunk_overlap=100,
            length_function=len,
        )
The RecursiveCharacterTextSplitter splits on natural boundaries (paragraphs, then sentences, then words) instead of cutting mid-sentence. The chunk_size=1000 balances context preservation with retrieval precision, while chunk_overlap=100 prevents information loss at chunk boundaries.
Here's the chunking method:
    def chunk_documents(self, documents: List[Document]) -> List[Document]:
        """
        Split documents into smaller chunks for better retrieval.

        Args:
            documents: List of documents to chunk

        Returns:
            List of chunked documents
        """
        print(f"✂️ Chunking {len(documents)} documents...")
        chunks = self.text_splitter.split_documents(documents)
        print(f"✅ Created {len(chunks)} chunks")
        return chunks
The splitter preserves metadata (URL and title) during chunking, enabling the agent to cite sources. Typical documentation pages produce 3-5 chunks, each representing a logical section.
Embeddings and vector storage
OpenAI's text-embedding-3-small converts chunks into 1,536-dimensional vectors. Chunks with similar meanings get similar vectors, enabling semantic search where "web scraping" and "content extraction" are recognized as related concepts.
Add the vector store creation method:
    def create_vectorstore(self, chunks: List[Document]) -> Chroma:
        """
        Create a Chroma vector store from document chunks.

        Args:
            chunks: List of document chunks

        Returns:
            Chroma vector store instance
        """
        print(f"🔢 Creating vector store with {len(chunks)} chunks...")

        try:
            vectorstore = Chroma.from_documents(
                documents=chunks,
                embedding=self.embeddings,
                collection_name="documentation"
            )
            print("✅ Vector store created successfully")
            return vectorstore

        except Exception as e:
            print(f"❌ Error creating vector store: {str(e)}")
            raise
Chroma is a lightweight vector database that runs in memory. It's perfect for demos and small projects because there's no server to set up. The from_documents() method handles everything: it calls OpenAI's API to generate embeddings for each chunk, stores the vectors and original text, and builds an index for fast searching.
This setup uses in-memory storage, which means the vector database disappears when you close the app. For production, you'd add persistence by passing a persist_directory parameter. For a documentation assistant that you rebuild on demand, though, in-memory works fine.
How similarity search works
The k=8 parameter retrieves the top 8 most relevant chunks using cosine similarity. It provides enough context for most questions without overwhelming the LLM.
Creating Agent Tools for Documentation Search
View the complete script: src/tools.py
With your vector store ready, you can now build the tool your agent will use to search it. LangGraph agents don't directly access vector databases. They need tools (functions they can call when they need information). The agent decides when to use each tool, what query to pass, and how to interpret the results.
Understanding LangChain tools
Tools are Python functions with the @tool decorator. The function name, docstring, type annotations, and string return value tell the agent when and how to call it.
Create src/tools.py and add the imports:
"""
Agent tools for documentation search and retrieval.
"""
from typing import Annotated
from langchain_core.tools import tool
The Annotated type adds parameter descriptions that guide the agent, while tool converts functions into callable agent tools.
Building the search tool with a closure
The search tool needs access to your vector store, but tools can't take extra parameters beyond what the agent passes. The solution is a closure: a function that returns another function, with the inner function retaining access to the outer function's variables.
Add the create_search_tool() function:
def create_search_tool(vectorstore):
    """
    Create a search tool that has access to the vector store.

    Args:
        vectorstore: The Chroma vector store containing documentation

    Returns:
        A tool function that can search the documentation
    """

    @tool
    def search_documentation(query: Annotated[str, "The search query or question about the documentation"]) -> str:
        """
        Search the documentation for relevant information.

        Use this tool when you need to find specific information from the documentation
        to answer user questions.
        """
        try:
            # Perform similarity search
            results = vectorstore.similarity_search(query, k=8)

            if not results:
                return "No relevant documentation found for this query."
The closure pattern gives the inner function access to the vector store while keeping the tool interface clean. The annotated query parameter and detailed docstring guide the agent on when and how to call this tool.
We retrieve k=8 chunks because this provides about 8,000 characters of context. This amount is enough for most documentation questions without excessive token cost or latency. More chunks add noise; fewer risk missing relevant information.
Formatting results for the agent
The raw results from the vector store are Document objects. The agent needs a formatted string it can read and understand. The formatting matters because the agent uses this text to generate its answer.
Continue adding to the search_documentation() function:
            # Format the results
            context_parts = []
            for i, doc in enumerate(results, 1):
                source = doc.metadata.get('url', 'Unknown source')
                title = doc.metadata.get('title', 'Untitled')
                content = doc.page_content.strip()

                context_parts.append(
                    f"[Source {i}: {title}]\n"
                    f"URL: {source}\n"
                    f"Content: {content}\n"
                )

            return "\n---\n".join(context_parts)

        except Exception as e:
            return f"Error searching documentation: {str(e)}"

    return search_documentation
Each result includes a labeled source with URL and content. The [Source 1: Title] format enables easy citation, while --- separators distinguish between chunks for the agent to parse.
Error handling returns strings rather than raising exceptions because tools must return strings. The outer function returns the inner search_documentation function, which you pass to the agent.
Building the LangGraph ReAct Agent
View the complete script: src/agent.py
Your search tool queries the vector store and returns formatted chunks. Tools are passive. They need a decision-making layer. The LangGraph agent orchestrates tool calls through ReAct reasoning, deciding when to search, what queries to use, and how to synthesize answers.
Why system prompts control agent behavior
The system prompt tells the LLM how to behave, when to use tools, and how to format responses. Our prompt ensures the agent searches efficiently, cites sources, and admits when information isn't found.
Create src/agent.py and define the system prompt:
"""
LangGraph agent configuration and setup.
"""
from typing import List
from langchain_core.tools import BaseTool
from langchain_openai import ChatOpenAI
from langgraph.prebuilt import create_react_agent
from langgraph.checkpoint.memory import MemorySaver


# System prompt for the documentation assistant
SYSTEM_PROMPT = """You are a helpful documentation assistant. You have access to documentation that has been crawled and indexed from a website.

GUIDELINES:
- Use the search_documentation tool to find relevant information
- Be efficient: one well-crafted search is usually sufficient
- Only search again if the first results are clearly incomplete
- Provide clear, accurate answers based on the documentation
- Always cite your sources with page titles or URLs
- If information isn't found, say so clearly
- Be concise but thorough

When answering:
1. Search the documentation with a focused query
2. Synthesize a clear answer from the results
3. Include source citations (titles and URLs)
4. Only search again if absolutely necessary
"""
The prompt emphasizes efficiency because agents can fall into loops where they search repeatedly for the same information. The "one well-crafted search is usually sufficient" line prevents this. The citation requirement ensures users can verify answers. The numbered steps at the end give the agent a clear process to follow.
Configuring the agent with memory
LangGraph's create_react_agent() function handles the ReAct loop for you. You pass it an LLM, tools, a system prompt, and a checkpointer for memory. It returns an agent that can reason about when to use tools and maintain conversation context.
Add the agent creation function:
def create_documentation_agent(tools: List[BaseTool], model_name: str = "gpt-5"):
    """
    Create a documentation assistant agent using LangGraph.

    Args:
        tools: List of tools the agent can use
        model_name: Name of the OpenAI model to use

    Returns:
        A configured LangGraph agent
    """
    # Initialize the language model
    llm = ChatOpenAI(model=model_name, temperature=0)

    # Create a memory saver for conversation history
    memory = MemorySaver()

    # Create the ReAct agent
    agent = create_react_agent(
        llm,
        tools=tools,
        prompt=SYSTEM_PROMPT,
        checkpointer=memory
    )

    return agent
We use temperature=0 for deterministic, factual responses. Documentation assistants need accuracy over creativity. The MemorySaver checkpointer stores conversation history by thread ID, enabling follow-up questions that reference previous context. For production systems requiring persistence across restarts, swap MemorySaver for a database-backed checkpointer.
Building the Streamlit User Interface
View the complete script: app.py
The backend pipeline is complete: Firecrawl scrapes, Chroma stores embeddings, your tool retrieves chunks, and the LangGraph agent orchestrates ReAct reasoning. Streamlit transforms these components into an interactive web application.
Managing session state
Streamlit reruns your entire script every time a user interacts with a widget. Without session state, your vector store and agent would disappear after each button click, forcing you to rebuild everything from scratch.
Create app.py and initialize session state:
"""
Streamlit app for converting documentation sites into chatbots using LangGraph.
"""
import streamlit as st
from dotenv import load_dotenv
from langchain_core.messages import HumanMessage

load_dotenv()

from src.crawler import DocumentationCrawler
from src.vectorstore import VectorStoreManager
from src.tools import create_search_tool
from src.agent import create_documentation_agent


st.set_page_config(
    page_title="Docs to Agent",
    page_icon="📚",
    layout="wide"
)


def initialize_session_state():
    """Initialize all session state variables."""
    if 'discovered_urls' not in st.session_state:
        st.session_state.discovered_urls = []
    if 'vectorstore' not in st.session_state:
        st.session_state.vectorstore = None
    if 'agent' not in st.session_state:
        st.session_state.agent = None
    if 'messages' not in st.session_state:
        st.session_state.messages = []
    if 'crawl_status' not in st.session_state:
        st.session_state.crawl_status = 'not_started'
Each variable is initialized only if it doesn't exist, preventing session state from being reset on script reruns.
Building the setup sidebar
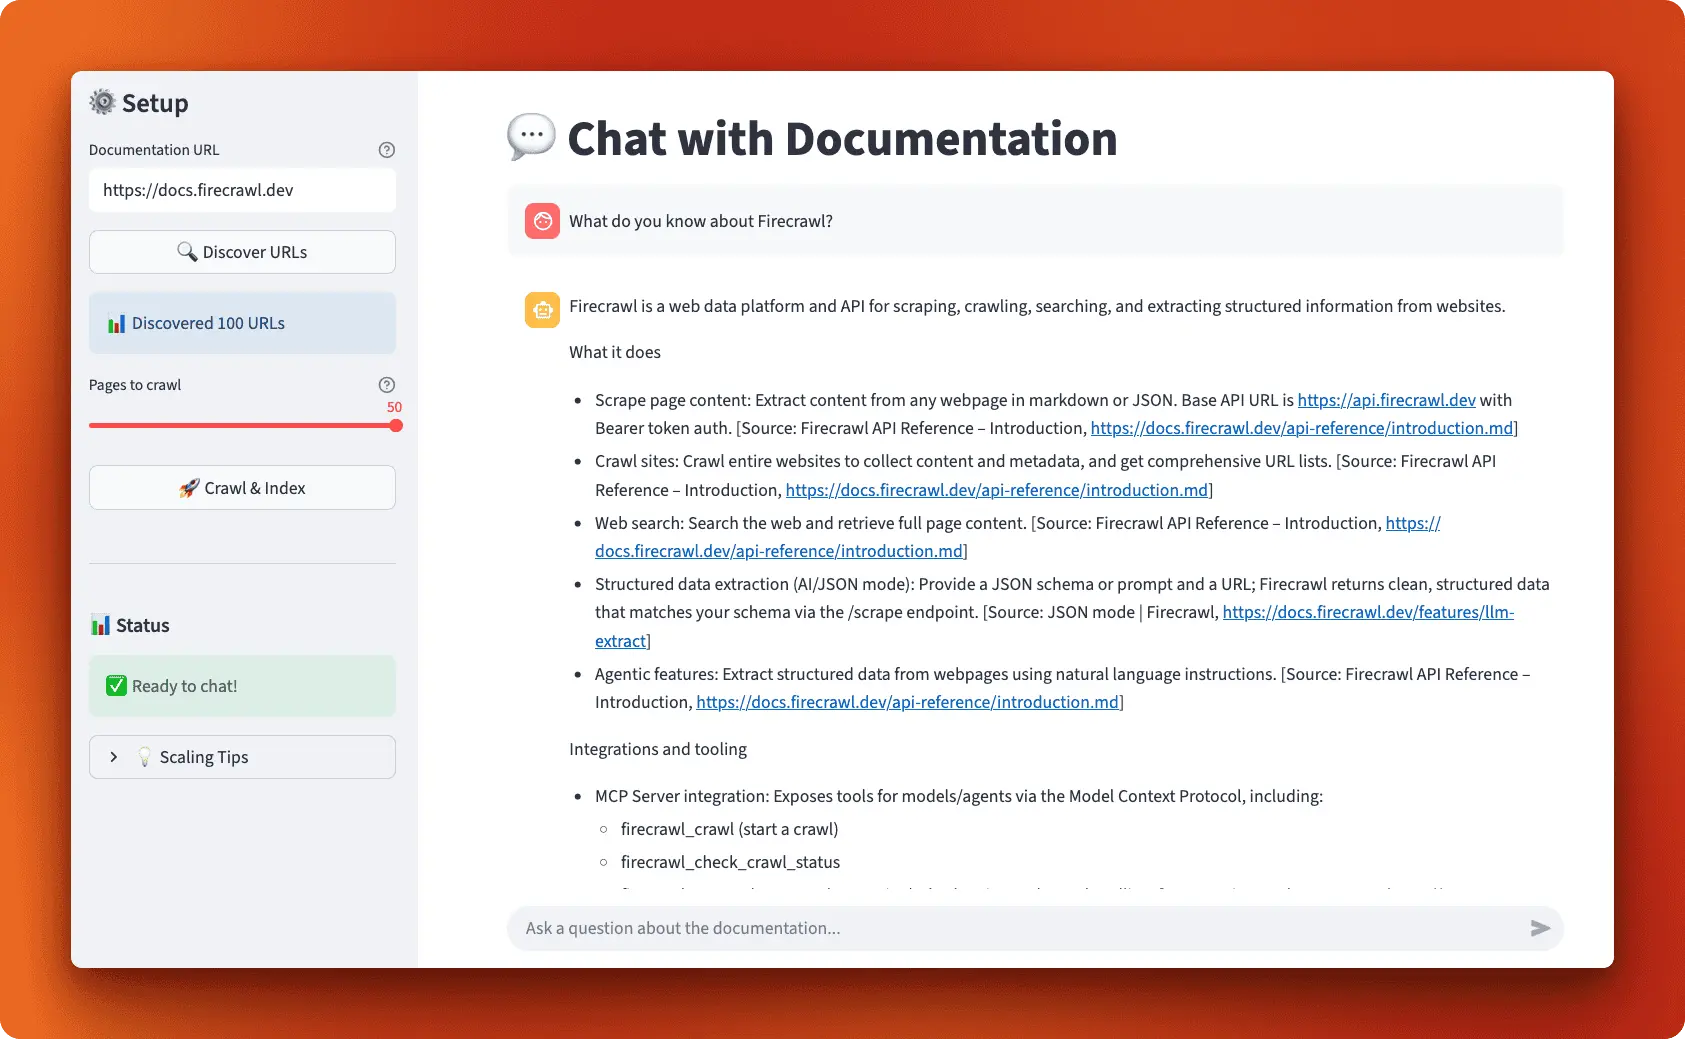
The sidebar handles the three-step setup process: discover URLs, select how many to crawl, then index them.
Add the sidebar rendering function:
def render_sidebar():
    """Render the sidebar with setup controls."""
    with st.sidebar:
        st.title("⚙️ Setup")

        # URL input
        base_url = st.text_input(
            "Documentation URL",
            placeholder="https://docs.example.com",
            help="Enter the base URL of the documentation site you want to convert into an agent"
        )

        # Discover URLs button
        if st.button("🔍 Discover URLs", disabled=not base_url, use_container_width=True):
            discover_urls(base_url)

        # Show discovered URLs count
        if st.session_state.discovered_urls:
            st.info(f"📊 Discovered {len(st.session_state.discovered_urls)} URLs")

            # Max pages slider
            max_pages = st.slider(
                "Pages to crawl",
                min_value=5,
                max_value=min(50, len(st.session_state.discovered_urls)),
                value=min(20, len(st.session_state.discovered_urls)),
                help="Select how many pages to crawl (recommended: 10-30 for testing)"
            )

            # Crawl button
            if st.button("🚀 Crawl & Index", use_container_width=True):
                crawl_and_index(st.session_state.discovered_urls, max_pages)

        # Status indicator
        st.divider()
        st.subheader("📊 Status")

        if st.session_state.crawl_status == 'not_started':
            st.info("Ready to start")
        elif st.session_state.crawl_status == 'completed':
            st.success("✅ Ready to chat!")
        elif st.session_state.crawl_status == 'error':
            st.error("❌ Error occurred")
The disabled state prevents discovering URLs until a base URL is entered. The slider and crawl button appear progressively as the workflow advances.
The URL discovery helper
The discover_urls() helper wraps the crawler's discovery method and stores results in session state:
def discover_urls(base_url: str):
    """Discover URLs from the documentation site."""
    try:
        with st.spinner("🔍 Discovering URLs..."):
            crawler = DocumentationCrawler()
            urls = crawler.discover_urls(base_url, limit=100)
            st.session_state.discovered_urls = urls
            st.success(f"✅ Found {len(urls)} URLs")
    except Exception as e:
        st.error(f"❌ Error discovering URLs: {str(e)}")
The crawl and index helper
The crawl_and_index() helper runs the full pipeline you built in previous sections:
def crawl_and_index(urls: list, max_pages: int):
    """Crawl documentation and create vector store."""
    try:
        # Step 1: Crawl
        with st.spinner(f"📄 Crawling {min(len(urls), max_pages)} pages..."):
            crawler = DocumentationCrawler()
            documents = crawler.crawl_documentation(urls, max_pages=max_pages)

        if not documents:
            st.error("No documents were crawled. Please check the URLs and try again.")
            return

        # Step 2: Chunk and create vector store
        with st.spinner("✂️ Chunking documents..."):
            vs_manager = VectorStoreManager()
            chunks = vs_manager.chunk_documents(documents)

        with st.spinner("🔢 Creating vector store..."):
            vectorstore = vs_manager.create_vectorstore(chunks)
            st.session_state.vectorstore = vectorstore

        # Step 3: Create agent
        with st.spinner("🤖 Creating agent..."):
            search_tool = create_search_tool(vectorstore)
            agent = create_documentation_agent([search_tool])
            st.session_state.agent = agent

        st.session_state.crawl_status = 'completed'
        st.success("✅ Documentation indexed! You can now chat with it below.")

    except Exception as e:
        st.error(f"❌ Error: {str(e)}")
        st.session_state.crawl_status = 'error'
The st.spinner() context manager shows loading messages while each step runs, giving users feedback on what's happening.
Creating the chat interface
With the setup complete, users need a place to ask questions. The chat interface displays message history and handles new questions:
def render_chat():
    """Render the chat interface."""
    st.title("💬 Chat with Documentation")

    # Check if agent is ready
    if st.session_state.agent is None:
        st.info("👈 Please set up your documentation in the sidebar first!")
        st.markdown("""
        ### How to use:
        1. Enter a documentation URL in the sidebar (e.g., `https://docs.firecrawl.dev`)
        2. Click "Discover URLs" to find all pages
        3. Select how many pages to crawl (start with 10-20)
        4. Click "Crawl & Index" and wait for processing
        5. Start chatting!
        """)
        return

    # Display chat messages
    for message in st.session_state.messages:
        with st.chat_message(message["role"]):
            st.markdown(message["content"])

    # Chat input
    if prompt := st.chat_input("Ask a question about the documentation..."):
        # Add user message
        st.session_state.messages.append({"role": "user", "content": prompt})
        with st.chat_message("user"):
            st.markdown(prompt)

        # Get agent response (streaming logic in next section)
        with st.chat_message("assistant"):
            # Placeholder for streaming implementation
            pass
The walrus operator := assigns and checks prompt in one line. Chat message bubbles get styled automatically via st.chat_message(), while session state preserves conversation history across reruns.
Add the main function to tie everything together:
def main():
    """Main application function."""
    initialize_session_state()
    render_sidebar()
    render_chat()


if __name__ == "__main__":
    main()
Implementing Real-Time Streaming Responses
The workflow is complete, but users wait 10-20 seconds staring at a blank screen without streaming. Token-level streaming shows real-time progress as the agent thinks, searches, and composes responses.
Why streaming matters
Streaming shows progress in real time: thinking indicators when the agent reasons, search status when it calls tools, and tokens appearing word-by-word as the answer generates.
LangGraph supports three streaming modes: values (complete state snapshots), updates (changes only), and messages (individual tokens). For real-time responses, use messages mode. It yields tokens as the LLM produces them, with metadata identifying the source node.
Building the streaming generator
Replace the placeholder in render_chat() with streaming implementation. This code continues after the user message is added:
# Get agent response
with st.chat_message("assistant"):
    # Create status and message placeholders
    status_placeholder = st.empty()
    message_placeholder = st.empty()

    try:
        # Create config with thread ID for conversation memory
        config = {"configurable": {"thread_id": "documentation_chat"}}
Two placeholders handle dynamic updates: one for status indicators (thinking/searching/generating), one for the streaming response. The thread ID in the config enables conversation memory across turns.
        # Generator function for real-time streaming
        def generate_response():
            """Generator that yields tokens from LangGraph stream."""
            status_placeholder.markdown("🤔 **Thinking...**")
            first_content_token = True
            tool_call_detected = False
            final_answer_started = False
The generator tracks state to control status updates and filter tokens from tool calls versus final answers.
            # Stream with "messages" mode for real LLM tokens
            for msg, metadata in st.session_state.agent.stream(
                {"messages": [HumanMessage(content=prompt)]},
                config=config,
                stream_mode="messages"
            ):
                # Check which node is streaming
                langgraph_node = metadata.get("langgraph_node", "")
The messages mode yields individual tokens with metadata identifying the producing node (agent vs. tools).
                # Skip tool outputs entirely (they contain the search results, not answer tokens)
                if "tools" in langgraph_node.lower() or "tool" in langgraph_node.lower():
                    if not tool_call_detected:
                        status_placeholder.markdown("🔍 **Searching documentation...**")
                        tool_call_detected = True
                    continue  # Skip all tool messages
Tool node outputs get skipped. They contain search results, not answer tokens. We only update the status indicator to show search activity.
                # Only stream content from the "agent" node (the LLM's response)
                if "agent" in langgraph_node.lower() and hasattr(msg, 'content'):
                    content = msg.content

                    # Only yield non-empty content tokens
                    if content:
                        # Update status on first content token
                        if first_content_token:
                            status_placeholder.markdown("💬 **Generating answer...**")
                            first_content_token = False
                            final_answer_started = True

                        # Yield the token only if we're in final answer mode
                        if final_answer_started:
                            yield content

            # Clear status when streaming is complete
            status_placeholder.empty()
Only agent node tokens get yielded. These are the LLM's actual answer. The status updates to "Generating answer" on the first token and clears when streaming completes.
        # Use st.write_stream for automatic token-by-token display
        with message_placeholder.container():
            full_response = st.write_stream(generate_response())

    except Exception as e:
        error_msg = f"❌ Error: {str(e)}"
        status_placeholder.empty()
        message_placeholder.markdown(error_msg)
        full_response = error_msg

# Add assistant response to history
st.session_state.messages.append({"role": "assistant", "content": full_response})
Streamlit's st.write_stream() displays tokens as they arrive and returns the complete response for message history.
How Streamlit handles the stream
The message_placeholder.container() wrapper ensures the streamed content appears in the correct UI location. The thread-based config groups messages by conversation ID, enabling context-aware follow-up questions.
Run your application:
streamlit run app.pyEnter a documentation URL, crawl pages, and ask questions. You'll see thinking indicators, search status updates, and tokens streaming in real time.
Testing and Deployment
Run the application locally:
streamlit run app.pyTest with small documentation sites (10-30 pages). URL discovery takes 2-5 seconds, crawling runs at 1-2 seconds per page, and the first response takes 10-15 seconds.
For deployment, Streamlit Cloud offers the easiest path with free tier access. Add API keys through secrets management. For production, consider Docker containers or cloud platforms (AWS, GCP, Azure) with persistent Chroma storage for larger datasets.
From Website to LangGraph Agent
You've built a complete documentation agent from scratch. The system uses Firecrawl's /map endpoint for fast URL discovery, batch scraping for parallel content extraction, and Chroma for vector storage. LangGraph's ReAct pattern orchestrates the agent's decision-making, determining when to search and when to respond directly. Token-level streaming provides real-time feedback, and conversation memory allows context-aware follow-ups. The Streamlit interface wraps everything in a deployable web application.
What makes this approach powerful is how the agent reasons about retrieval. Unlike traditional RAG systems that blindly retrieve chunks for every query, this agent decides when retrieval is necessary. Simple questions get fast direct responses, while complex ones trigger thorough searches. The ReAct loop (think → act → observe → repeat) handles multi-step reasoning automatically through LangGraph's built-in implementation.
P.S: Anthropic has been killing it with their shipping velocity lately. On February 5, 2026, Anthropic released Claude Opus 4.6, a major upgrade to their smartest model. The major update was Agent teams (research preview) using which one can spin up multiple Claude Code agents that work in parallel. We wrote a detailed guide on Building Apps with Claude Opus 4.6 Agent Teams & Firecrawl Agent.
Next steps
Read more: How to Build a Web Scraping Agent With LangGraph and Firecrawl
From here, you can take this architecture in several directions:
- Add more tools to create multi-source agents that search documentation, GitHub repositories, and technical blogs simultaneously
- Build custom tools for code execution, API testing, or database queries
- Swap the vector store for Pinecone or Weaviate when scaling beyond in-memory storage
- Implement hybrid search combining semantic and keyword matching, or add reranking models to improve retrieval quality
- Add production features like authentication, rate limiting, and response caching
The Firestarter RAG chatbot generator provides another approach to building RAG systems quickly. LangGraph's official tutorials cover advanced patterns like multi-agent systems and human-in-the-loop workflows. Test your agent against real documentation sites and extend the patterns that match your use case.