Building AI agents means dealing with code. You need to understand Python frameworks like LangGraph or CrewAI, wire up APIs, and manage orchestration logic. When you want to create a workflow that scrapes websites, makes decisions, and processes data, you're looking at setting up multiple libraries, handling state management, and debugging complex execution flows. The setup takes time when you just want to build and test quickly.
Visual workflow builders exist. Tools like n8n, Zapier, and Make handle automation well, but they were designed for general task automation rather than AI agent patterns. OpenAI released its own agent builder, but it locks you into OpenAI's models only. There's room for something built specifically for agent workflows that lets you choose your AI provider.
Open Agent Builder fills this space. It's an open-source visual workflow builder designed for AI agents. Built by the Firecrawl team, you drag and drop nodes to create agent workflows—from web scraping to reasoning to conditional logic. It supports multiple AI providers (Anthropic, OpenAI, Groq) and runs in real-time. No Python files, just a visual canvas that shows exactly what your agent will do.
This article covers what Open Agent Builder is and how it works. You'll learn about the node-based system, how to deploy your first workflow, and what kinds of automation you can build with it. By the end, you'll know whether this tool fits your needs.
What is Open Agent Builder?
Open Agent Builder is a visual workflow builder for AI agents. You connect nodes to create pipelines: web scraping, reasoning, conditional logic. Unlike OpenAI's agent builder which locks you to their models, this is open source and supports any AI provider (Claude, OpenAI, Groq, or OpenAI-compatible endpoints). Built by the Firecrawl team under MIT license, it runs locally or deploys to Vercel.
Open Agent Builder makes AI agent workflows accessible through visual design. The project fits into the broader ecosystem of open source agent frameworks but takes a different approach: those frameworks require code, while this uses a visual interface.
Common use cases:
- Web scraping workflows with multi-step logic
- Research automation that crawls and summarizes content
- Competitive analysis pipelines
- Price monitoring with conditional alerts
- Custom workflows that integrate internal tools
The workflow system uses eight node types:
- Start/End nodes
- Agent nodes (LLM reasoning)
- MCP Tools (external APIs)
- Transform (data manipulation)
- Conditional logic (If/Else, While Loop)
- User Approval for human-in-the-loop workflows
These node types combine to handle patterns from simple scrapers to complex multi-agent systems.
Who should use Open Agent Builder?
Open Agent Builder is a great tool for:
Developers who want to prototype agent workflows quickly. Visual design speeds up iteration and makes debugging easier. You get LangGraph's orchestration under the hood.
Non-technical users who need AI-powered automation. If you've used tools like Zapier or n8n, you already understand the workflow concept. Open Agent Builder applies that same pattern to AI agents. Transform nodes support JavaScript for custom logic when needed.
Teams building automation together. Visual workflows make collaboration easier. Product managers can design workflows, developers can deploy them, and everyone sees what the automation does.
The tech stack
- Frontend: Next.js 16, React, Tailwind CSS, React Flow (drag-and-drop canvas interface)
- Backend: LangGraph (workflow orchestration and state management), Convex (real-time database with live workflow updates)
- Auth: Clerk (user authentication and session management)
- AI providers: Claude, OpenAI, Groq, or any OpenAI-compatible endpoint (powers the agent reasoning)
- Scraping: Firecrawl (handles JavaScript rendering and returns clean, structured data)
- Execution: E2B or Vercel sandboxes (secure isolated environments for running code)
You can switch AI providers without rebuilding workflows. Firecrawl is built by the same team and handles web scraping reliably.
With a clear understanding of what Open Agent Builder offers and who can benefit from it, let's get it running on your local machine.
Setting Up Open Agent Builder Locally
Now that you've learned what Open Agent Builder can do and the technology behind it, let's walk through how to set it up on your local machine.
Prerequisites
You need Node.js 18 or higher installed—this is the JavaScript runtime that runs the application. You also need npm or pnpm (package managers that come with Node.js) and Git to clone the repository.
Clone the repository
git clone https://github.com/firecrawl/open-agent-builder.git
cd open-agent-builder

# Install dependencies
npm install
# or if you use pnpm
pnpm install
Get your API keys
Before configuring the application, you need accounts and API keys from these services:
Firecrawl (for web scraping):
- Sign up at firecrawl.dev
- Navigate to your dashboard and copy the API key
- See the Firecrawl quickstart guide for detailed steps
AI provider (choose one):
- Anthropic Claude: Sign up at anthropic.com and create an API key (works best with MCP tools)
- OpenAI: Sign up at openai.com and create an API key
- Groq: Sign up at groq.com and create an API key
Convex (real-time database):
- Create a free account at convex.dev
- We'll get the deployment URL in the next step
Clerk (authentication):
- Create a free account at clerk.com
- Create a new application
- Copy your API keys from the dashboard (you'll see both the secret key and publishable key)
- Go to Configure > JWT Templates > Create New Template
- Select "Convex" from the template options
- Copy the Issuer URL that appears (looks like
https://your-app.clerk.accounts.dev)
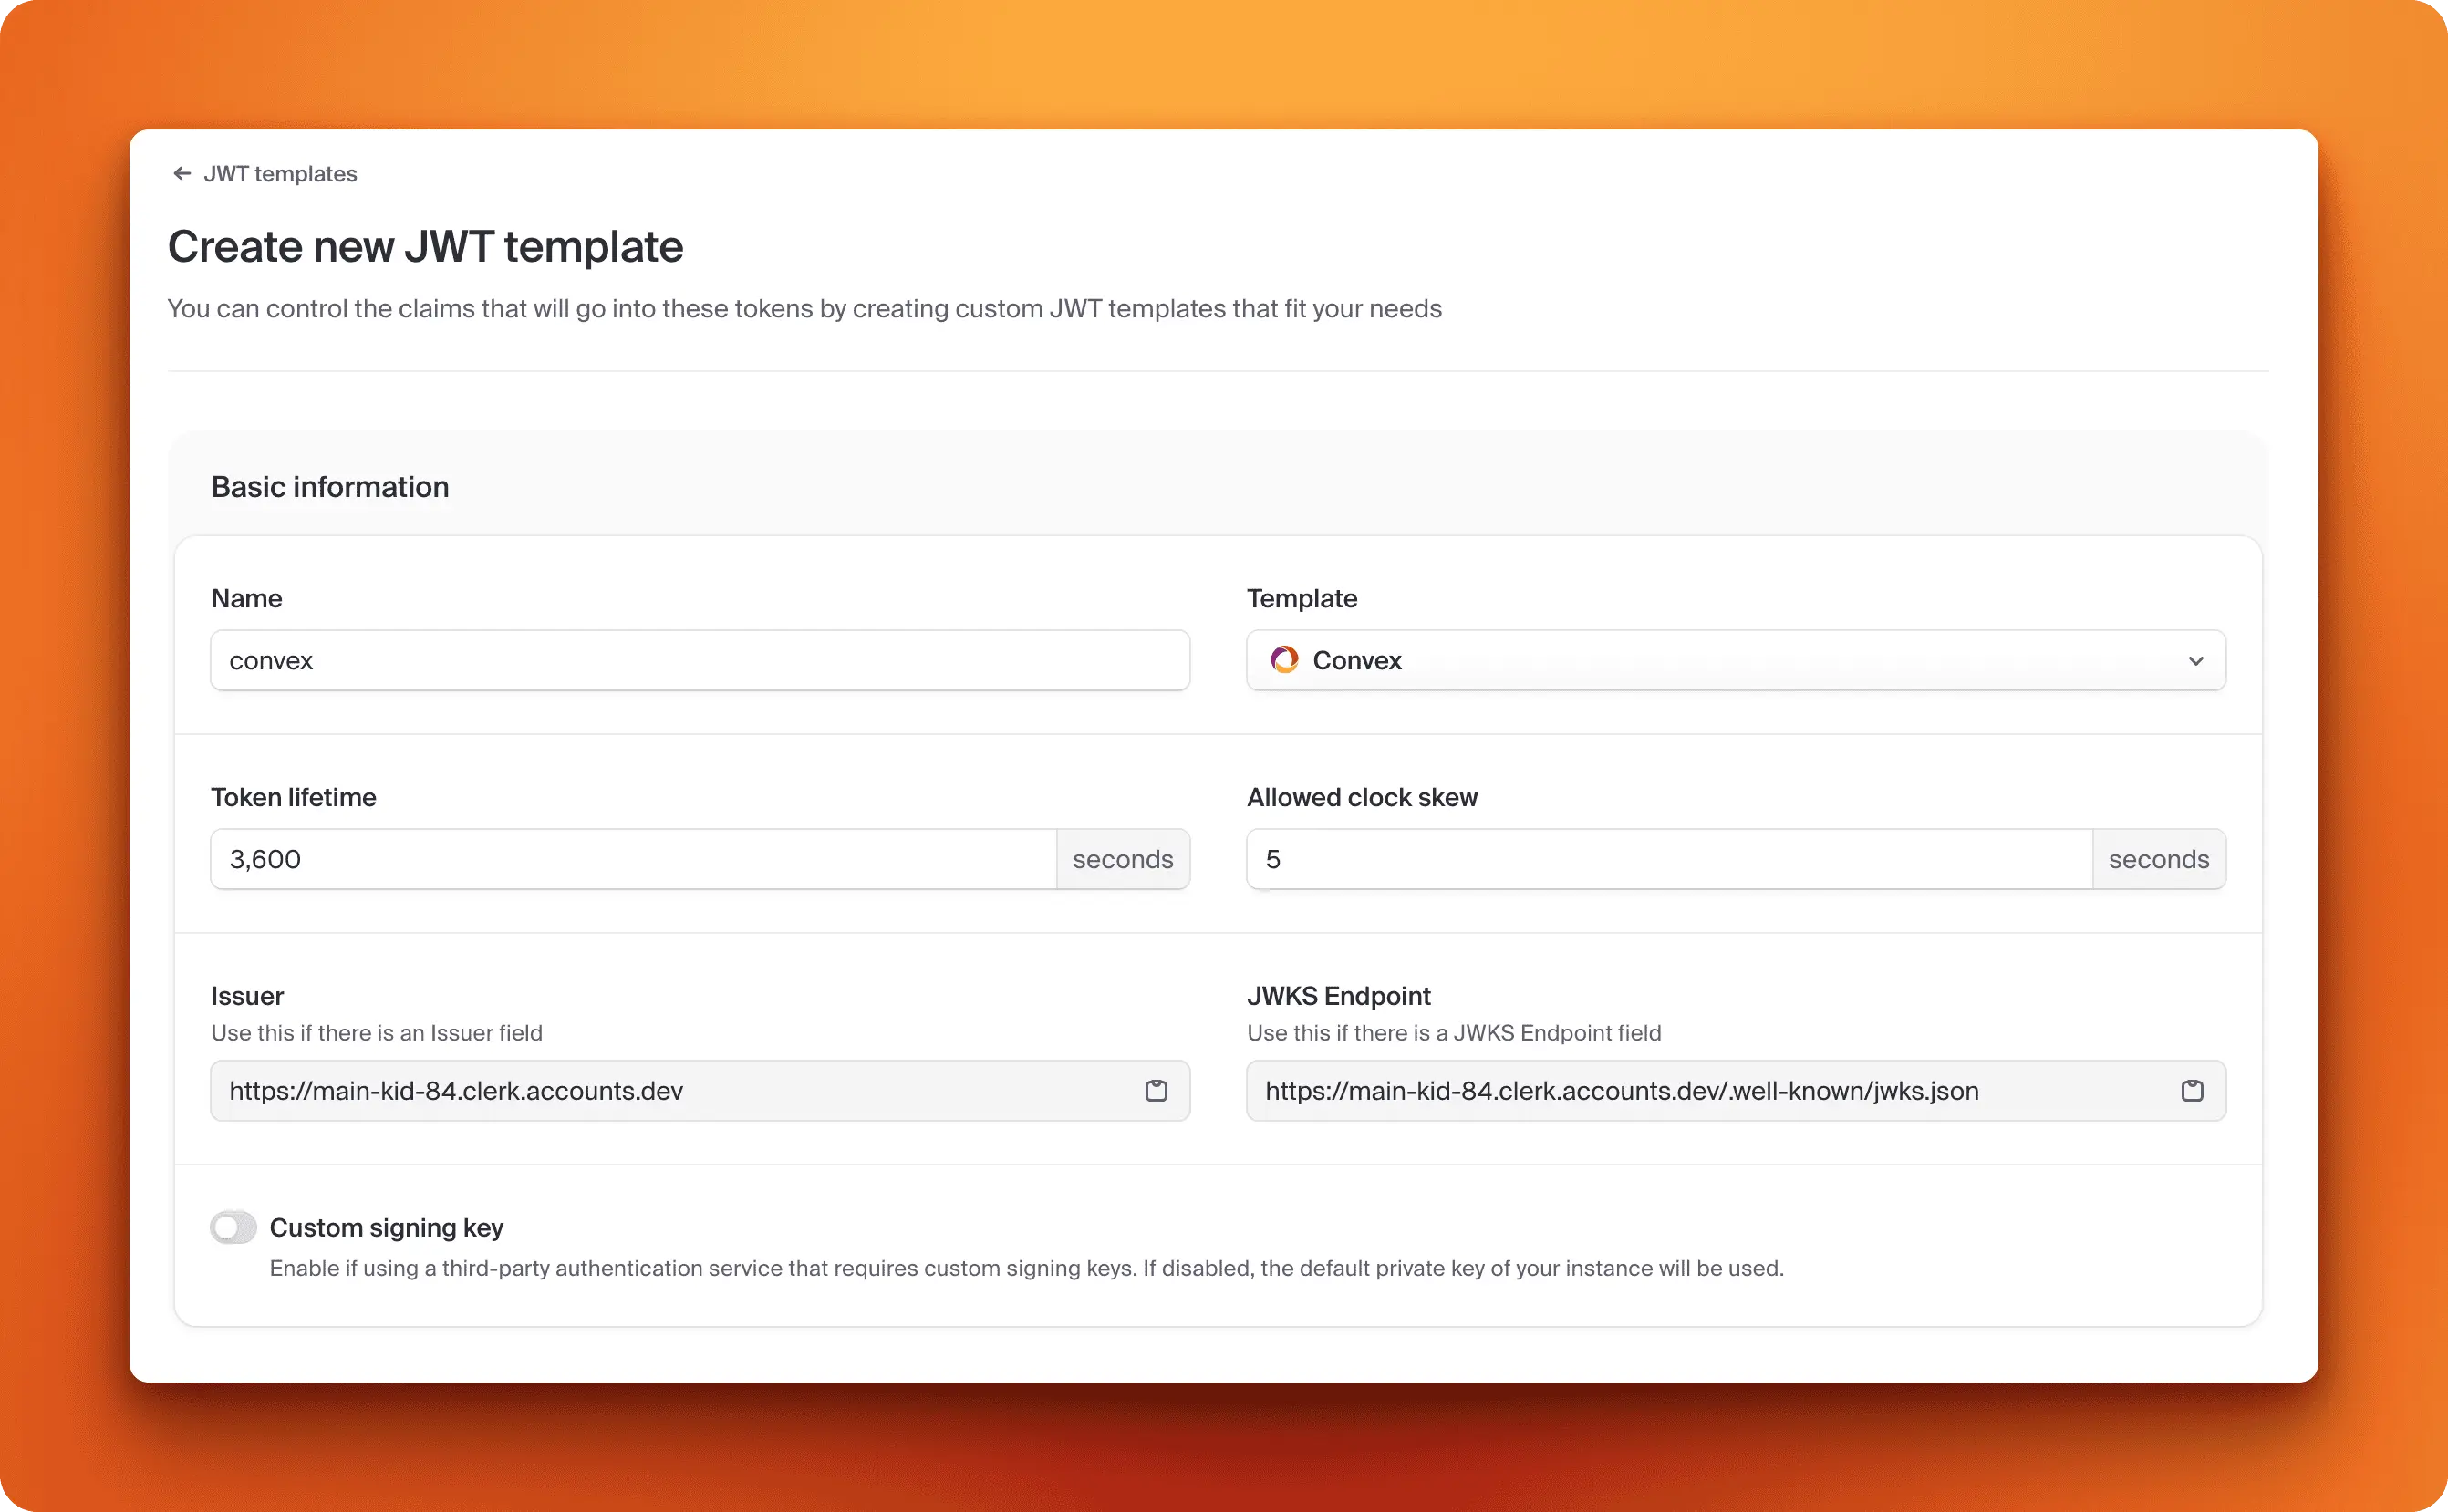 Copy the Issuer URL from your Convex JWT template configuration
Save these credentials - you'll need them in the configuration steps below.
E2B (optional, for code execution sandboxes):
- Sign up at e2b.dev if you need secure code execution
Set up Convex
Convex powers the real-time database. Open Agent Builder needs a database to store your workflows, execution history, and real-time updates as nodes run. Convex handles this automatically with live synchronization between the backend and your browser interface.
To start, install the Convex CLI and initialize your project:
# Install Convex CLI globally
npm install -g convex

# Initialize and start Convex development server
npx convex dev
The npx convex dev command automatically creates your .env.local file and adds the NEXT_PUBLIC_CONVEX_URL variable. It will prompt you to log in from the terminal. Follow the instructions to create a project and set your device name.
Keep the Convex dev server running in the background.
Configure environment variables
Open .env.local in your editor. The file should already have NEXT_PUBLIC_CONVEX_URL from the Convex setup. Add your API keys from the services above:
# Automatically added by npx convex dev
NEXT_PUBLIC_CONVEX_URL=https://your-deployment.convex.cloud

# Add these manually:
FIRECRAWL_API_KEY=your_firecrawl_key_here

# Pick one AI provider
ANTHROPIC_API_KEY=your_claude_key_here
# or use OPENAI_API_KEY if you picked OpenAI
# or use GROQ_API_KEY if you picked Groq

# Clerk authentication (from clerk.com dashboard)
CLERK_SECRET_KEY=your_clerk_secret_key
NEXT_PUBLIC_CLERK_PUBLISHABLE_KEY=your_clerk_publishable_key
CLERK_JWT_ISSUER_DOMAIN=https://your-app.clerk.accounts.dev  # Save this - you'll need it for the next step

# Optional: E2B sandbox for code execution
E2B_API_KEY=your_e2b_key_here
Save the file.
Configure Convex authentication
Convex needs to integrate with Clerk for authentication. Open convex/auth.config.ts and hardcode your Clerk issuer domain:
export default {
  providers: [
    {
      domain: "https://your-app.clerk.accounts.dev", // Replace with your actual Clerk issuer URL from .env.local
      applicationID: "convex",
    },
  ],
};
Important: The domain must be hardcoded: don't use process.env.CLERK_JWT_ISSUER_DOMAIN. Convex functions don't run in a Node.js environment, so process is undefined and will cause TypeScript errors.
After editing the file, restart your Convex dev server:
# Stop the server (Ctrl+C), then restart
npx convex dev
This ensures Convex picks up the authentication configuration changes.
Run the development server
You have two options:
Option 1: Run both servers with one command (recommended):
npm run dev:allOption 2: Run servers separately:
# Terminal 1: Convex (if not already running)
npx convex dev

# Terminal 2: Next.js development server
npm run dev
Open http://localhost:3000 in your browser. You should see the Open Agent Builder interface with a blank canvas.
Try your first workflow
Start with a template from the library to get familiar with the interface. The library includes pre-built categories like Web Scraping, Research Automation, and Price Monitoring.
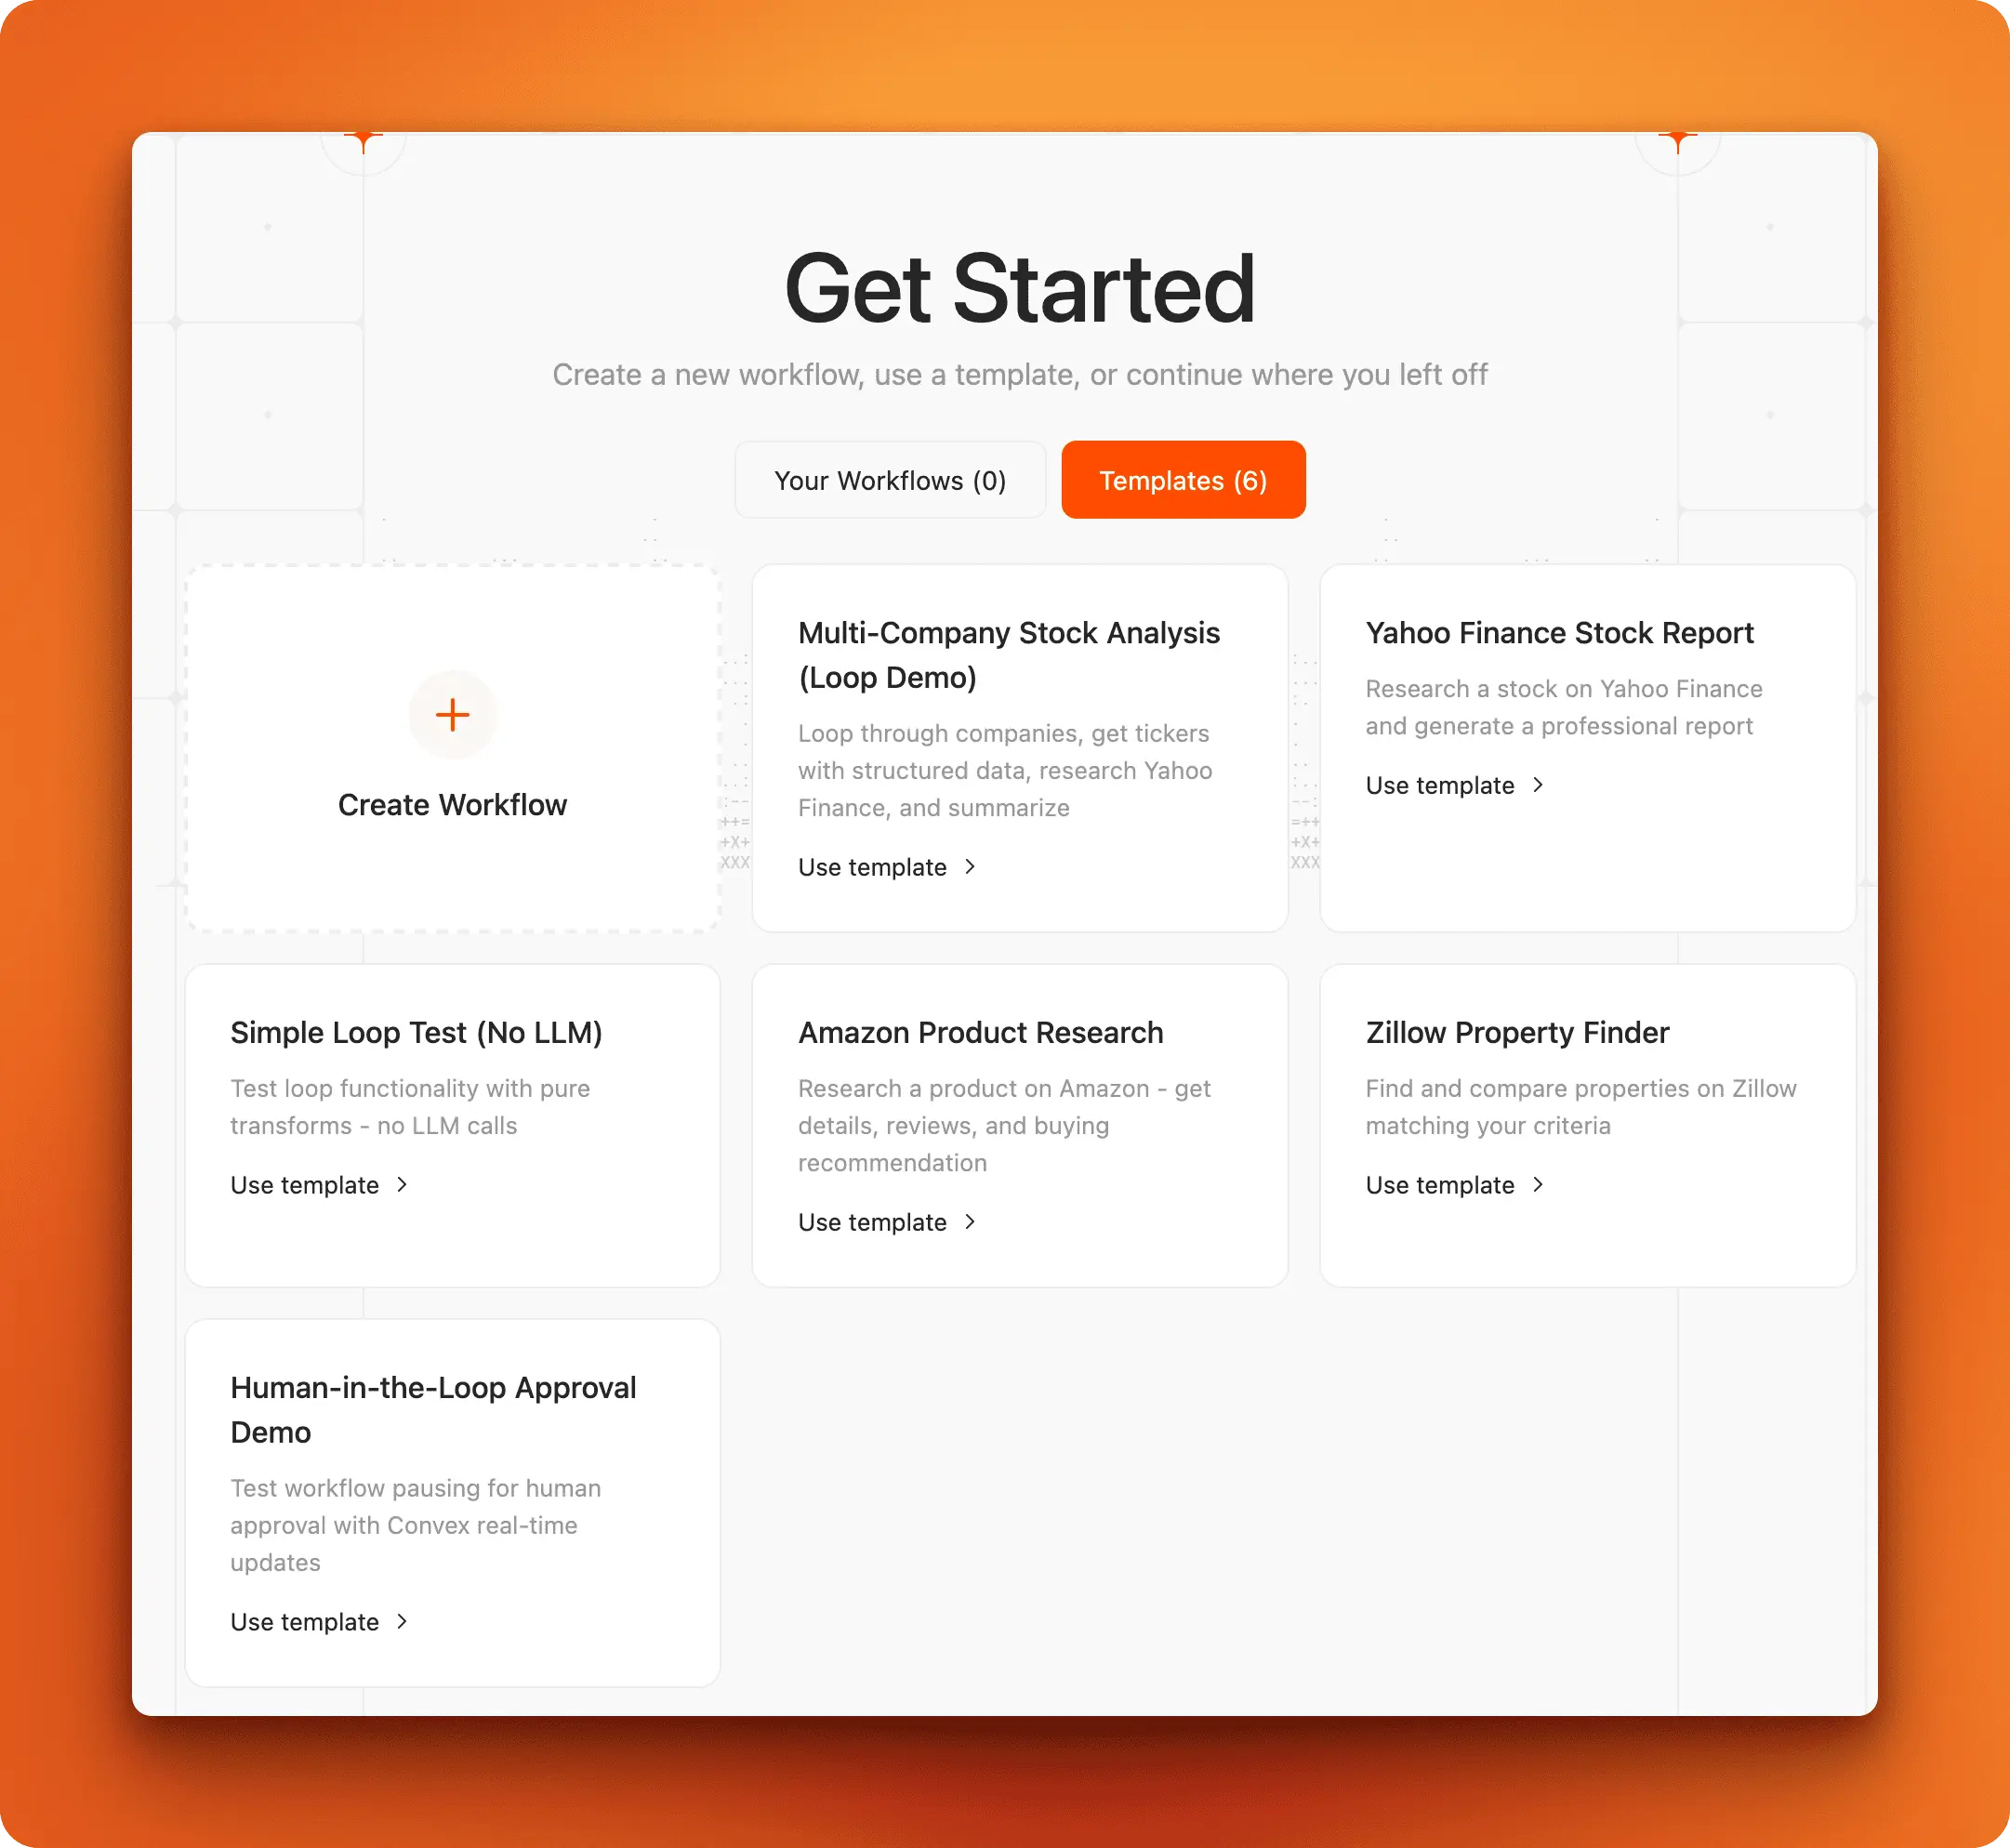 Available workflow templates to help you get started
Select one, look at how the nodes connect, and click run to watch it execute. You can customize any workflow by adding or removing nodes.
We'll explore the interface and node types in detail in the next section, where we'll walk through a complete workflow example to show you exactly how everything works together.
Troubleshooting common issues
Authentication error: "No auth provider found matching the given token"
This happens when your Clerk JWT issuer doesn't match the domain in convex/auth.config.ts.
Fix:
- Verify
convex/auth.config.tsdomain exactly matches yourCLERK_JWT_ISSUER_DOMAINfrom.env.local - Clear browser cache: DevTools → Application → Storage → Clear "Local Storage" and "Cookies" for localhost:3000
- Hard refresh (Cmd+Shift+R or Ctrl+Shift+R)
- Restart Convex dev server if you changed
auth.config.ts
TypeScript error: "Cannot find name 'process'"
convex/auth.config.ts:13:15 - error TS2591: Cannot find name 'process'Fix: You're using process.env.CLERK_JWT_ISSUER_DOMAIN in your auth config. Replace it with the hardcoded domain value:
// ❌ Wrong - causes error
domain: process.env.CLERK_JWT_ISSUER_DOMAIN!,

// ✅ Correct - use actual domain
domain: "https://your-app.clerk.accounts.dev",
With Open Agent Builder running successfully on your machine, you're ready to explore how workflows are built and executed through the visual interface.
Exploring the Open Agent Builder UI
With Open Agent Builder running locally, you can explore how workflows are built and executed. The best way to understand the interface is through an actual example, so we'll walk through the Zillow Property Finder template. This workflow searches for properties in a specific location, analyzes each one, and generates a comparison report—a real-world automation that demonstrates all the key UI concepts.
The workflow canvas
Opening any workflow displays a visual canvas where nodes connect to form your automation pipeline. Each node represents a step, and the lines between them show how data flows:
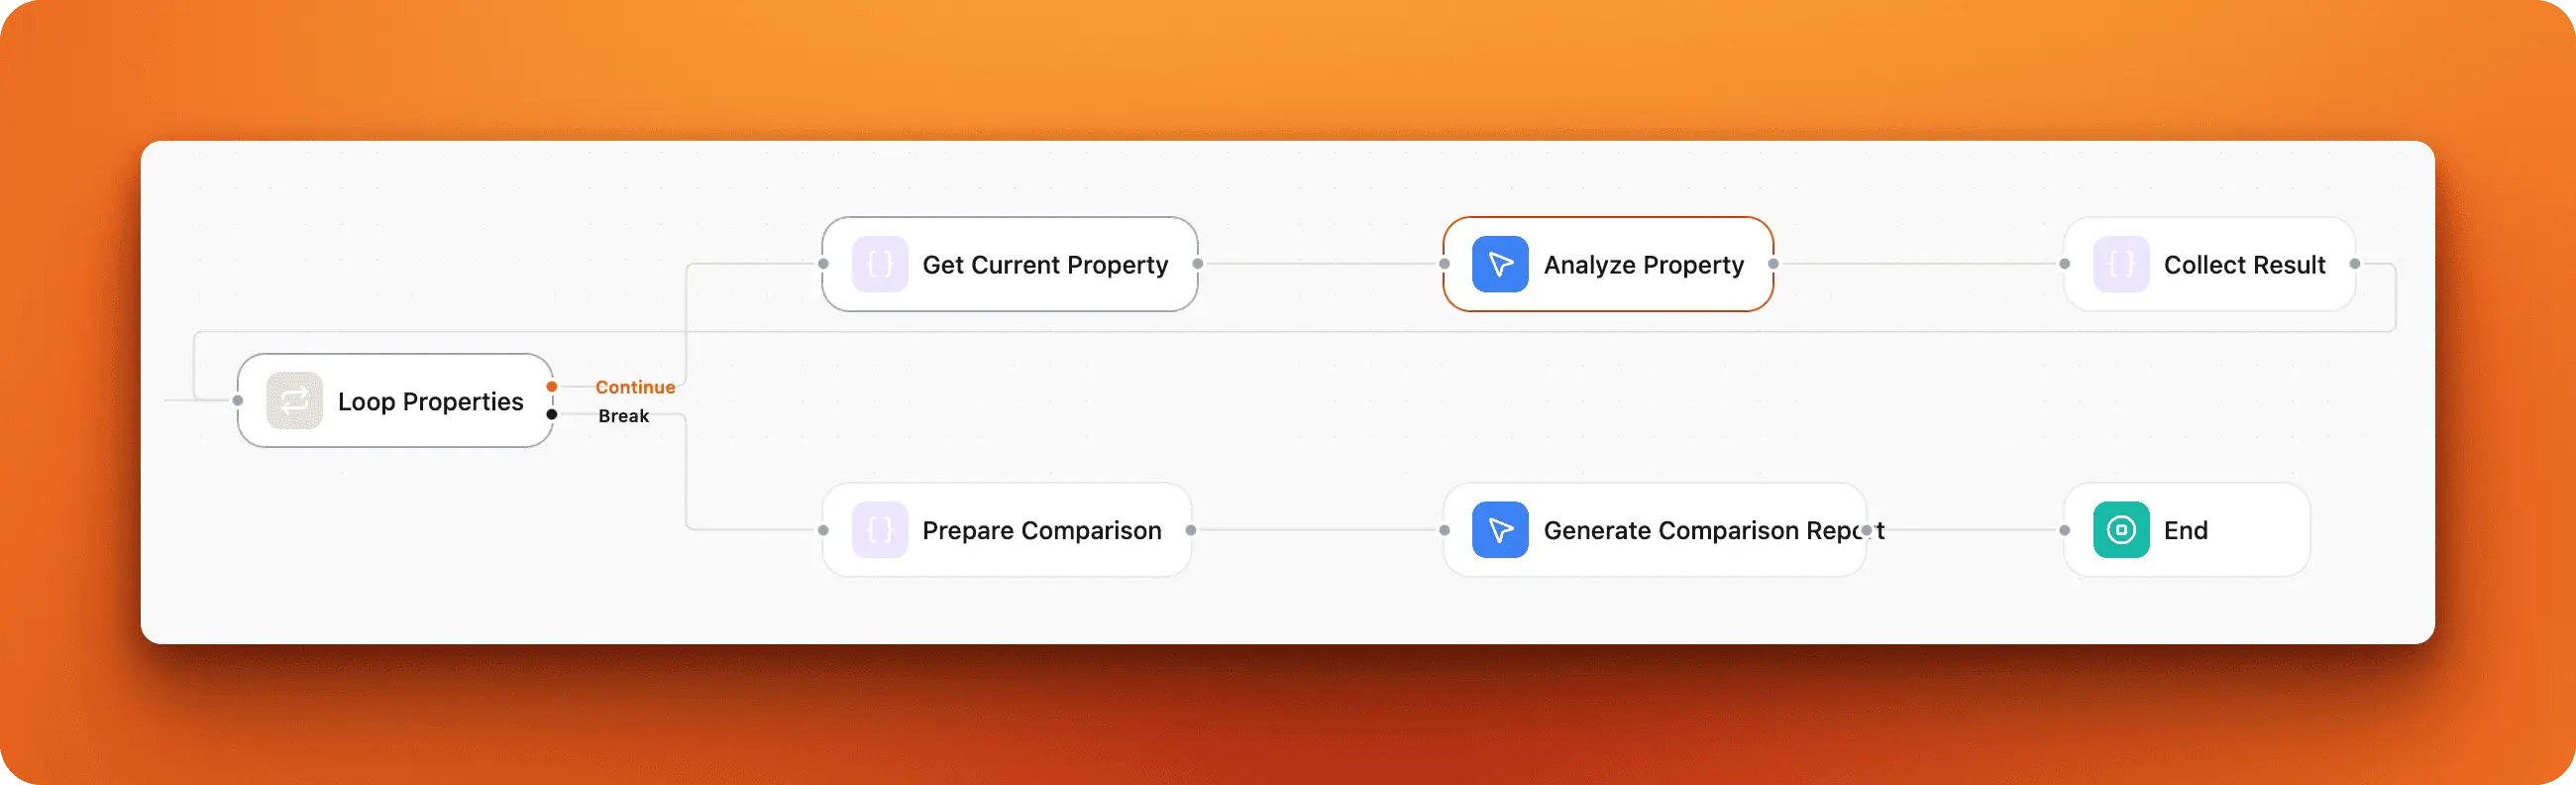 The complete Zillow workflow showing how nodes connect from start to finish
The workflow flows left to right, with data passing from one node to the next through the connections. Notice how the Loop Properties node has two outgoing paths—Continue and Break—which control whether the loop keeps running or stops. This branching structure is how workflows handle conditional logic.
Running a workflow
Before running the workflow, ensure your API keys are set up in the workflow settings page:
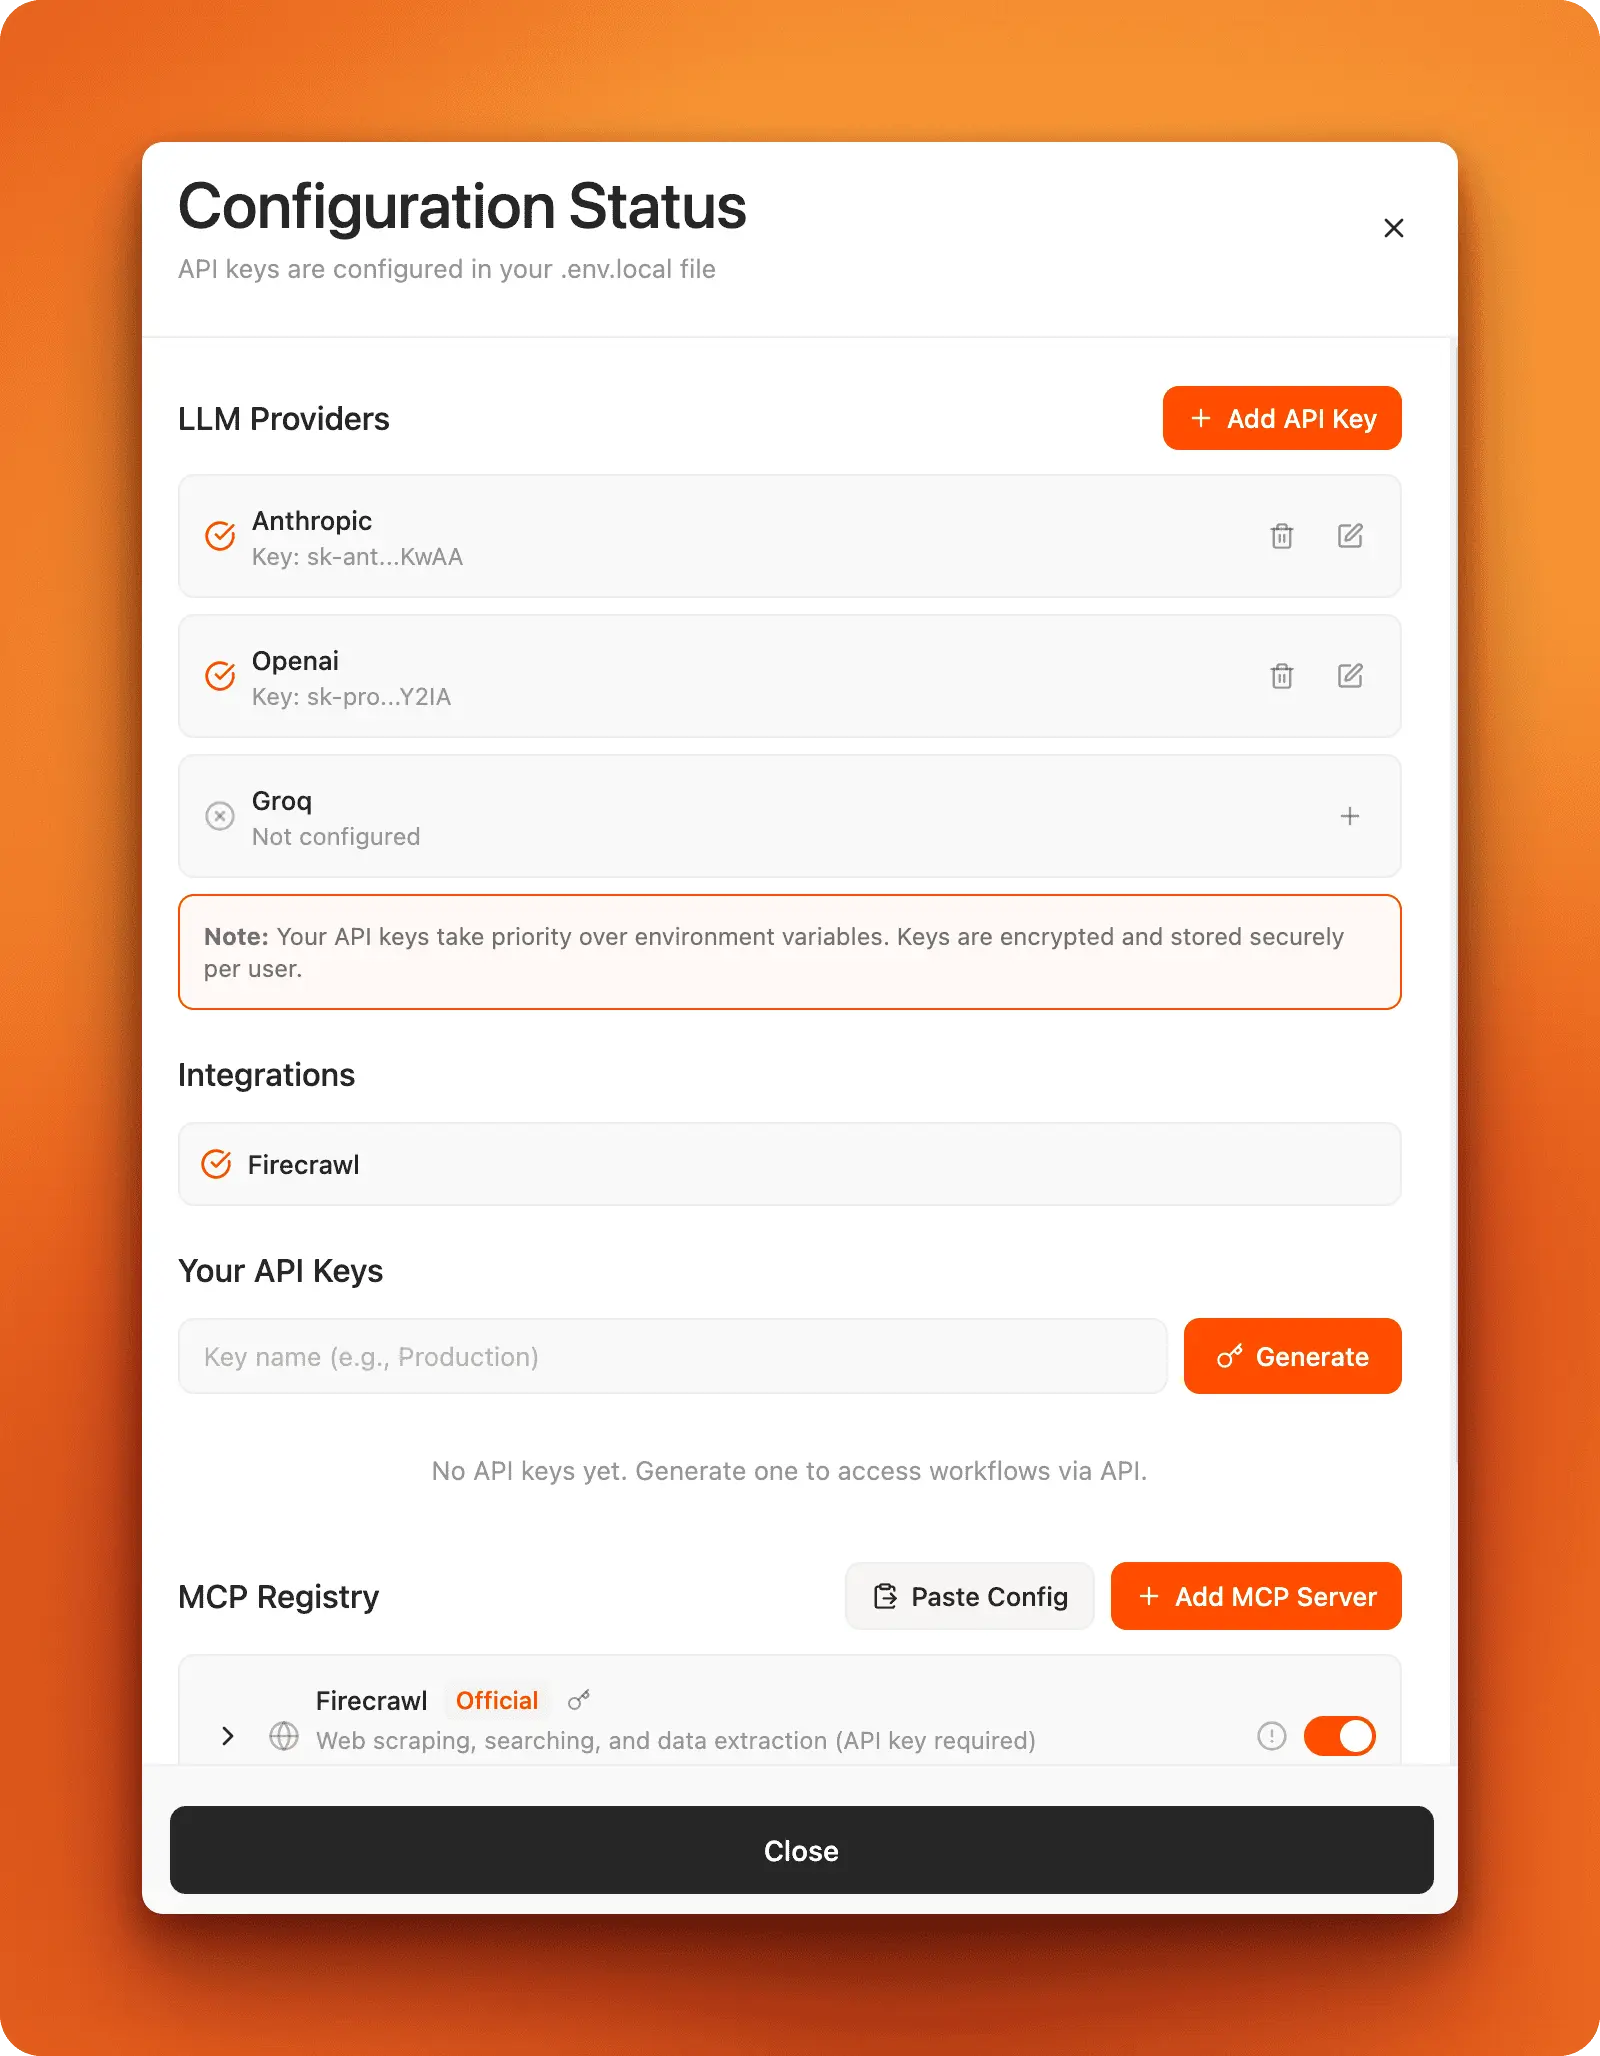 Check that your LLM providers and Firecrawl integration are properly configured
Now, click the play button. A preview panel opens on the right side, displaying each node's output in real-time:
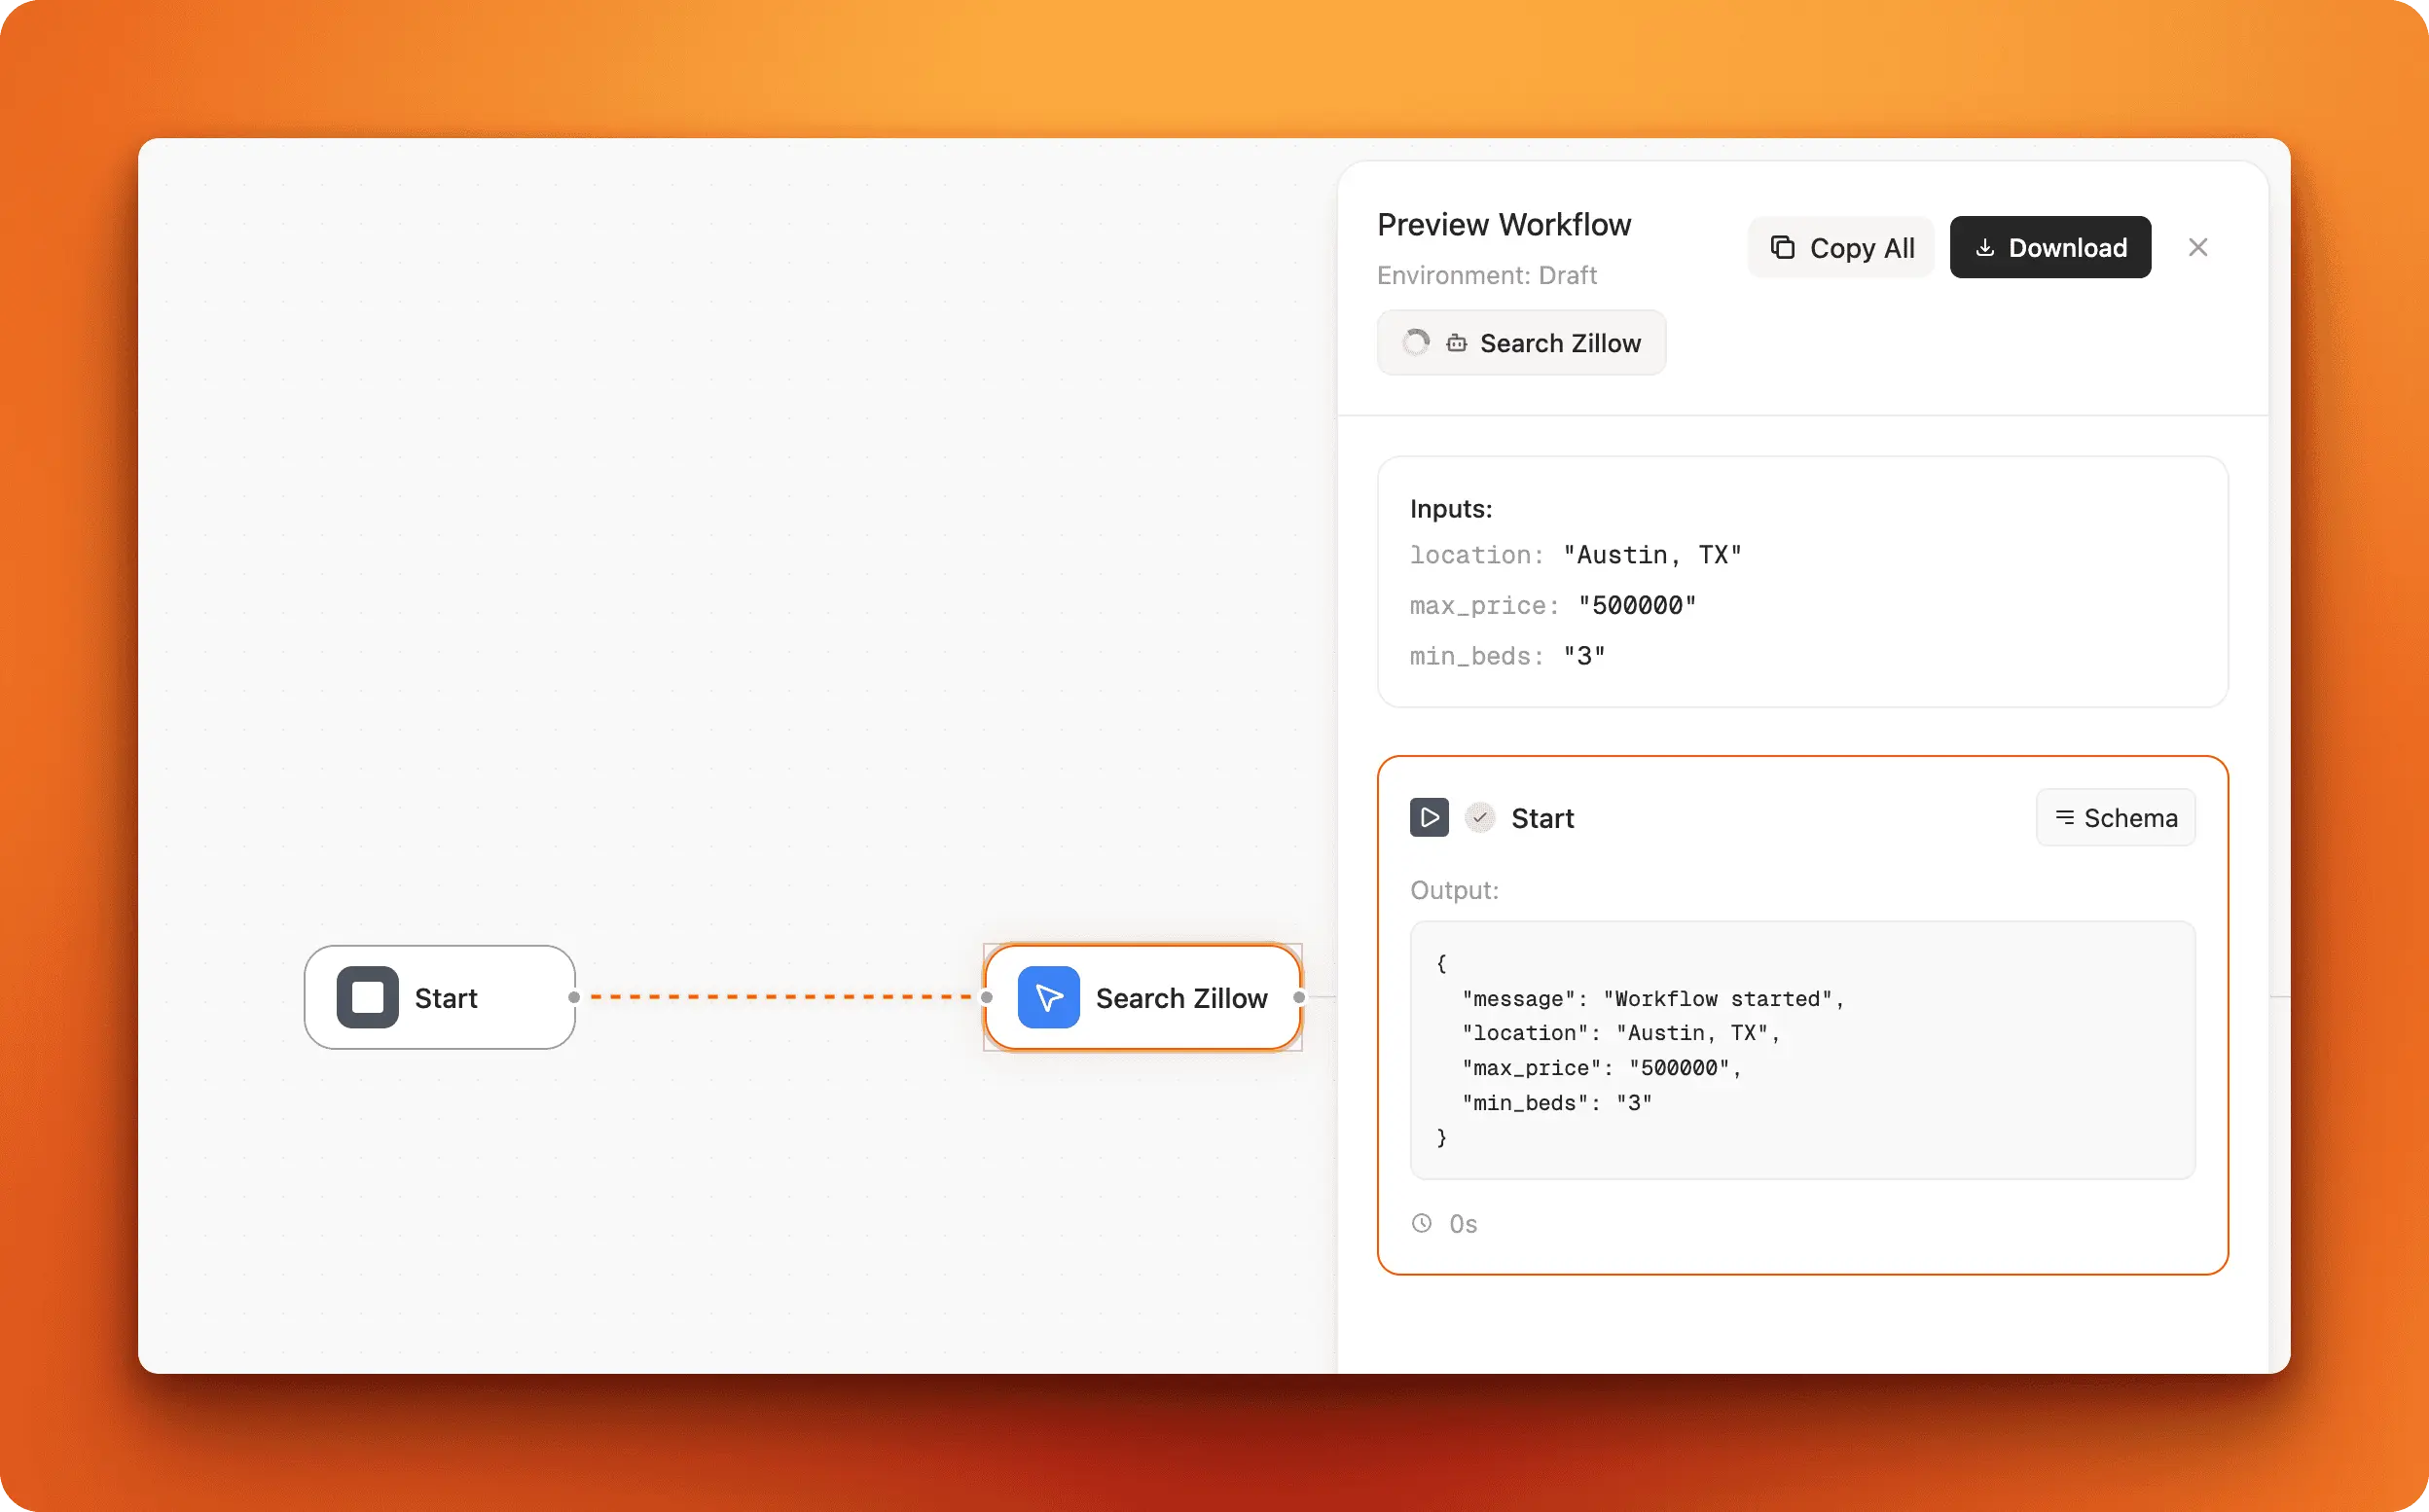 The Search Zillow agent running with input parameters: location, max_price, and min_beds
The preview shows the Start node's output first, which includes your workflow inputs (Austin, TX location, $500,000 max price, 3 minimum bedrooms). These variables get passed to the next node in the chain, where they're used to customize the search parameters.
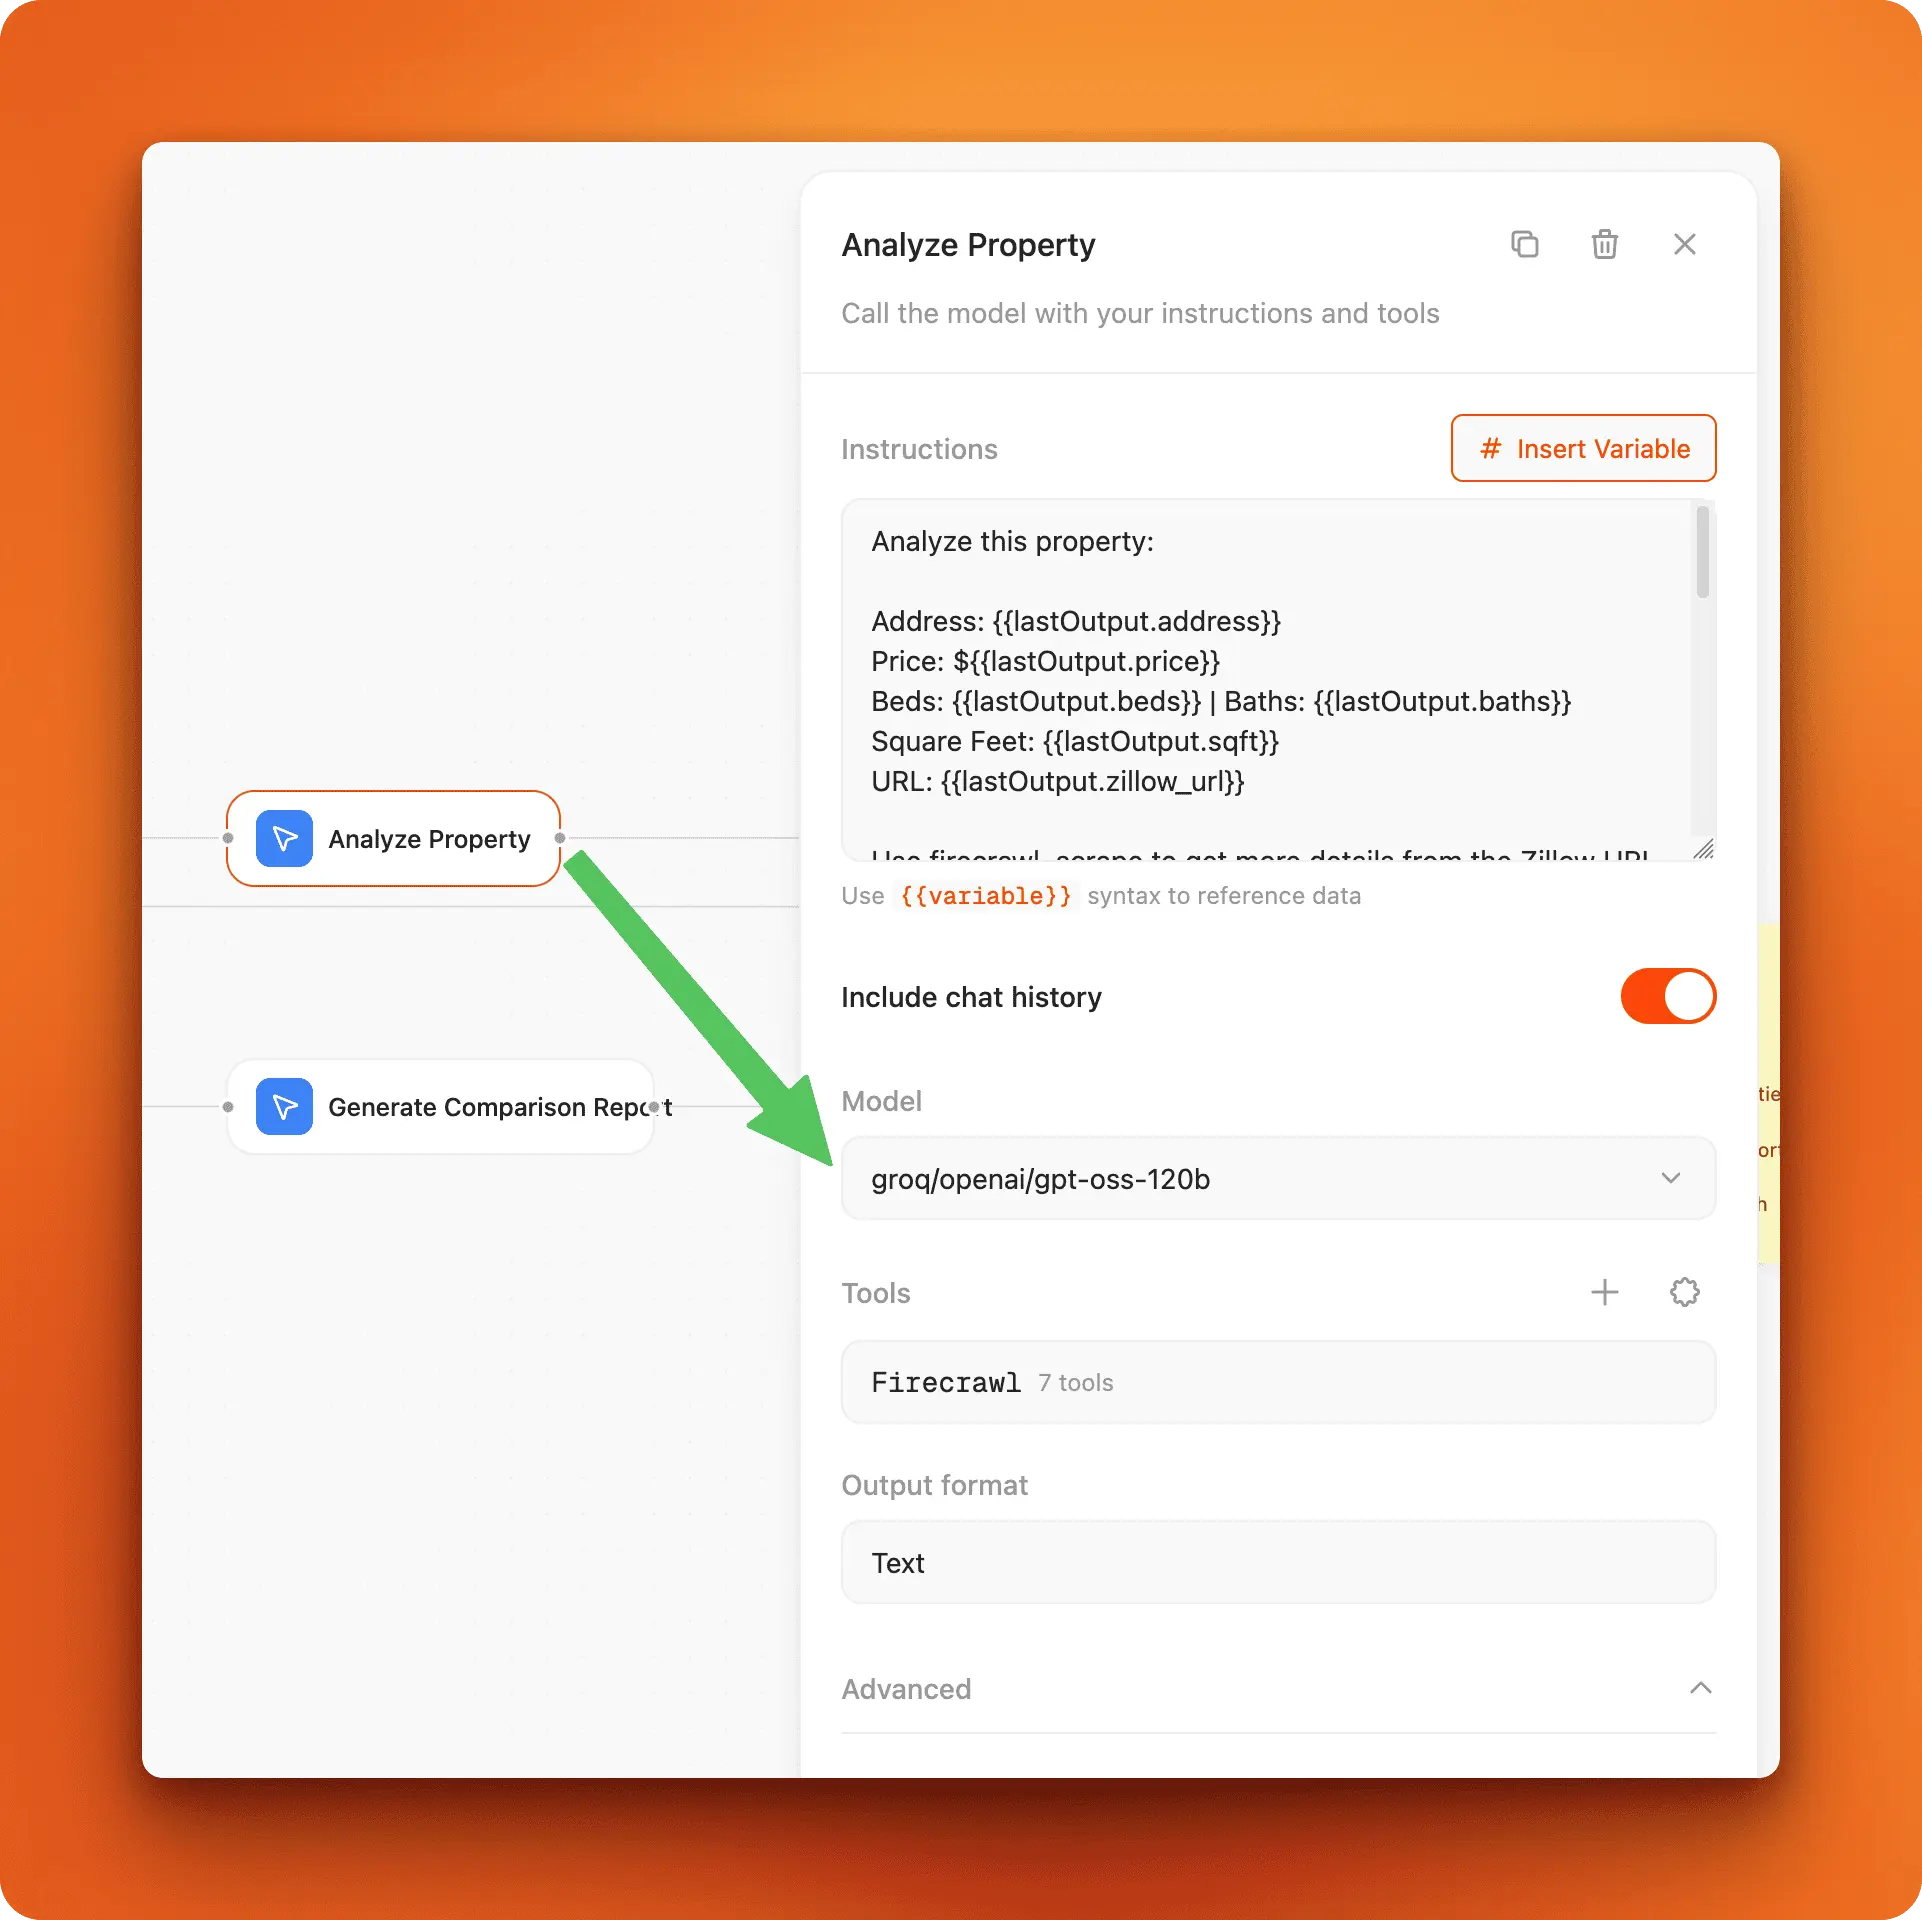
Configuring Agent nodes
Agent nodes are where your AI reasoning happens. Click any Agent node to open its configuration panel and see what instructions it follows. The Analyze Property node shows a typical setup:
 Agent node showing instructions, model selection, and available tools
The configuration has several parts:
Instructions: Tell the AI what to do. You can insert variables from previous nodes using the {{variable}} syntax. In this example, {{lastOutput.address}} pulls the property address from the previous node's output.
Model: Choose your AI provider from the dropdown. You'll see available models like GPT-5, Claude, or Groq. Switching models doesn't require changing your workflow—just select a different option.
Tools: The agent can use external tools when needed. Firecrawl shows 7 available tools for web scraping and data extraction. The agent automatically calls these tools when its instructions require them.
Output format: Control how the agent returns data (text, JSON, etc.).
Control flow with loops
Loops let you repeat actions across multiple items. The Loop Properties node iterates through each property found by the search. Click it to see how loop conditions work:
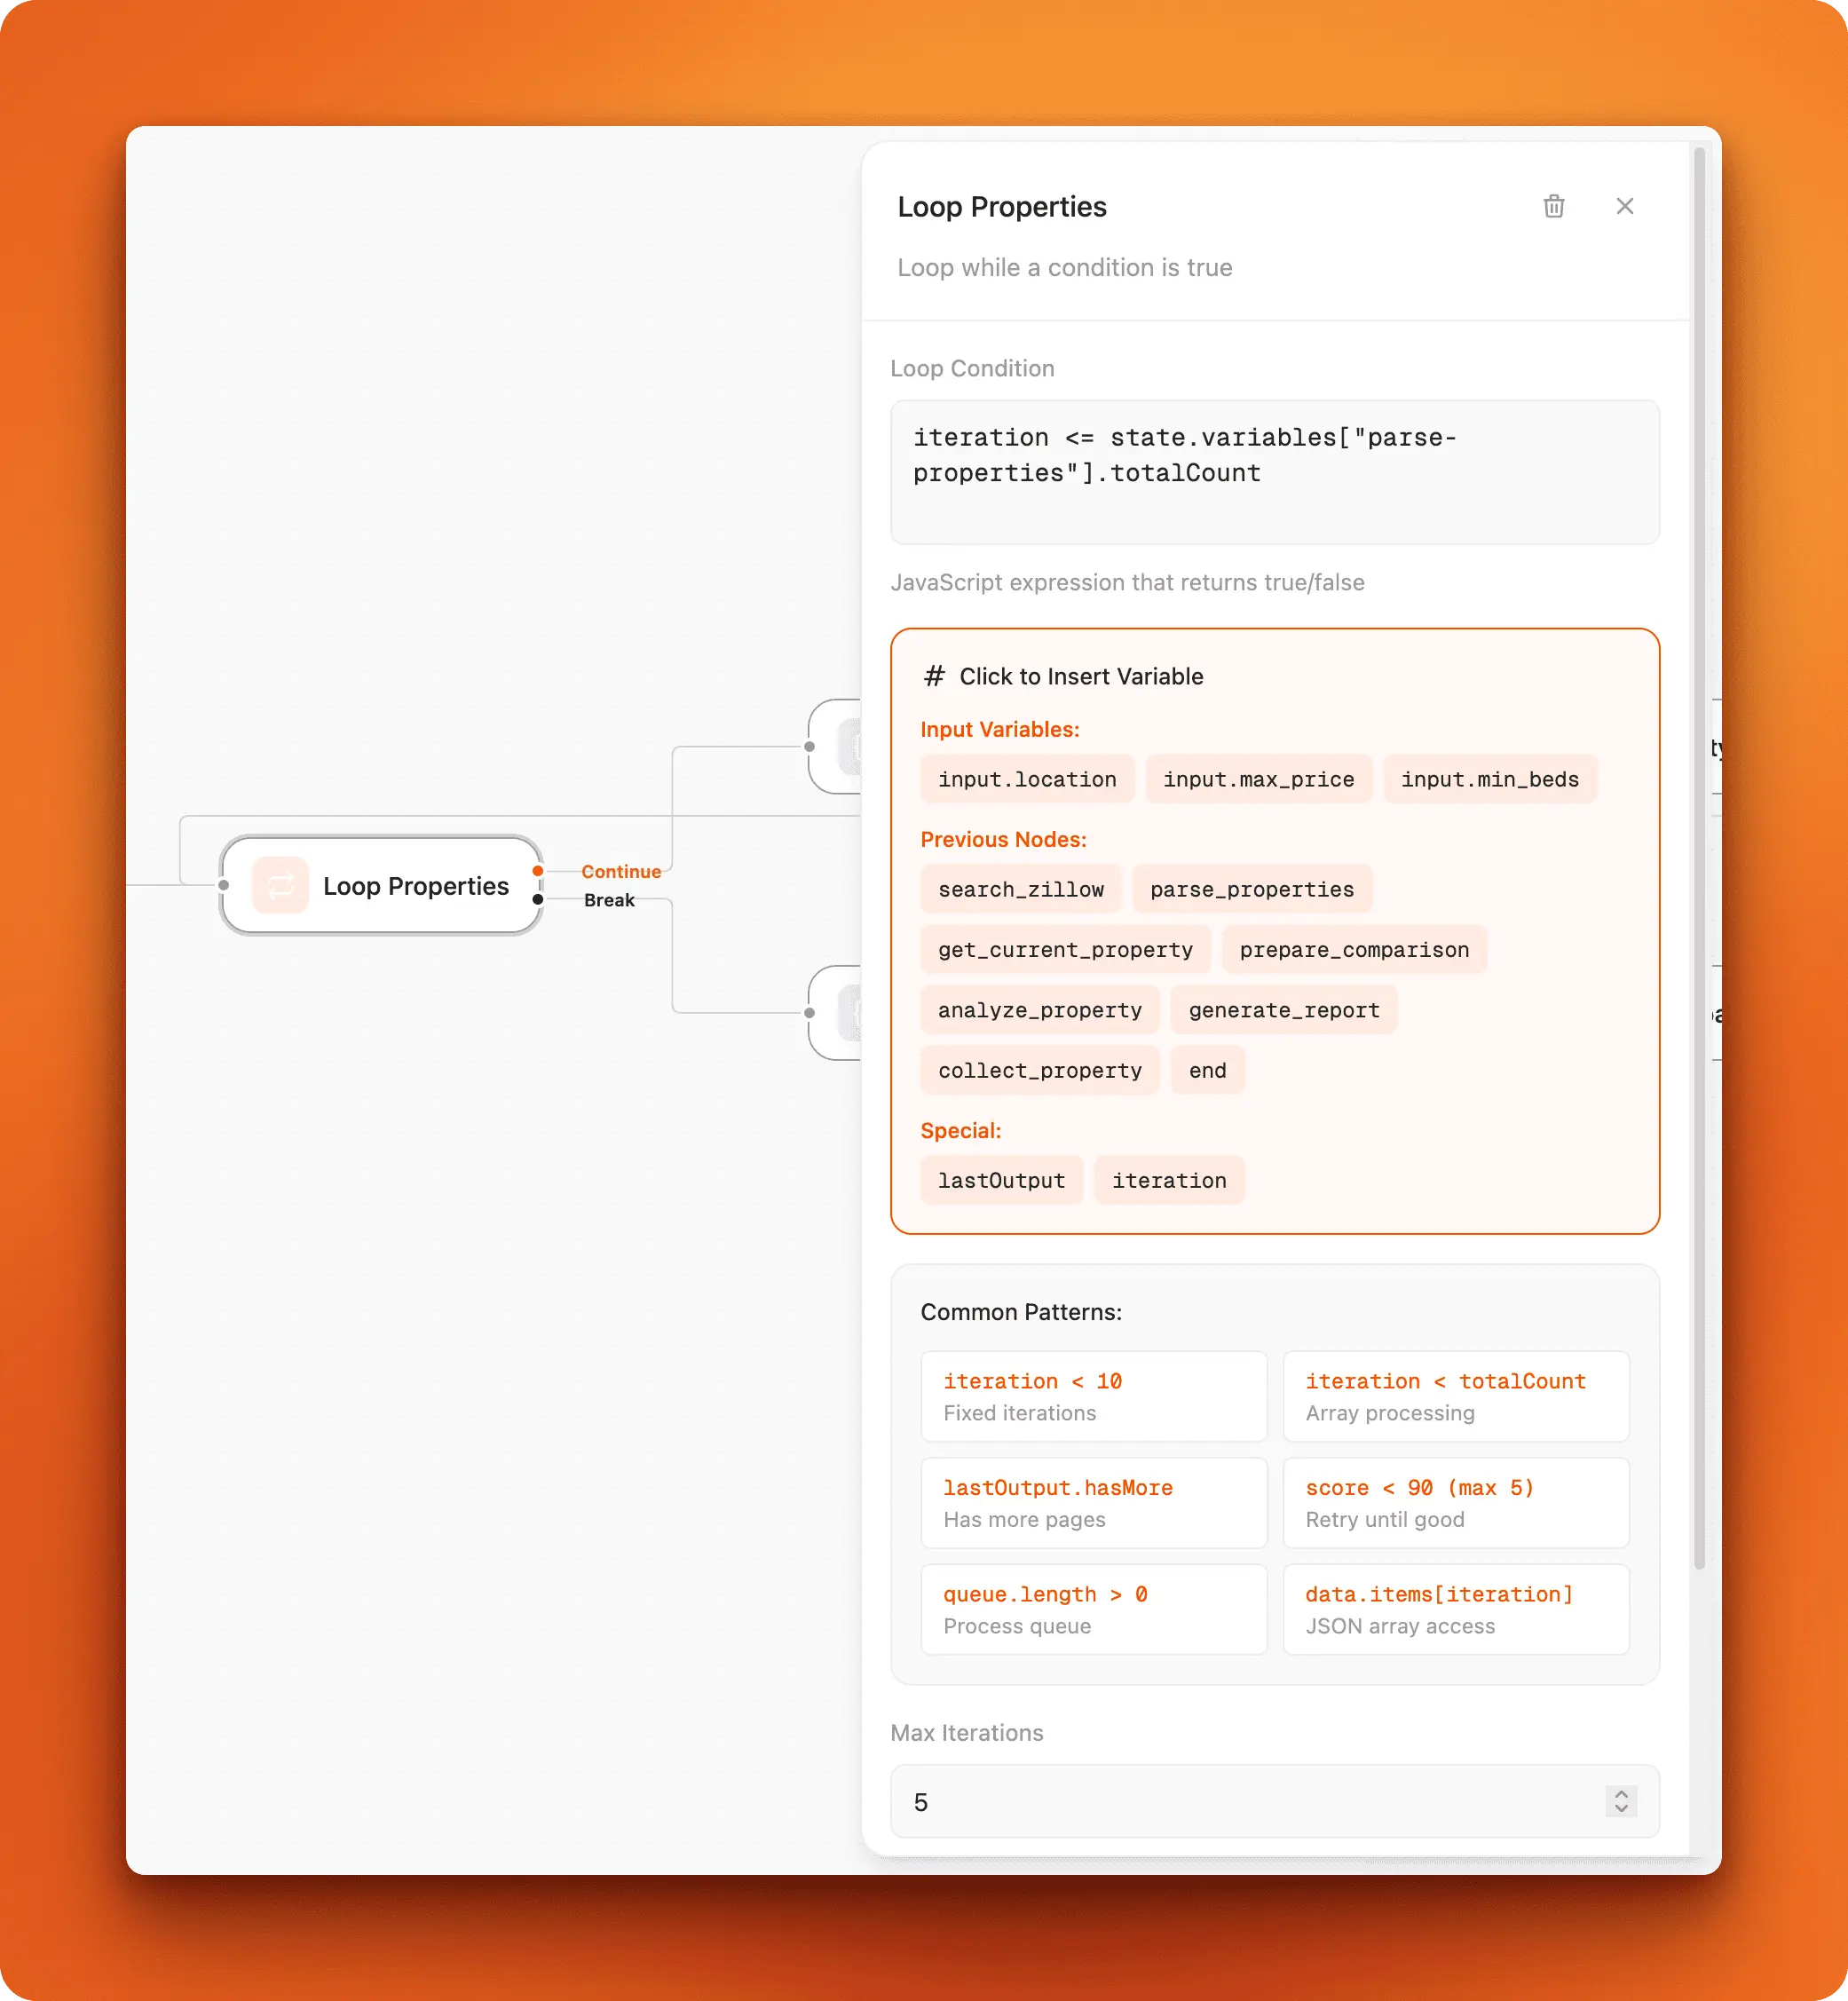 Loop condition using JavaScript to check iteration count against total properties
The loop condition is a JavaScript expression: iteration <= state.variables["parse-properties"].totalCount. This compares the current iteration number to the total number of properties found.
The orange helper box shows available variables you can reference:
- Input Variables: The workflow's starting inputs (location, max_price, min_beds)
- Previous Nodes: Output from each node that ran before this one
- Special: Built-in variables like
lastOutputanditeration
Common patterns are listed at the bottom, and you can click any pattern to insert it into your condition.
Viewing results
When all nodes finish executing, the End node displays your final output:
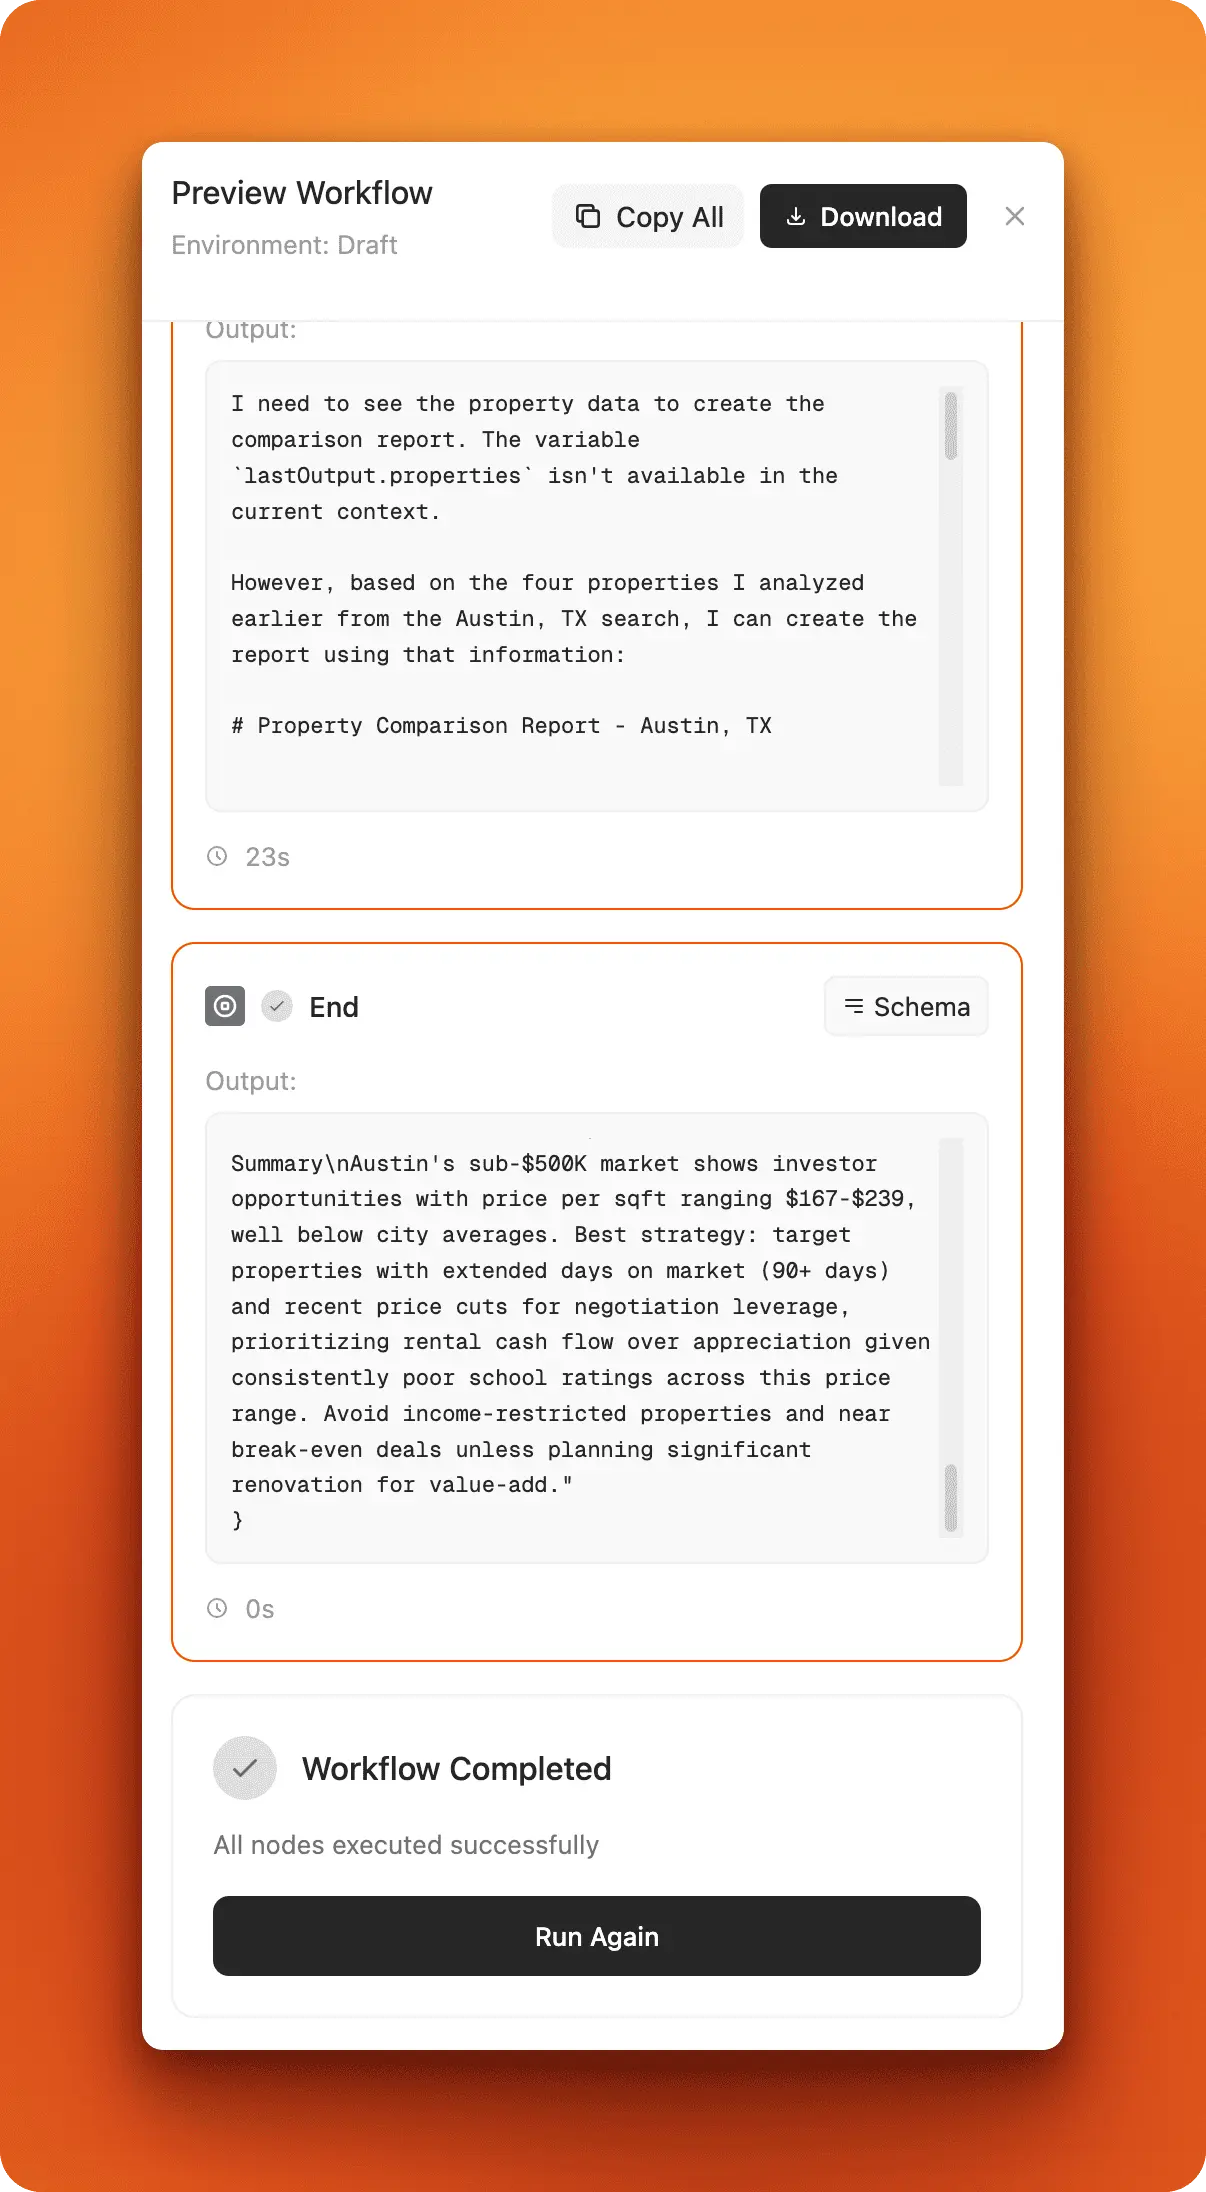 The End node displaying a completed property comparison report for Austin, TX
This workflow took 23 seconds to run and produced a detailed analysis comparing properties in the Austin market, complete with specific recommendations about pricing strategy and investment opportunities.
Building your own workflows
Open the Zillow Property Finder template from your templates gallery and experiment with it. Change the location to your city, adjust the price range, and run it to see how each node executes. Try modifying the instructions in the Agent nodes and watch how the output changes.
Once you're comfortable with how templates work, use the Create Workflow button to build your own automation from scratch. Most workflows follow this basic structure: Start → Fetch data → Process with AI → Apply logic → Output results. The templates give you a foundation to understand these patterns before you design custom solutions.
Now that you understand how to build and run workflows locally, the next step is making your instance accessible from anywhere by deploying it to production.
Deploying Open Agent Builder to Vercel
You've explored the interface and tested workflows locally. The next step is getting Open Agent Builder online so you can access it from anywhere and share it with your team. Vercel is the deployment platform built by the creators of Next.js, making it the natural choice for this Next.js application.
Vercel benefits
Vercel is designed for Next.js applications like Open Agent Builder. You get a free tier for personal projects, automatic deployments whenever you push code to GitHub, and a global CDN that makes your app fast anywhere in the world. The platform auto-detects Next.js configuration, so you don't need to configure build settings manually.
Prerequisites
Before you start the deployment process, gather these requirements:
- A GitHub account (free at github.com)
- A Vercel account (free at vercel.com)
- Your local Open Agent Builder setup working from the previous section
- Git installed on your machine
Preparing Your Repository
Vercel deploys directly from GitHub, so you'll need to push your configured setup to your own repository. Since you cloned the original Open Agent Builder repository, Git is already initialized, but the remote origin points to the Firecrawl repository. You need to change it to point to your own repository.
First, go to github.com and create a new repository. When GitHub asks if you want to initialize it with a README, skip that option since you already have code.
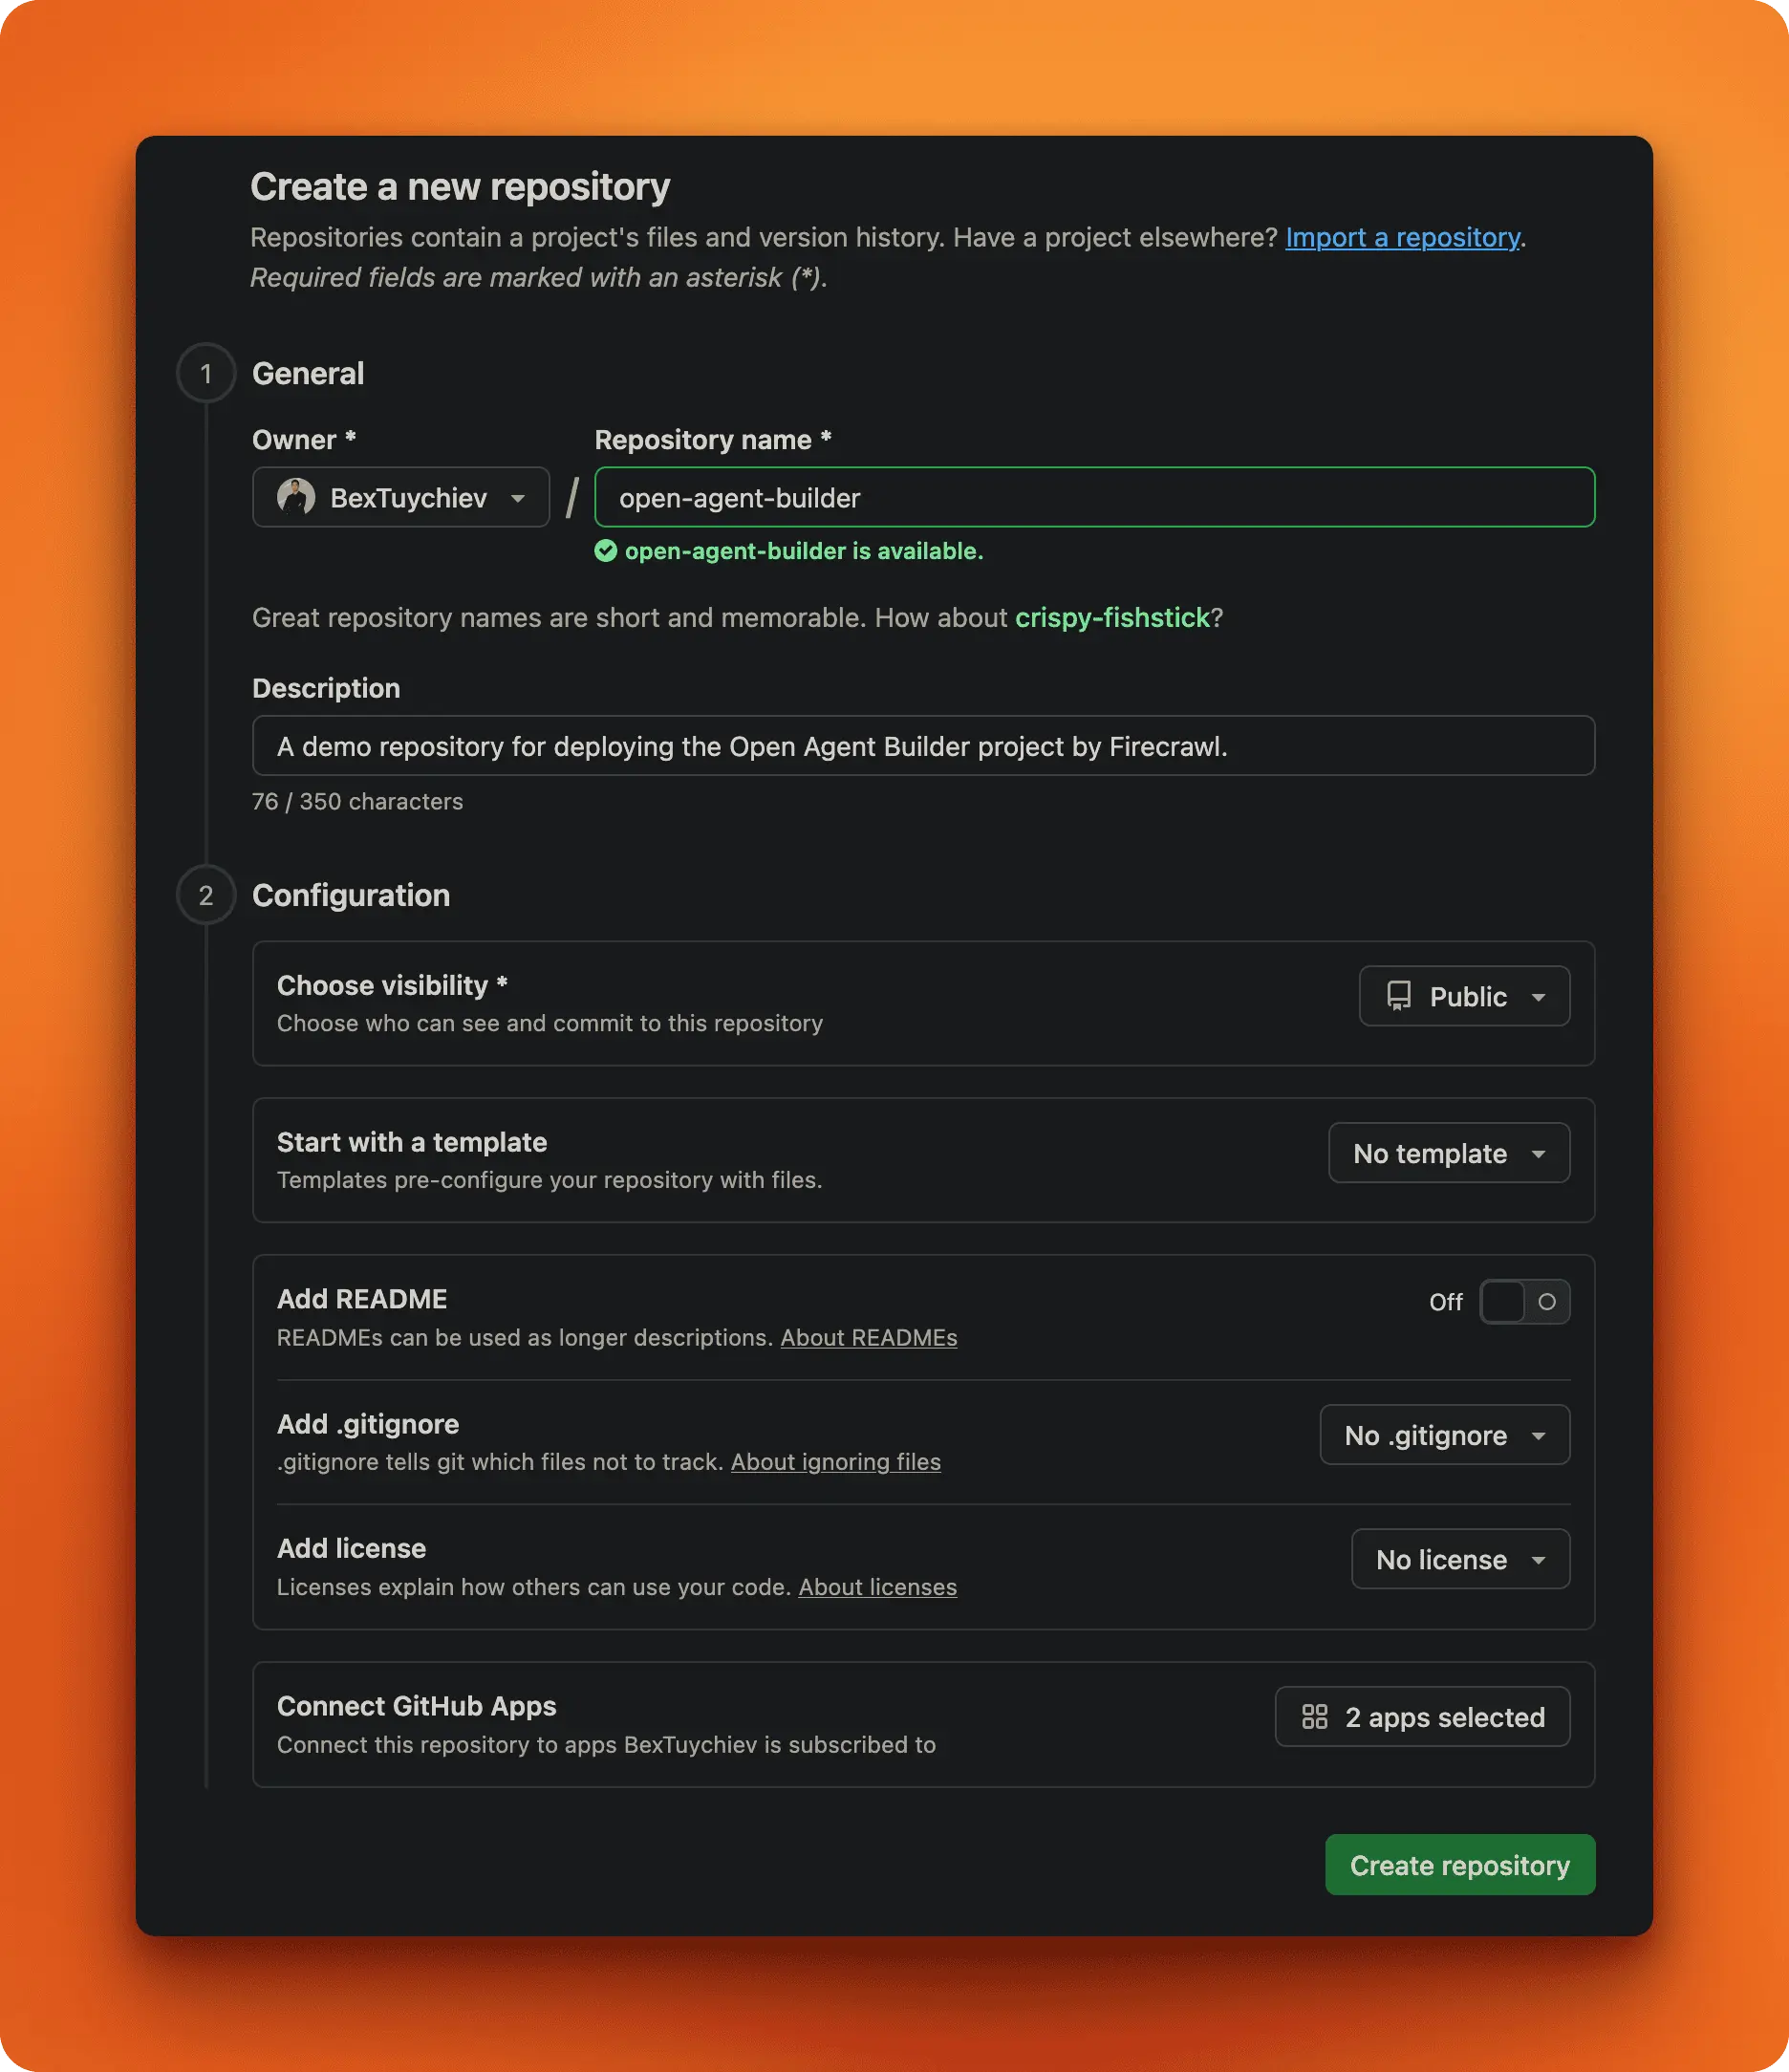 Create a new repository without initializing it with README or .gitignore
Copy the repository URL from the page, then update your local repository to point to your new GitHub repository:
# Change the remote to your repository
git remote set-url origin https://github.com/yourusername/your-repo-name.git

# Commit your local configuration changes
git add .
git commit -m "Configure for personal deployment"

# Push to your repository
git push -u origin main
Your code is now in your GitHub repository and ready for deployment. The .gitignore file from the original project already excludes .env.local, so your API keys stay safe. Just verify that .env.local isn't showing up in your Git status before committing.
Connecting Vercel to GitHub
Sign in to vercel.com using your GitHub account. This connection lets Vercel access your repositories. Once you're in the dashboard, click "Add New Project."
Vercel shows a list of your GitHub repositories. Find the Open Agent Builder repository you just pushed and click "Import."
 Import your GitHub repository from the Vercel dashboard
The platform detects that this is a Next.js project automatically and fills in the build settings for you. The default configuration works for most cases, so leave those settings as-is unless you have specific requirements.
What you do need to configure are the environment variables. Click "Environment Variables" and add each key from your .env.local file:
NEXT_PUBLIC_CONVEX_URL(your Convex deployment URL)FIRECRAWL_API_KEY(from firecrawl.dev)ANTHROPIC_API_KEYorOPENAI_API_KEYorGROQ_API_KEY(whichever AI provider you chose)CLERK_SECRET_KEY(from clerk.com)NEXT_PUBLIC_CLERK_PUBLISHABLE_KEY(from clerk.com)CLERK_JWT_ISSUER_DOMAIN(your Clerk Frontend API URL from the dashboard, looks likehttps://your-app.clerk.accounts.dev)E2B_API_KEY(if you're using E2B for code execution)
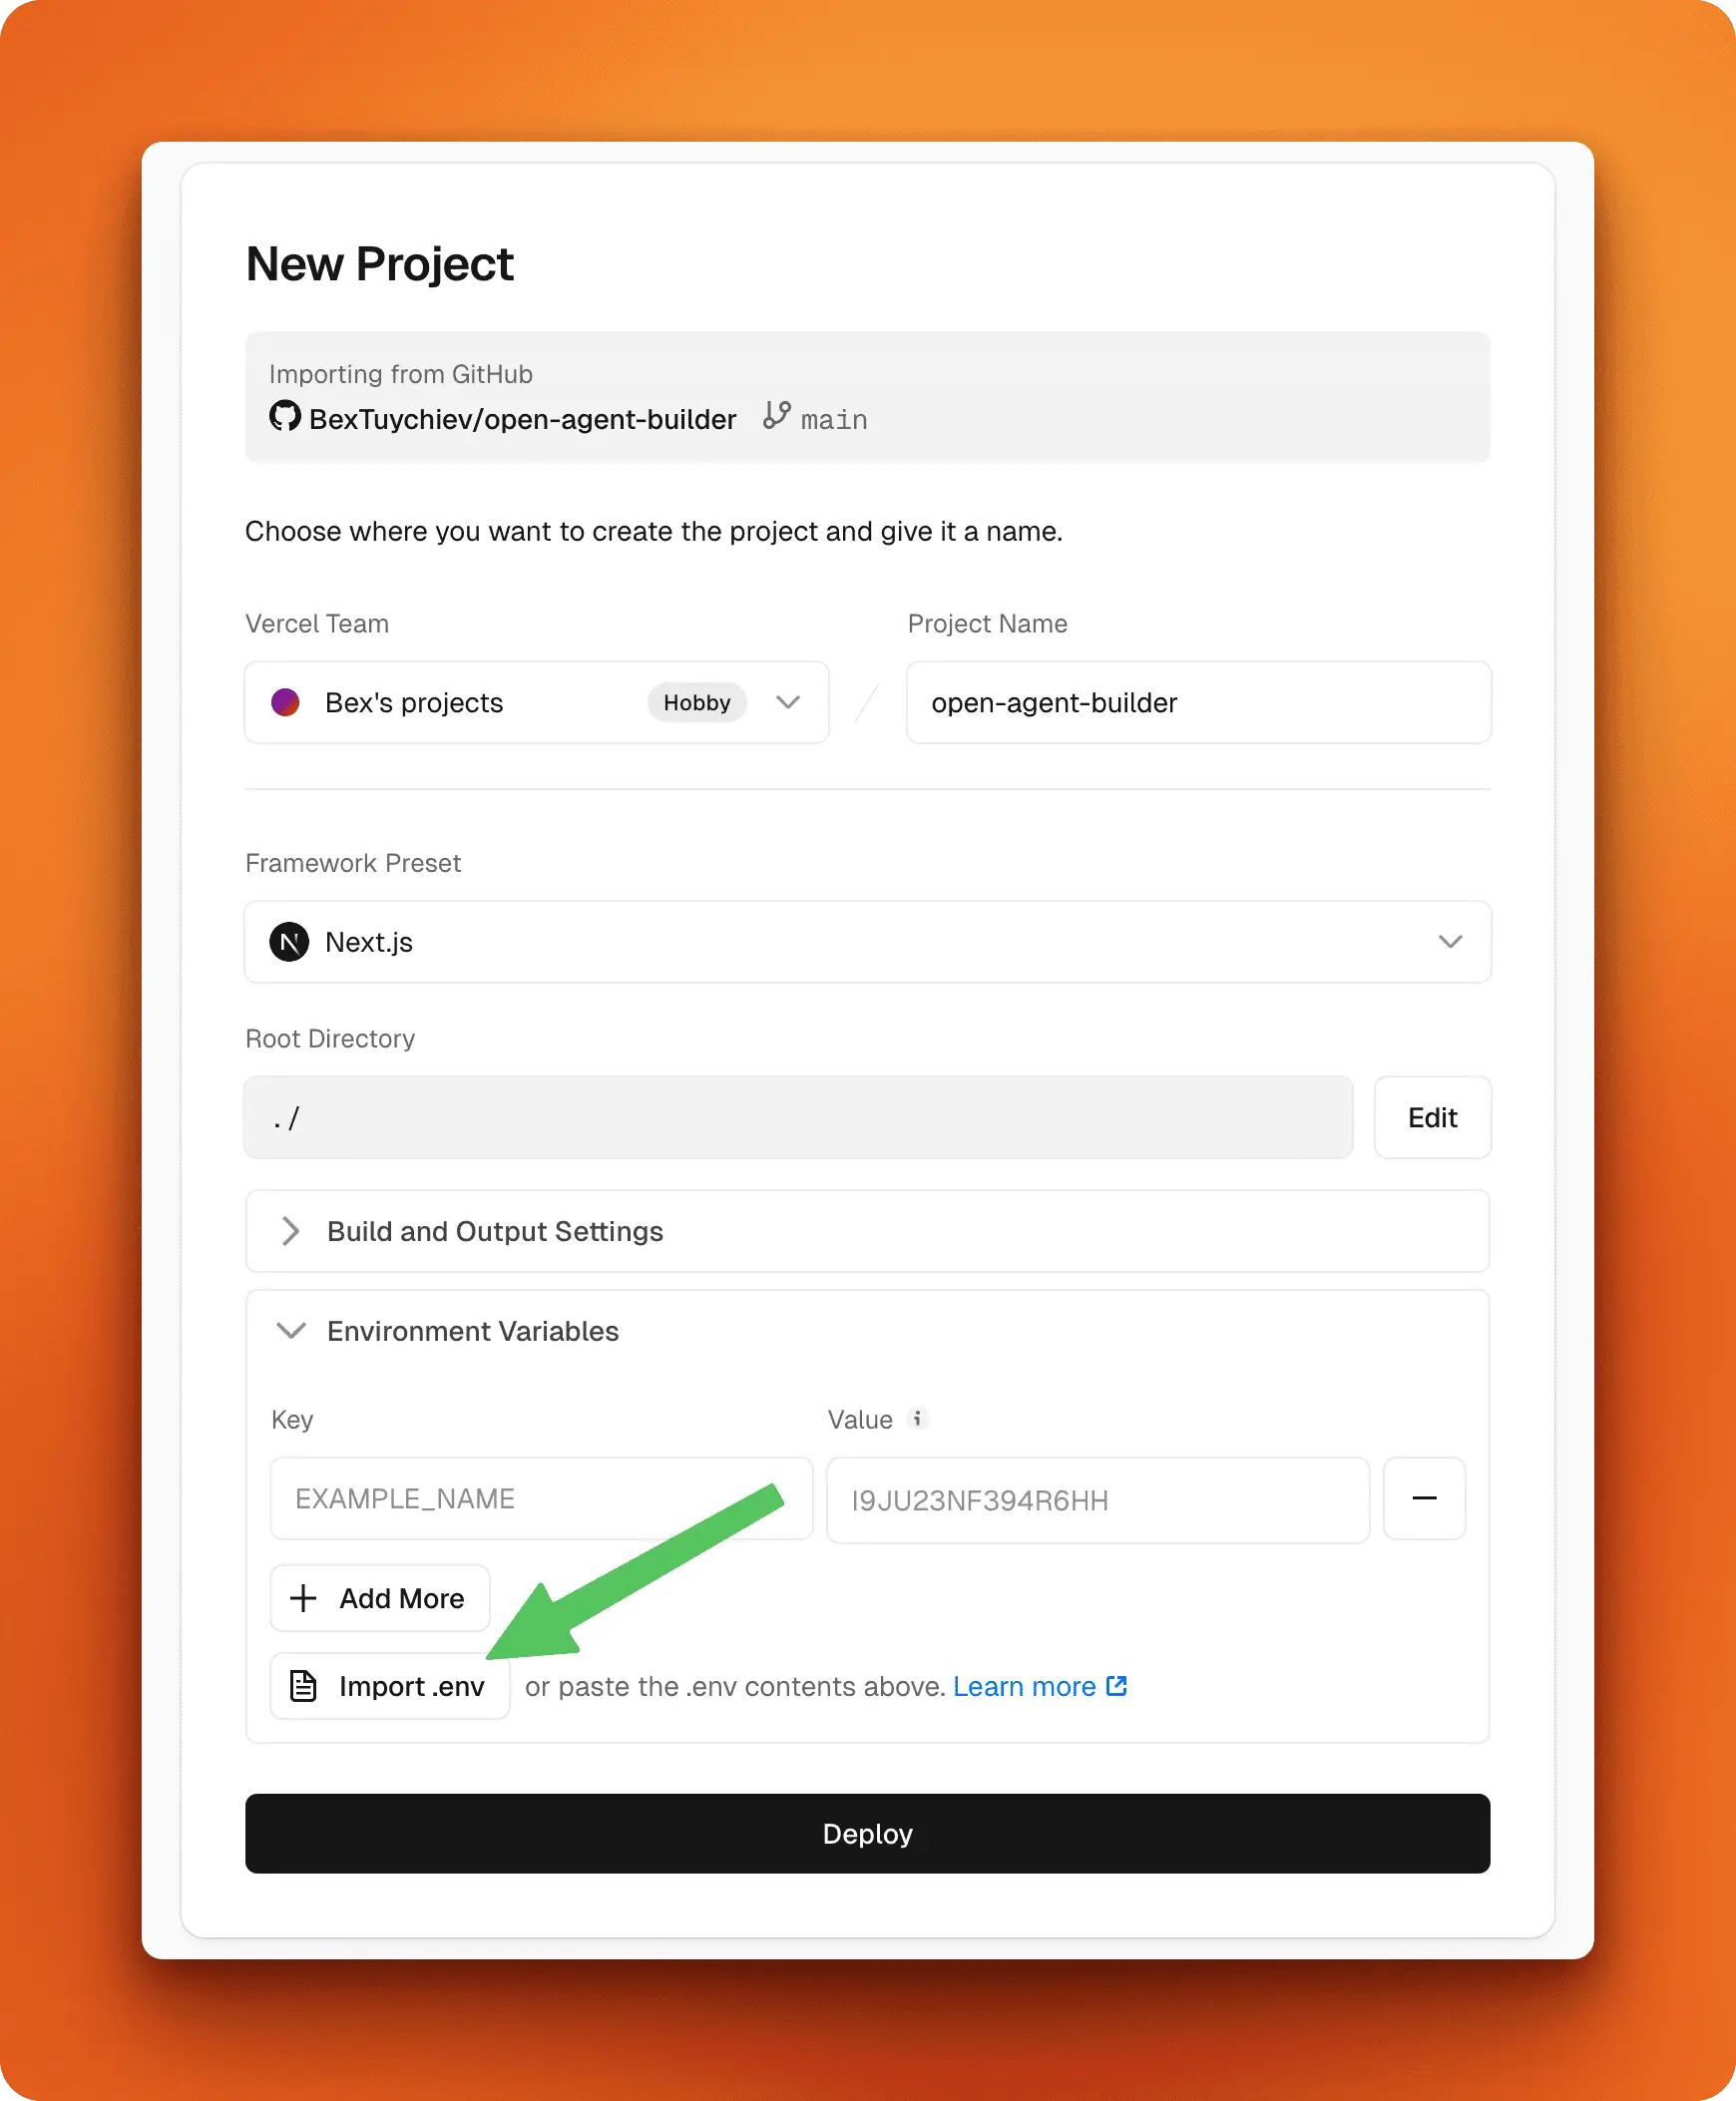 Configure environment variables before deploying. You can also import them from a .env file
Add these for the "Production" environment at minimum. If you plan to test preview deployments, you can add them to "Preview" and "Development" environments as well.
Once the environment variables are set, click "Deploy." Vercel builds your application and deploys it to their global network. Most projects finish in 1-3 minutes, though larger applications may take longer. You'll see a real-time build log showing the progress.
Testing Your Deployment
When the build completes, Vercel provides a URL like your-project.vercel.app. Click it to open your live Open Agent Builder instance.
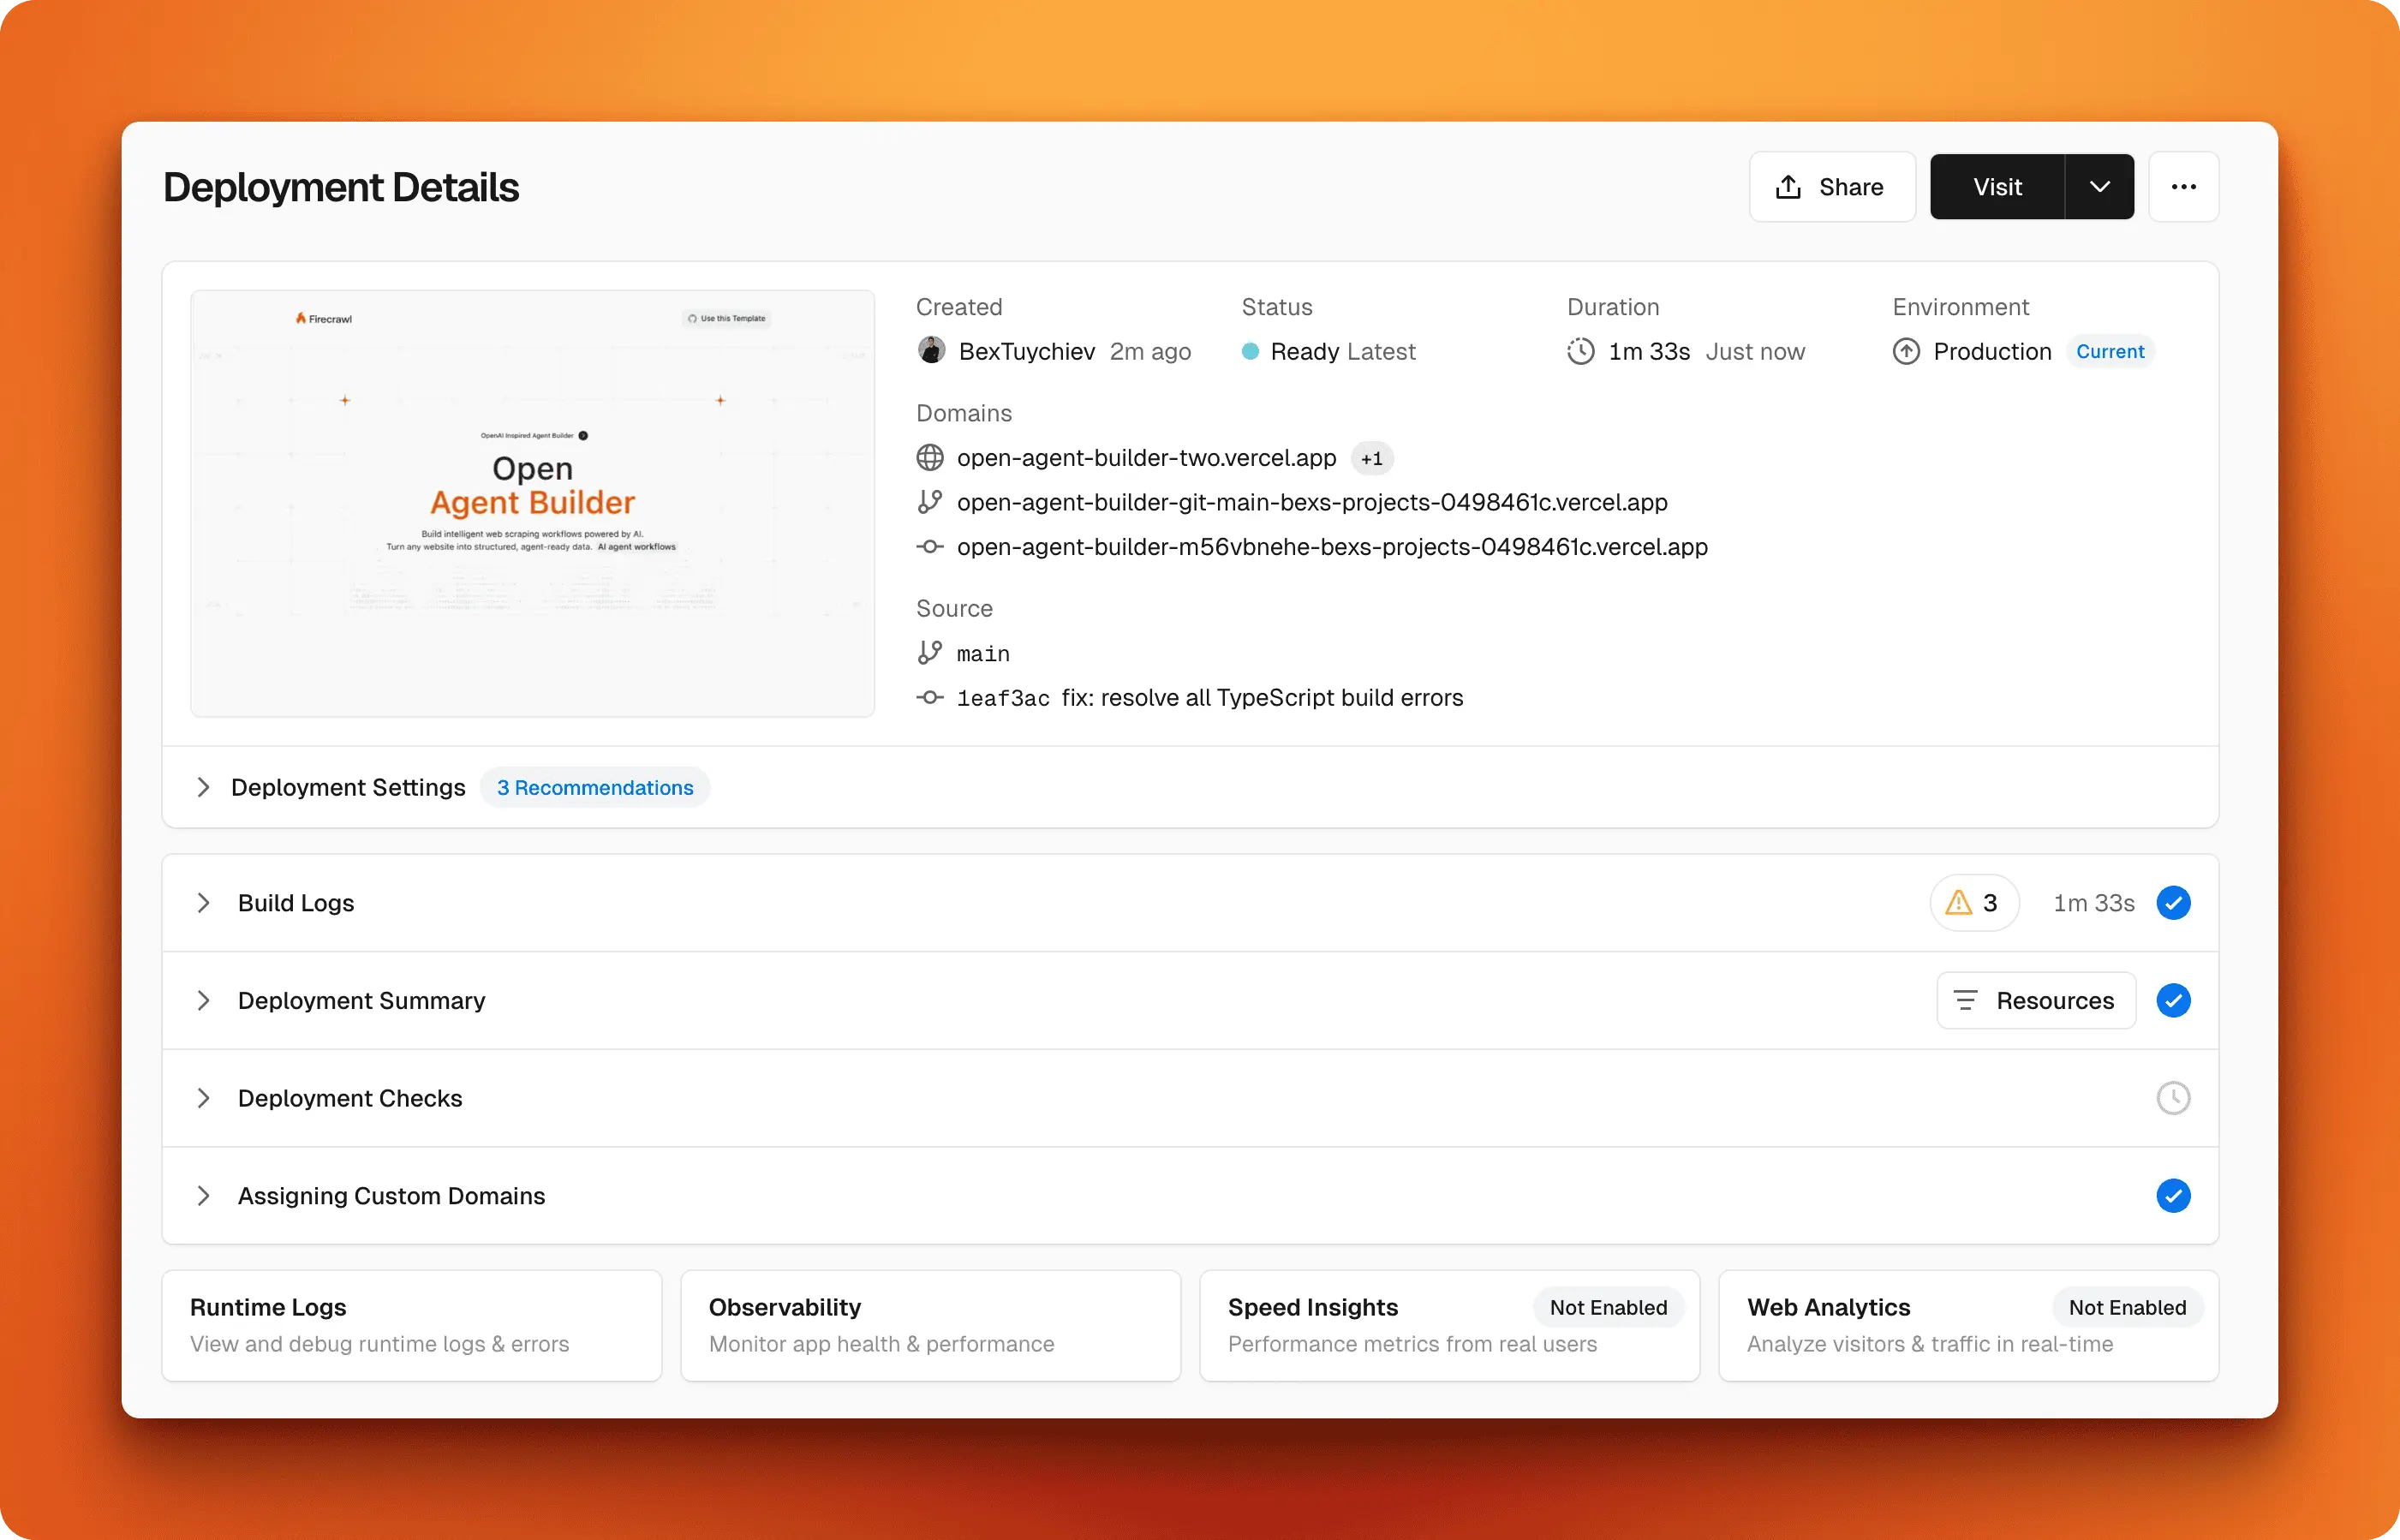 Deployment complete with live URLs and build details
Run through a workflow to verify everything works as expected. The app should behave exactly like it did on localhost, but now it's accessible from anywhere. If you configured Clerk authentication correctly, only authorized users will be able to access it.
Vercel automatically rebuilds and redeploys your app every time you push new commits to your main branch on GitHub. You can monitor this activity in the Vercel dashboard, where you'll find deployment history and build logs for troubleshooting.
For a more professional setup, you can connect a custom domain like workflows.yourcompany.com through your project settings in Vercel. The platform handles SSL certificates automatically, so your custom domain will be secure without any additional configuration.
With your workflows now live and accessible online, you can take integration one step further by exposing them as programmable API endpoints.
Using your workflows via API
Once your workflows are deployed and tested, you can access them programmatically through API endpoints. This transforms your visual workflows into reusable services that other applications can call.
Click the Production tab in your workflow editor to see the API configuration panel.
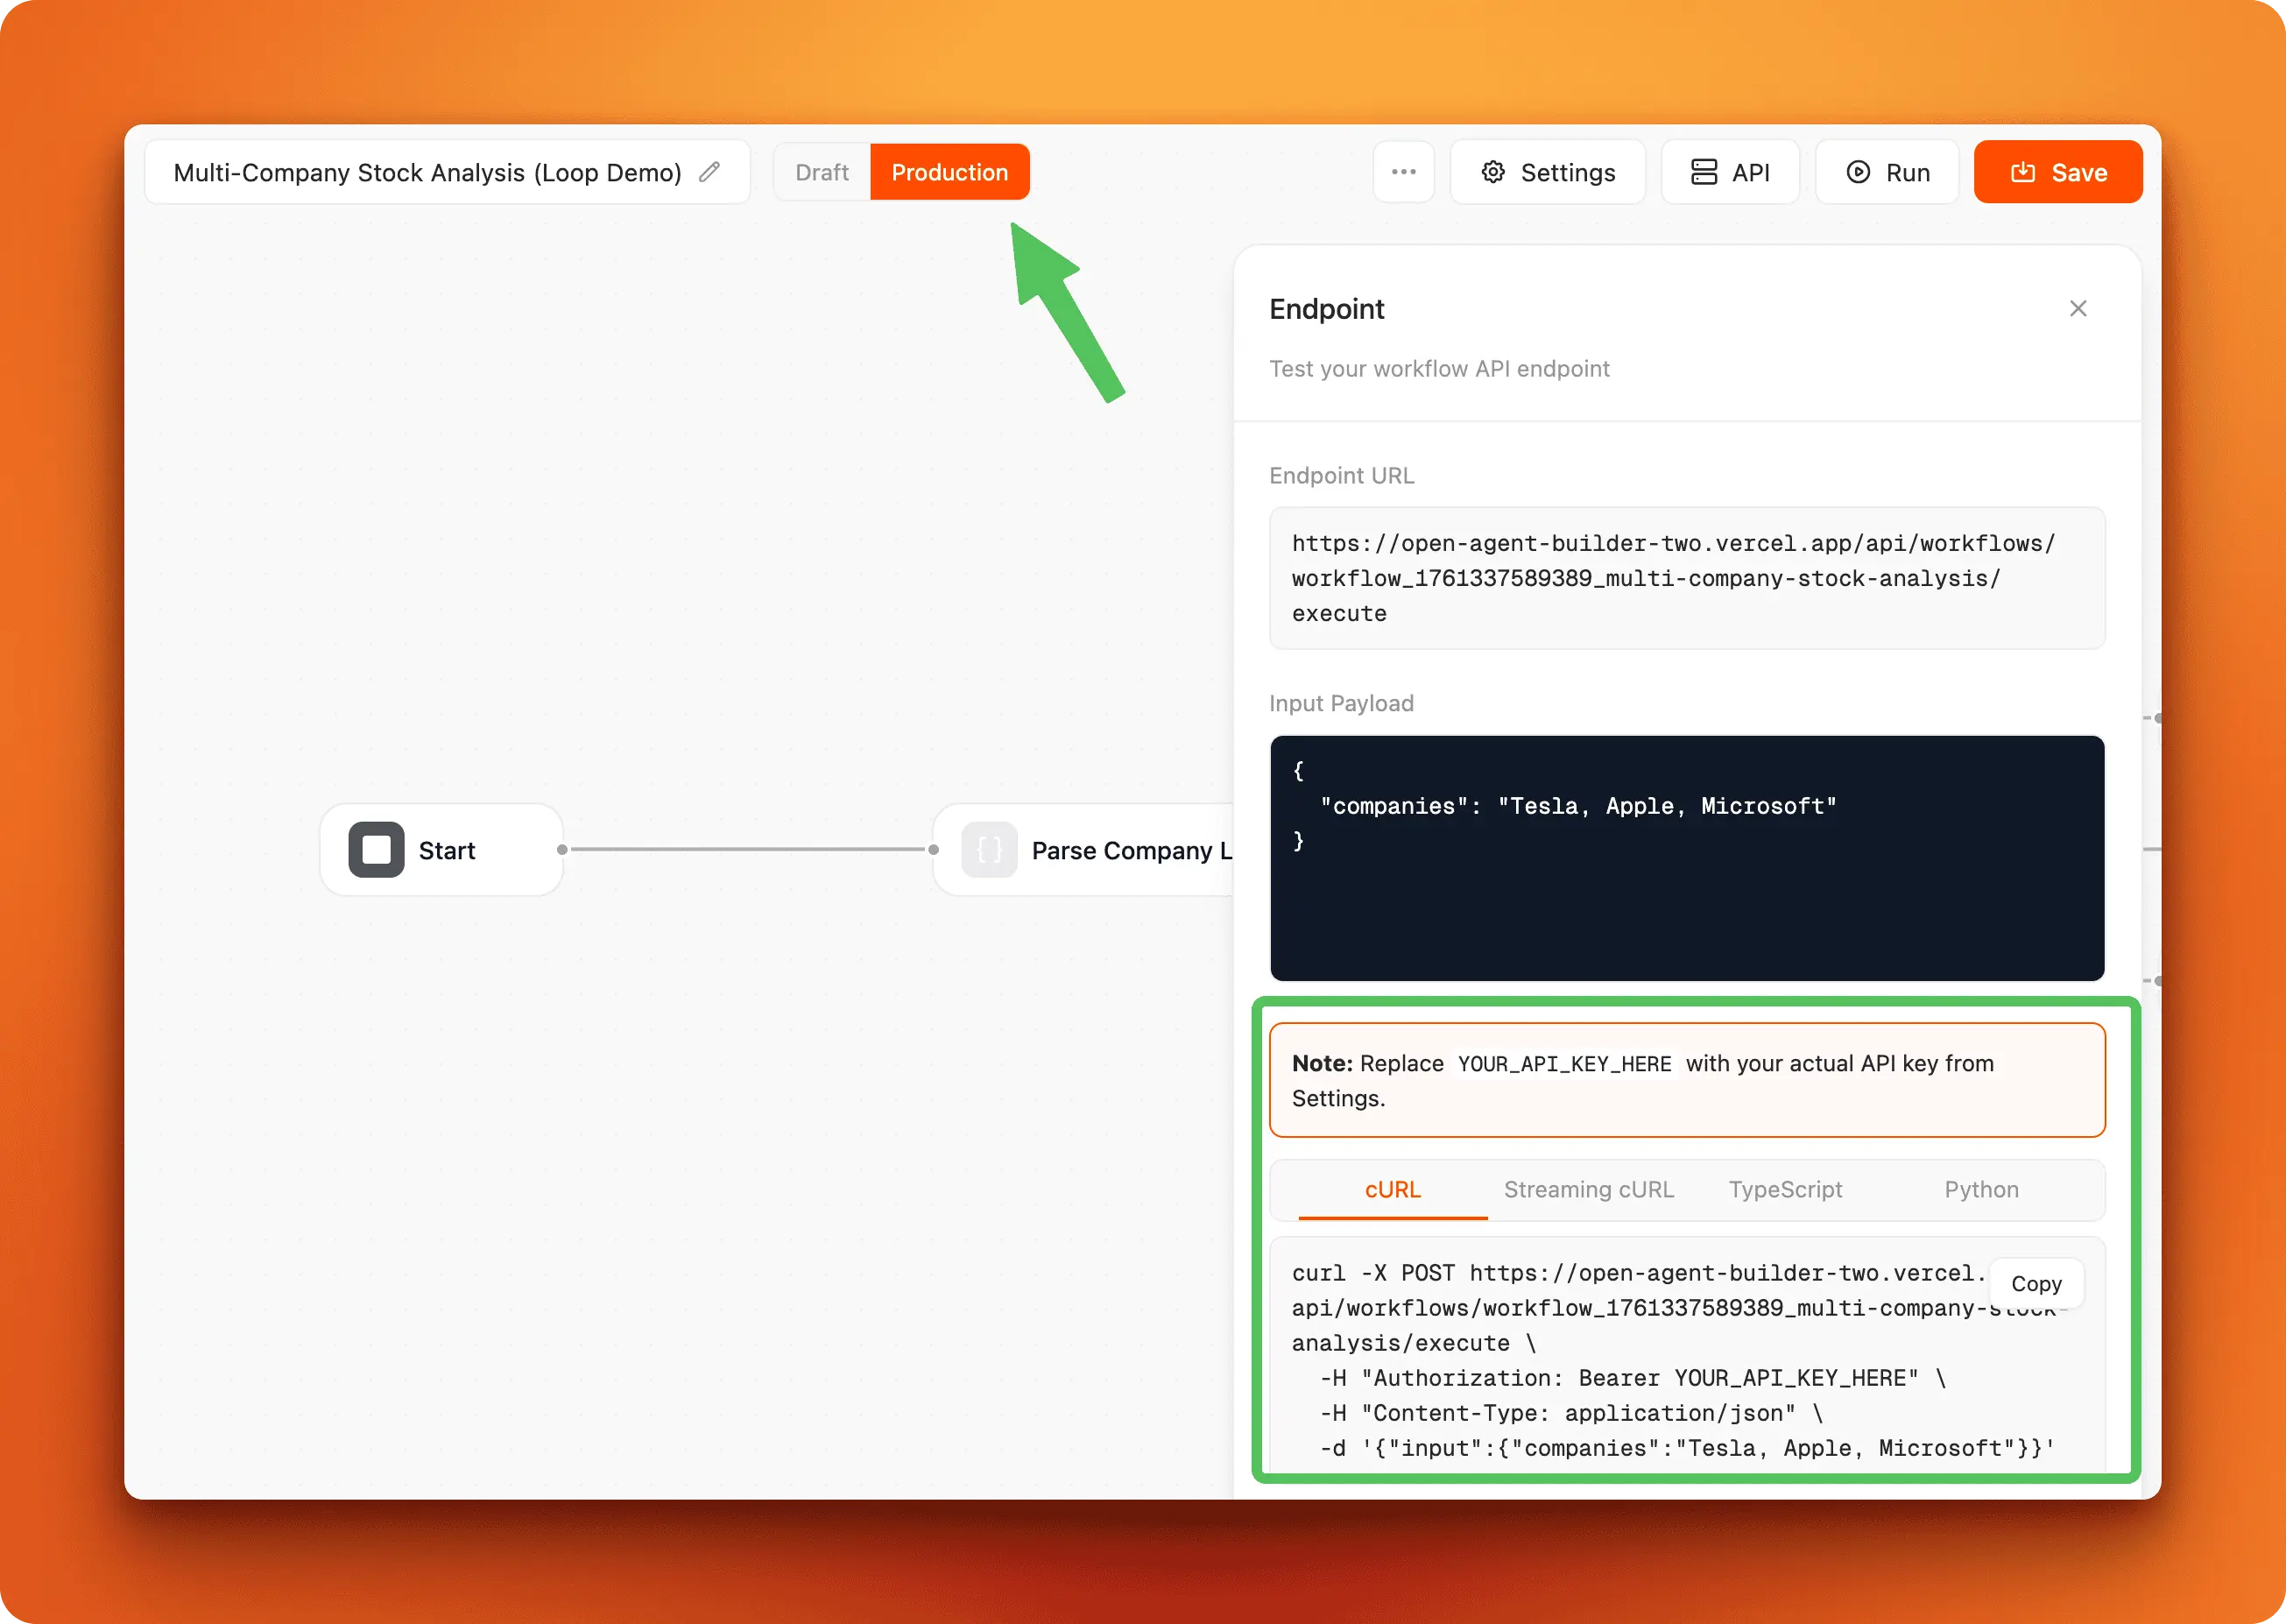 Switch to the Production tab to get your workflow's API endpoint and integration examples
The panel shows your workflow's endpoint URL, required input format, and example cURL commands for calling the workflow from external applications. This lets you integrate your workflows into other services, trigger them from scripts, or build custom applications on top of them.
Common use cases for API access include:
- Webhook integrations: Trigger workflows when events happen in other services
- Scheduled automation: Use cron jobs to run workflows at specific times
- Custom applications: Build frontend interfaces that call your workflows as backend services
- Cross-platform integration: Connect workflows to mobile apps, Slack bots, or internal tools
Build fast with Open Agent Builder
Open Agent Builder makes AI agent workflows accessible through visual design. You drag nodes onto a canvas instead of writing Python code. It supports multiple AI providers and runs on production-grade technology. Built by the Firecrawl team, Open Agent Builder integrates naturally with Firecrawl's web scraping capabilities and fits into their broader ecosystem of open source AI tools.
The visual approach matters because it reduces the time from idea to working workflow. You see what your agent does before it runs, and you can modify logic without touching code. No vendor lock-in means you control where your workflows run and which AI models they use.
Start today by cloning the repository and running through the setup guide above.
Firecrawl has built other open source tools that can help you build your own workflows: Open Researcher for AI research workflows and Fireplexity for building answer engines. Visit firecrawl.dev to learn more about the platform and join the community.
Frequently Asked Questions
How is Open Agent Builder different from OpenAI's agent builder?
OpenAI's agent builder locks you to OpenAI models only. Open Agent Builder supports any AI provider (Claude, OpenAI, Groq, or OpenAI-compatible endpoints). It's also open source under MIT license, so you can self-host, modify the code, and deploy wherever you want. No vendor lock-in.
Do I need coding experience to use Open Agent Builder?
No for most workflows. The visual interface handles the complexity. You connect nodes, write instructions in plain English, and watch your workflow execute. JavaScript knowledge helps when you need custom logic in Transform nodes, but the templates and Agent nodes work without code.
What AI models does Open Agent Builder support?
Claude from Anthropic (recommended for MCP tool support), OpenAI models like GPT-5, Groq for fast inference, and any OpenAI-compatible API endpoint. You can switch models from the dropdown in each Agent node without rebuilding your workflow.
Is it really free?
The software is free and open source (MIT license). You pay for the services it uses: Firecrawl API calls, AI provider API usage (Claude, OpenAI, etc.), and infrastructure if you deploy to Vercel beyond the free tier. Convex and Clerk have free tiers that work for most personal projects.
What are MCP Tools and why do they matter?
MCP (Model Context Protocol) Tools extend what your agents can do beyond basic text generation. They let agents perform actions like file operations, API calls, or specialized computations. Claude models have the best MCP support, which is why Anthropic is the recommended provider for workflows that need these capabilities.
Can I customize Open Agent Builder for my team?
Yes. It's open source, so you can fork the repository, add custom node types, integrate proprietary tools, modify the UI, or build features specific to your use case. The Firecrawl documentation helps if you want to extend the web scraping capabilities.
What will running Open Agent Builder actually cost me?
The software is free, but you pay for the services it uses. Here's the breakdown:
Free tier capabilities:
- Firecrawl: 1,000 credits free per month (1,000 page scrapes). Each scrape costs 1 credit.
- Convex: 1 million function calls/month, 0.5 GB storage free
- Clerk: 10,000 monthly active users free
- Vercel: Free forever for personal use (1M requests/month, 100 GB transfer)
- E2B (optional): $100 in free usage credits
AI provider costs (per million tokens):
- GPT-5: $1.25 input / $10 output
- Claude 3.5 Sonnet: $3 input / $15 output
- Groq Llama 3.1: $0.05 input / $0.08 output (cheapest)
Realistic monthly cost for light use: If you stay within free tiers and run 10-20 workflows per day with moderate AI usage, expect $5-15/month in AI costs. Firecrawl will be your main recurring cost after the free 1,000 monthly credits run out ($16/month for 5,000 credits on the Hobby plan). Heavy users running production workflows daily should budget $50-100/month across all services.