Building Multi-Agent Systems With CrewAI - A Comprehensive Tutorial

Agent Building Frameworks in 2026
The AI agent market continues to expand in 2026, with strong growth projections for the rest of the decade. The ecosystem has also matured: teams now prioritize production reliability, evals, and tool governance alongside raw capability. Several open-source frameworks are now available to developers: LangGraph provides stateful orchestration, Dify offers a low-code approach, and CrewAI — the focus of this tutorial — has gained momentum with its role-based architecture and streamlined setup process. On the TypeScript side, newer agent frameworks like Flue and Eve target edge runtimes and serverless deployments as an alternative to Python-first options. For a practical example of Eve in action, see how to build a Slack AI agent with Eve and Firecrawl web search.
This tutorial demonstrates how to use CrewAI to build a multi-agent ChatGPT clone. We'll walk through project initialization, agent definition, task creation, crew orchestration, testing, and UI development. You'll learn to implement CrewAI's role-playing agent system to develop a ChatGPT clone (with a Streamlit UI), providing you with the knowledge to create functional multi-agent systems for practical applications.
TL;DR
- CrewAI makes multi-agent systems practical - Define specialized roles, goals, and backstories to keep behavior consistent and debuggable
- Project-based setup scales better - Use YAML configs for agents/tasks to separate configuration from code
- Agent Tools are the real power - Firecrawl adds search, deep research, and extraction without managing scraping infrastructure
- Crew orchestration handles the workflow - Coordinate agents and tasks with sequential or deterministic flows
- A simple Streamlit UI is enough - Wrap your crew with a chat interface and iterate quickly
Overview of CrewAI's Features and Capabilities
CrewAI offers a comprehensive framework built independently from other agent systems, with features designed to address real-world production challenges. Its role-based agent architecture allows developers to create specialized AI workers with defined expertise and responsibilities, enabling complex tasks to be naturally decomposed in ways that reduce maintenance overhead and simplify debugging in production environments.
Key capabilities that translate directly to production value include:
- Role-Based Agents - Specialized workers that maintain consistent behavior across multiple runs, improving system reliability
- Flexible Tool Integration - Connection to external services without brittle dependencies, ensuring deployment stability
- Intelligent Collaboration - Coordinated task management that reduces prompt engineering complexity
- Dual Workflow Management - Options for both autonomous operation and deterministic control flow
- Enterprise-Ready Design - Security-focused architecture with optimized token usage for cost efficiency
The framework's distinguishing characteristic is its dual approach to workflow management. Crews provide autonomous collaboration for scenarios requiring adaptive problem-solving, while Flows offer deterministic, event-driven orchestration with fine-grained state management, ensuring predictable execution paths that satisfy enterprise requirements for auditability and reliability. This balanced approach allows development teams to implement production systems that combine structured processes with intelligent decision-making, optimizing both computational resources and maintainability for enterprise-grade deployments.
Getting Started With CrewAI
To start building multi-agent systems with CrewAI, we'll create a simple example that searches for flights and processes the results. The following script demonstrates the core components of CrewAI: Agents, Tasks, and a Crew.
Installation and API Setup
First, install CrewAI and required dependencies:
# Install required packages
pip install crewai 'crewai[tools]' firecrawl-py python-dotenv
For the Firecrawl search tool, you'll need to:
-
Create a free account at Firecrawl.dev
-
Navigate to your account dashboard and generate an API key
-
Create a
.envfile in your project directory with:FIRECRAWL_API_KEY=fc-your-api-key-here
Step-by-Step Example
Let's break down a basic CrewAI implementation that searches for flights:
import warnings
warnings.filterwarnings("ignore")

from crewai import Crew, Task, Agent
from crewai_tools import FirecrawlSearchTool
from dotenv import load_dotenv

# Load environment variables from .env file
load_dotenv()
This section imports the necessary libraries and suppresses warnings. We're using CrewAI's core components, the FirecrawlSearchTool for web searches, and dotenv to manage environment variables (like API keys) securely.
# Create our tools
flight_search = FirecrawlSearchTool()
Here we initialize the FirecrawlSearchTool without specifying a default query. This allows the agent to formulate its own search queries based on the task requirements.
# Define our specialized agents
flights_agent = Agent(
    role="Travel Search Specialist",
    goal="Find optimal flight options based on price and convenience",
    backstory="I specialize in discovering the best flight deals across multiple airlines and booking platforms.",
    tools=[flight_search],
    allow_delegation=False,
)

summarize_agent = Agent(
    role="Travel Consultant",
    goal="Create clear, actionable travel recommendations",
    backstory="I translate complex travel data into personalized recommendations that save travelers time and money.",
    allow_delegation=False,
)
In this section, we create two specialized agents:
- The Travel Search Specialist finds flight options using the Firecrawl tool
- The Travel Consultant organizes and presents the information
Each agent has a role, goal, and backstory that shape its behavior and responses. The allow_delegation=False parameter prevents the agent from delegating tasks to other agents.
# Define the tasks our agents will perform
search_task = Task(
    description=(
        "Search for {trip_type} flights from {origin} to {destination} around {travel_date}"
    ),
    expected_output="""
    Top 3 flight options from Chicago to Miami on January 15:
    1. United Airlines: Departs 08:15, Arrives 12:05, Duration: 3h 50m, Price: $178
    2. American Airlines: Departs 10:30, Arrives 14:10, Duration: 3h 40m, Price: $195
    3. Southwest: Departs 13:45, Arrives 17:20, Duration: 3h 35m, Price: $210
    """,
    agent=flights_agent,
)

booking_options_task = Task(
    description="Analyze booking options for the flights found and recommend the best overall value",
    expected_output="""
    Recommended booking options for Chicago to Miami (Jan 15):

    BEST VALUE: United Airlines
    - Departure: 08:15 (ORD)
    - Arrival: 12:05 (MIA)
    - Duration: 3h 50m
    - Price: $178
    - Booking: Direct through [United.com](https://www.united.com) offers free carry-on
    - Additional: Economy Plus upgrade available for $45

    FASTEST OPTION: Southwest
    - Departure: 13:45 (MDW)
    - Arrival: 17:20 (MIA)
    - Price: $210
    - Booking: [Southwest.com](https://www.southwest.com) includes 2 free checked bags
    """,
    agent=summarize_agent,
)
Here we define two tasks with a clear division of responsibilities:
- The
flights_agenthandles searching for flight information - The
summarize_agentanalyzes the options and creates customer-friendly recommendations
The task description accepts variables in curly braces like {origin}, which will be filled in when the crew runs. The expected_output provides a template that helps guide the agent's response format.
# Assemble the crew with our agents and tasks
crew = Crew(
    agents=[flights_agent, summarize_agent],
    tasks=[search_task, booking_options_task],
    verbose=True,  # Show detailed execution logs
)
The Crew brings together our agents and tasks. It manages the workflow and coordinates how tasks are executed. We've set verbose=True to show detailed logs during execution, which helps with monitoring and debugging.
# Execute the crew's work
if __name__ == "__main__":
    result = crew.kickoff(
        inputs={
            "trip_type": "one-way",
            "origin": "New York",
            "destination": "London",
            "travel_date": "June 15th, 2026",
        }
    )

    print(result)
Finally, we execute our crew with the kickoff() method, providing specific inputs for an international flight from New York to London. The crew will handle the sequential execution of tasks, with the flights_agent first searching for options, and then the summarize_agent creating a polished recommendation based on those findings.
Recommended booking options for New York to London (June 15, 2026):

BEST VALUE: American Airlines
- Departure: 19:00 (JFK)
- Arrival: 07:30 (+1 day) (LHR)
- Duration: 7h 30m
- Price: $285
- Booking: Direct through [American Airlines](https://www.aa.com) website offers straightforward booking and reliable service
- Additional: Competitive price with only a slight increase in duration compared to the fastest flight; good balance of cost and schedule

...
This example only scratches the surface of CrewAI's capabilities. The framework supports more advanced features like complex workflow management, hierarchical agent structures, memory systems for context retention, and integration with various tools and services that can dramatically enhance your multi-agent applications' power and flexibility. As you continue following along the tutorial, you will see some of these features for yourself.
Firecrawl: the Best Friend of LLMs and Agents
Before we dive into the tutorial, let's explore the Firecrawl tool we used to search for flights. Firecrawl is the context API to search, scrape, and interact with the web at scale, bridging the gap between complex web content and AI agents by converting websites into clean, structured data that models can process effectively.
Key capabilities that make Firecrawl valuable for agent development include:
- Intelligent Navigation - Handles dynamic content, pagination, and multi-step processes
- Format Flexibility - Converts web content to markdown, HTML, or structured data
- Clean Data Extraction - Removes noise like ads and navigation elements
- Search Integration - Processes natural language queries for contextual web results
- Web scraping - Can scrape arbitrary information from open websites with just a prompt
- API-First Design - Integrates with frameworks like CrewAI through standardized tooling
Using Firecrawl involves a straightforward API approach, as shown in this example:
from firecrawl import FirecrawlApp

app = FirecrawlApp(api_key="fc-your-api-key")

# Scrape a URL and convert it to markdown
result = app.scrape_url(
    "https://example.com/product-page",
    {
        "formats": ["markdown"],
        "onlyMainContent": True  # Remove headers, footers, navigation
    }
)

print(result["markdown"])
Throughout this tutorial, we'll implement Firecrawl as a tool for our CrewAI agents, providing them with web scraping, search, and research capabilities. This integration allows agents to access current information from the web while maintaining focus on their core tasks. By handling the technical aspects of web interaction, Firecrawl lets developers concentrate on enhancing agent reasoning and decision-making rather than managing web extraction complexities. For a self-hosted agent that applies this same pattern, see our OpenClaw + Firecrawl guide.
If you're interested in exploring these capabilities further, you can find additional information at firecrawl.dev.
Creating Multi-Agent Applications With CrewAI
In the "Getting started" section, we covered the very basics of CrewAI in a script-based environment. However, to get the full benefits of the framework, we are going to use the recommended project-based configuration to build a ChatGPT clone. Through this example, you will get a feel of how multi-agent systems are built in CrewAI by creating a more complex crew of agents with access to more custom built tools and a user-friendly UI. In the end, our application will have the following features:
- General conversation assistant
- Access to real-time information with Firecrawl's search endpoint
- Perform in-depth research and analysis with Firecrawl's search endpoint
- Extract information with just a prompt from arbitrary websites with Firecrawl's agent endpoint
- Generate images with OpenAI's Dall-E 3 model
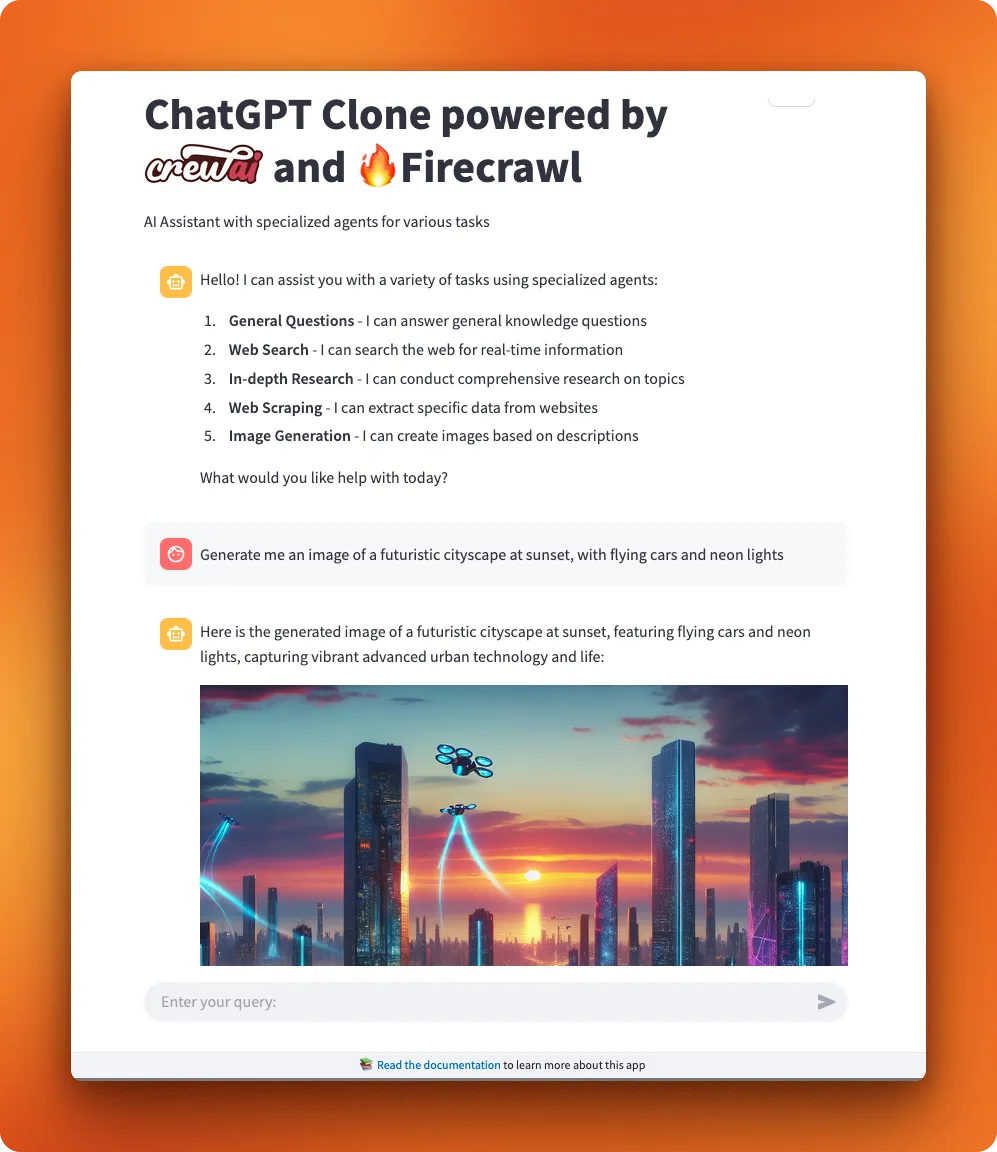
Here is the application UI:
In the following steps, we will explain almost every aspect of the project. However, we may omit certain code parts or sections to reduce repetitive explanations. For this reason, we highly recommend you follow along the tutorial by opening the project repo for this article in a separate tab.
With that said, let's get started!
Step 1: Initializing and Configuring a Project
To create our ChatGPT clone using CrewAI, we first need to set up the project structure. CrewAI provides a CLI tool that generates a standardized project structure, which offers significant advantages over a script-based approach.
P.S: We recently explored Why CLIs Are Better for AI Coding Agents Than IDEs.
-
Install CrewAI CLI and uv package manager:
pip install crewai-cli uv -
Create a new project folder with standardized structure:
crewai create crew crewai_chatgpt_clone
cd crewai_chatgpt_clone
This command generates the following directory structure:
crewai_chatgpt_clone/
├── src/
│   └── crewai_chatgpt_clone/
│       ├── __init__.py
│       ├── main.py
│       ├── crew.py
│       ├── config/
│       │   ├── agents.yaml   # Agent definitions in YAML
│       │   └── tasks.yaml    # Task definitions in YAML
│       └── tools/            # Custom tools directory
└── .env                      # Environment variables
Benefits of this structure:
- Separation of concerns (agents, tasks, tools)
- YAML configuration for clean, readable agent/task definitions
- Easier maintenance and collaboration
- Standardized format that follows Python packaging best practices
- Support for complex projects with multiple agents and tasks
We will talk more about these later on.
-
Set up environment variables: Create a
.envfile in your project root with:# Firecrawl API key for web search, research, and extraction FIRECRAWL_API_KEY=fc-your-api-key-here # OpenAI API key for DALL-E image generation OPENAI_API_KEY=sk-your-openai-key-here -
Install dependencies using uv: First, lock the basic CrewAI dependencies:
crewai installThen add project-specific dependencies:
uv add streamlit firecrawl-py openai python-dotenv
The project-based approach with YAML configuration files makes agent systems much more maintainable than single-script solutions. The YAML files allow non-technical users to adjust agent properties without touching code, while developers can focus on implementing tools and business logic. This separation creates a clean architecture that scales well as your agent system grows in complexity.
Step 2: Defining agents
Agents are the core building blocks of any CrewAI application. They represent specialized AI personas with specific roles, goals, and backstories that shape how they approach tasks. In our ChatGPT clone, we'll define multiple specialized agents that work together to handle different types of requests.
Using YAML for agent configuration
Notice that we're using YAML files to define our agents rather than directly instantiating Agent classes as we did in the getting started example. This approach offers several advantages:
- Separation of concerns: Keeps configuration separate from implementation code
- Readability: YAML is more human-readable and easier to maintain
- Non-technical editing: Team members without Python knowledge can modify agent definitions
- Consistency: Standardized format for all agent definitions in one place
- Version control friendly: Changes to agent configurations are easier to track
Here's how our config/agents.yaml file looks for the ChatGPT clone:
chat_agent:
  role: >
    Conversational Assistant
  goal: >
    Understand the user's intent and provide useful, concise, and context-aware answers by orchestrating specialized agents when necessary. Here is the user's query: {user_input}
  backstory: >
    You're the primary interface to the user. You understand conversation context, identify the type of help needed, and either answer directly or delegate to a search, research, scraping or image generation agent.
  allow_delegation: true
Notice the use of {user_input} in the goal field. This is a variable placeholder that will be dynamically replaced with the actual user's query when we pass inputs to our agent system later. These placeholders allow our agents to receive and process contextual information at runtime, and you'll see their importance when we start passing inputs to the system.
The role-goal-backstory framework
CrewAI uses a powerful framework for agent definition that consists of three key elements:
- role: Defines what the agent does and their area of expertise
- goal: Directs the agent's efforts and shapes their decision-making
- backstory: Gives depth to the agent, influencing how they approach problems
Advanced agent configuration options
Beyond the basic role-goal-backstory framework, CrewAI offers several additional configuration options for fine-tuning agent behavior:
| Option | Description |
|---|---|
llm | The model name you want to use (you must configure API key for it as well in that case) |
allow_delegation | Controls whether the agent can request help from other agents (default: False) |
verbose | Enables detailed logging of agent actions for debugging |
max_rpm | Limits requests per minute to external services (None for unlimited) |
max_iter | Maximum iterations an agent can perform for a task (default: 25) |
max_execution_time | Sets a time limit for task completion |
tools | Array of tools the agent can use (defined in Python code) |
cache | Determines if the agent should cache tool usage results |
respect_context_window | Enables sliding context window to maintain appropriate size |
max_retry_limit | Sets maximum number of retries on errors |
In our implementation, we'll connect these YAML definitions to actual tools in the crew.py file later in the process.
Understanding delegation
Delegation is a powerful capability that allows agents to collaborate by requesting assistance from other agents. In our ChatGPT clone, only the main chat_agent has delegation enabled:
chat_agent:
  # ... other configuration ...
  allow_delegation: true

search_agent:
  # ... other configuration ...
  allow_delegation: false
The chat_agent can delegate tasks to specialized agents when it recognizes that their expertise is needed. For example:
- When factual information is needed → delegates to the
search_agent - For in-depth analysis → delegates to the
research_agent - For extracting data from websites → delegates to the
scraper_agent - For creating images → delegates to the
image_agent
This creates a hierarchical structure where the chat_agent acts as a coordinator, determining which specialized agent is best suited to handle specific parts of the user's request.
Specialized agents for our ChatGPT clone
Let's look at our complete set of specialized agents:
search_agent:
  role: >
    Real-Time Search Expert
  goal: >
    Use Firecrawl's general search capability to find accurate and current answers to specific user queries. Here is the user's query: {user_input}
  backstory: >
    You specialize in quick, high-level answers by searching the web in real-time using Firecrawl's search engine. You respond with clear summaries and citations.
  allow_delegation: false

research_agent:
  role: >
    Deep Research Analyst
  goal: >
    Use Firecrawl's deep research mode to generate detailed, structured research reports on complex topics. Here is the user's query: {user_input}
  backstory: >
    You're an analytical AI built for thorough research. You extract in-depth information from multiple sources using Firecrawl and return organized summaries and insights.
  allow_delegation: false
Each agent definition includes the {user_input} variable in the goal field, ensuring that all agents receive the user's query when tasks are executed.
Best practices for agent design
When designing your agents, follow these key principles:
- Specialists over generalists: Agents perform better with specialized roles rather than general ones.
- The 80/20 rule: While agent design is important, remember that 80% of your effort should go into designing tasks, and only 20% into defining agents.
- Complementary skills: Design agents with distinct but complementary abilities that work well together.
- Clear purpose: Each agent should have a clearly defined purpose that doesn't overlap too much with other agents.
For a full list of agent attributes and advanced options, see the CrewAI agents documentation.
Remember that agent design is an iterative process. Start with these definitions, observe how they perform in practice, and refine them based on the results.
Step 3: Defining tasks
After defining our specialized agents, the next step is to create tasks for them to perform. Tasks in CrewAI are specific assignments that are completed by agents. Each task provides the necessary instructions and context for an agent to successfully execute its work.
Using YAML for task configuration
Similar to our agent definitions, we'll use YAML to configure tasks in our ChatGPT clone. This approach provides the same benefits of readability, maintainability, and separation of concerns. Let's examine the config/tasks.yaml file:
answer_user_query_task:
  description: >
    Process the user's message and classify its intent into one of the following:
    1. General question (answer yourself),
    2. Real-time factual lookup (delegate to Search Agent),
    3. Comprehensive research (delegate to Research Agent),
    4. Web scraping (delegate to Scraper Agent),
    5. Image generation (delegate to Image Agent).

    Based on the intent, trigger the appropriate agent, compile their response, and deliver a final, well-structured answer to the user.
  expected_output: >
    A finalized user response. This can include:
    - Text answers
    - Image links (with short captions)
    - Research summaries
    - Scraped data in markdown or tabular format
Task attributes explained
The key components of a task definition include:
-
description: Clear instructions for what the agent needs to do. In our ChatGPT clone, thedescriptionguides thechat_agentto classify user intent and delegate to specialized agents when appropriate. -
expected_output: A description of what the completed task should look like. This helps guide the agent's response format and content. -
agent(optional, not shown in our example): Specifies which agent should perform the task. We'll connect our task to the appropriate agent in thecrew.pyfile later.
Other optional attributes include:
context: References to other tasks whose outputs should be used as contextoutput_file: Path for saving task output to a filetools: Specific tools the agent can use for this particular taskhuman_input: Whether human review is required before completion
For a full list of task attributes and advanced options, see the CrewAI tasks documentation.
Understanding our ChatGPT clone task
Our ChatGPT clone uses a single task called answer_user_query_task. This task is responsible for:
- Processing the user's message and determining its intent
- Deciding whether to answer directly or delegate to a specialized agent
- Compiling the response and delivering it to the user
This task design leverages the delegation capability we enabled for the chat_agent. When a user asks about current events, for example, the chat_agent will recognize this requires real-time information and delegate to the search_agent.
Best practices for task design
When designing tasks for your own CrewAI applications, remember these principles:
- Single purpose, single output: Each task should have a clear, specific objective.
- Be explicit about inputs and outputs: Clearly define what the task receives and what it should produce.
- Include purpose and context: Help the agent understand why the task matters and how it fits into the larger workflow.
- The 80/20 rule: Remember that 80% of your effort should go into designing tasks, as even well-designed agents will fail with poorly designed tasks.
In the next section, we'll see how to give the actual power to our agents by implementing custom tools.
Step 4: Implementing custom tools
Before we create our crew, we need to implement the custom tools that our specialized agents will use to interact with external services. In CrewAI, tools provide agents with capabilities to perform specific actions like searching the web, generating images, or extracting data from websites.
Understanding CrewAI tools
Tools in CrewAI are Python functions decorated with @tool that agents can invoke to accomplish specific tasks. Each tool has:
- A name that describes its purpose
- A function that performs the actual work
- A docstring that explains how to use the tool (critical for agent understanding)
For our ChatGPT clone, we'll implement four custom tools using Firecrawl and OpenAI APIs:
Using the @tool decorator
The simplest way to create a custom tool is using the @tool decorator. Let's look at our implementation of the Firecrawl search tool:
# src/chatgpt_clone/tools/firecrawl_search_tool.py

from crewai.tools import tool
from firecrawl import FirecrawlApp

@tool("Quick Web Search with Firecrawl")
def firecrawl_search_tool(query: str) -> str:
    """Performs a quick real-time search using Firecrawl and returns summarized results."""
    app = FirecrawlApp()
    result = app.search(query)
    if not result.success:
        return "Search failed."

    summary = "\n\n".join(
        [
            f"{item['title']}\n{item['url']}\n{item['description']}"
            for item in result.data[:5]
        ]
    )
    return f"Top Search Results:\n\n{summary}"
The @tool decorator transforms our function into a tool that agents can use. The function:
- Takes a search query as input
- Creates a FirecrawlApp instance
- Performs a search and formats the results
- Returns formatted results for the agent to process
Custom tools for our ChatGPT clone
Let's explore the four custom tools we've implemented for our application:
- Firecrawl Search Tool: Enables real-time web searches to retrieve current information
- Firecrawl Research Tool: Conducts in-depth research on complex topics
- Firecrawl Extract Tool: Extracts specific data from websites based on a URL and instructions
- OpenAI Image Tool: Generates images using OpenAI's DALL-E API
The extract tool is particularly interesting as it handles a composite input:
@tool("Web Data Extraction with Firecrawl")
def firecrawl_extract_tool(input_data: str) -> str:
    """Extracts data from a website using Firecrawl.

    Input should be in the format: "URL|extraction instructions"
    Example: "https://github.com/trending|Extract the top 5 trending repositories"
    """
    parts = input_data.split("|", 1)
    if len(parts) != 2:
        return "Invalid input format. Please use: URL|extraction instructions"

    url, instructions = parts
    # Implementation details...
This tool parses its input to extract both a URL and instructions, allowing the agent to provide complex extraction commands.
Testing custom tools
It's important to test tools before integrating them with agents. We've created a test_tools.py file to verify each tool works correctly:
def test_firecrawl_search():
    print("\n🔥 Testing Firecrawl Search...")
    print(firecrawl_search_tool.run("What is the capital of France?"))

def test_firecrawl_research():
    print("\n📚 Testing Firecrawl Deep Research...")
    print(
        firecrawl_research_tool.run(
            "Best Android tablets for seniors to read ebooks and watch videos"
        )
    )
Running this test script helps ensure our tools function properly before we connect them to our agents.
Best practices for custom tools
When building your own tools, follow these guidelines:
- Clear docstrings: Write detailed descriptions as they guide the agent in using the tool correctly
- Input validation: Validate inputs early to prevent runtime errors
- Error handling: Gracefully handle failures so agents can understand what went wrong
- Return structured data: Format outputs consistently to make them easier for agents to process
- Keep tools focused: Each tool should do one thing well, following the single responsibility principle
For more advanced tool implementations, such as creating tools by subclassing BaseTool or implementing caching strategies, see the CrewAI custom tools documentation.
In the next section, we'll combine our agents, tasks, and tools by creating a crew that coordinates their work.
Step 5: Creating a crew
Now that we've defined our agents, tasks, and implemented custom tools, it's time to bring everything together by creating a crew. In CrewAI, a crew represents a collaborative group of agents working together to accomplish tasks. The crew defines the strategy for task execution, agent collaboration, and the overall workflow.
Using the CrewBase decorator pattern
Our ChatGPT clone uses the recommended @CrewBase decorator pattern to structure our application. This approach provides a clean, organized way to define agents, tasks, and the crew itself. Let's examine our crew.py file:
@CrewBase
class ChatgptCloneCrew:
    """ChatgptCloneCrew using CrewBase for structured agent and task definition."""

    agents_config = "config/agents.yaml"
    tasks_config = "config/tasks.yaml"

    # Added type hints
    agents: List[BaseAgent]
    tasks: List[Task]
The @CrewBase decorator automatically handles many boilerplate tasks for us. Notice how we specify the paths to our YAML configuration files with agents_config and tasks_config. This connects our YAML definitions to our code.
Connecting agents to tools
For each agent defined in our YAML file, we create a corresponding method decorated with @agent that returns an Agent instance. This is where we connect our agents to the custom tools we created in step 4:
@agent
def search_agent(self) -> Agent:
    return Agent(
        config=self.agents_config["search_agent"],  # type: ignore[index]
        tools=[firecrawl_search_tool],
        verbose=True,
    )
Each agent method:
- Uses the YAML configuration from our
agents.yamlfile - Connects the agent to its specific tools (like
firecrawl_search_toolfor thesearch_agent) - Sets additional parameters like
verbose=Truefor detailed logging
Notice how each specialized agent is matched with the appropriate tool:
- The
search_agentgets thefirecrawl_search_tool - The
research_agentgets thefirecrawl_research_tool - The
scraper_agentgets thefirecrawl_extract_tool - The
image_agentgets theopenai_image_tool
This pairing of specialized agents with specialized tools creates a powerful combination of capabilities.
Connecting tasks to agents
Similarly, we create methods decorated with @task for each task:
@task
def answer_user_query_task(self) -> Task:
    """Task to process the user's query, classify intent, delegate, and compile the final response."""
    return Task(
        config=self.tasks_config["answer_user_query_task"],  # type: ignore[index]
        agent=self.chat_agent(),  # This task is primarily handled by the chat_agent
    )
Notice how we explicitly connect the task to the chat_agent(). This is where we specify which agent is responsible for executing the task. In our case, the main chat_agent will handle the task and delegate to specialized agents as needed.
Assembling the crew
Finally, we create a method decorated with @crew that brings everything together:
@crew
def crew(self) -> Crew:
    return Crew(
        agents=self.agents,  # Populated by @agent decorators
        tasks=self.tasks,    # Populated by @task decorators
        process=Process.sequential,
        verbose=True,
    )
The @CrewBase decorator automatically populates self.agents and self.tasks with the agents and tasks we defined. We also specify:
process=Process.sequential: Tasks are executed in orderverbose=True: Detailed logging is enabled
Advanced crew features
CrewAI offers several powerful features that will be valuable as your application grows:
Execution processes
While our ChatGPT clone uses a simple sequential process, CrewAI also supports a hierarchical process:
- Sequential Process: Tasks are executed one after another (what we're using)
- Hierarchical Process: A manager agent coordinates the crew, delegating tasks and validating outcomes before proceeding
Flexible kickoff methods
CrewAI provides several methods for executing your crew:
# Standard kickoff with a single input
result = crew_instance.crew().kickoff(inputs={"user_input": user_query})

# Process multiple inputs in sequence
results = crew_instance.crew().kickoff_for_each(inputs=[{"user_input": "Query 1"}, {"user_input": "Query 2"}])

# Asynchronous execution
async_result = await crew_instance.crew().kickoff_async(inputs={"user_input": user_query})
These options will be valuable for scaling your application to handle multiple requests simultaneously.
Structured outputs
Crews return a CrewOutput object that provides multiple ways to access results:
crew_output = crew.kickoff(inputs={"user_input": "Tell me about AI"})

# Access as raw text
print(crew_output.raw)

# Access as structured data (if configured)
if crew_output.json_dict:
    print(crew_output.json_dict)
Memory and logging
For more advanced applications, you can add memory and detailed logging:
crew = Crew(
    # ... other parameters ...
    memory=True,  # Enable memory for learning over time
    output_log_file="chat_logs.json",  # Save detailed logs
)
For a complete exploration of crew capabilities, see the CrewAI crews documentation.
Running the crew
After setting up our crew, we can execute it with the kickoff() method, passing any required inputs:
def run_chat(user_input):
    crew_instance = ChatgptCloneCrew()
    result = crew_instance.crew().kickoff(inputs={"user_input": user_input})
    return result
This passes the user's input to our agents through the {user_input} variable we defined in our YAML configurations. When executed, our custom tools will enable the specialized agents to search the web, conduct research, extract data from websites, and generate images as needed.
In the next section, we'll test our crew to see how our agents collaborate to provide responses to user queries.
Step 6: Testing and running your crew
After building our agents, defining tasks, implementing custom tools, and creating our crew, it's time to test our ChatGPT clone and see how the agents collaborate. Let's examine how to execute our crew based on user input.
Understanding the main.py file
The main.py file serves as the entry point for our application, handling the initialization and execution of our crew:
#!/usr/bin/env python
import os
from crewai_chatgpt_clone.crew import ChatgptCloneCrew

os.makedirs("output", exist_ok=True)

def run():
    """Run the ChatGPT clone crew."""
    user_query = "Come up with beautiful new words for English that hold deep meaning."
    print(f"Running crew with user input: {user_query}")

    inputs = {"user_input": user_query}
    crew_instance = ChatgptCloneCrew()
    result = crew_instance.crew().kickoff(inputs=inputs)

    # Print the result
    print("\n\n=== CREW RESPONSE ===\n\n")
    if hasattr(result, "raw"):
        print(result.raw)
    else:
        print(result)

if __name__ == "__main__":
    run()
This file:
- Creates an output directory for any generated files
- Defines a hardcoded user query (which you can replace with dynamic input if you want)
- Initializes the
ChatgptCloneCrewinstance - Passes the user input to the crew via the
kickoff()method - Displays the result
Here, the user_input variable defined in the YAML files directly play a part as the name of that variable must match in this file as well.
Running the crew with the CrewAI CLI
The CrewAI CLI also provides convenient commands for running and testing your crew. Here's how to use them:
Using the crewai run command
The simplest way to run your crew is with the crewai run command:
crewai runThis command:
- Automatically detects your project structure
- Finds your
main.pyfile and executes it - Handles environment variables from your
.envfile - Displays the output in your terminal
Advanced CLI usage
You can customize the run command with various options:
# Run with a specific input
crewai run --input '{"user_input": "Tell me about quantum computing"}'

# Run with verbose output for debugging
crewai run --verbose

# Specify a custom entry point
crewai run --entry-point custom_main.py
Testing individual tools
Before running the full crew, it's often helpful to test the individual tools to ensure they're working correctly. You can use the test_tools.py file we created earlier:
python -m src.crewai_chatgpt_clone.test_toolsThis will run all the test functions, verifying that each tool:
- Can connect to its respective API
- Returns the expected format of data
- Handles errors gracefully
Troubleshooting common issues
If you encounter problems during execution:
- API key issues: Ensure your API keys are correctly set in your .env file
- Missing dependencies: Run
crewai installto ensure all dependencies are installed - Rate limiting: Check if you're hitting API rate limits (especially with the OpenAI API)
- Tool errors: Look for error messages in the tool responses
By following these steps, you can effectively test and run your ChatGPT clone, making iterative improvements to enhance its capabilities. In production environments, you'd typically integrate this with a user interface like the Streamlit app we are going to build in the next section, allowing users to interact with your crew directly.
Step 7: Building a UI around your crew
Finally, let's create a user interface to allow users to interact with our ChatGPT clone. We'll use Streamlit, a popular Python framework for building data apps, to create a chat interface that connects to our crew.
Creating a Streamlit chat interface
Our app.py script implements a chat interface similar to ChatGPT, with a message history, input field, and smooth response rendering:
import streamlit as st
from crewai_chatgpt_clone.crew import ChatgptCloneCrew
import time
import gc
import base64

# Session state initialization for chat history
if "messages" not in st.session_state:
    st.session_state.messages = []

    # Add initial welcome message
    welcome_message = """
Hello! I can assist you with a variety of tasks using specialized agents:

1. **General Questions** - I can answer general knowledge questions
2. **Web Search** - I can search the web for real-time information
3. **In-depth Research** - I can conduct comprehensive research on topics
4. **Web Scraping** - I can extract specific data from websites
5. **Image Generation** - I can create images based on descriptions

What would you like help with today?
"""
    st.session_state.messages.append({"role": "assistant", "content": welcome_message})
This code initializes the chat history and creates a welcome message explaining the capabilities of our ChatGPT clone.
Connecting the UI to the crew
The core functionality happens when a user submits a query. Our app processes the query using our CrewAI crew and displays the response:
# Check if we need to generate a response
if st.session_state.messages and st.session_state.messages[-1]["role"] == "user":
    user_query = st.session_state.messages[-1]["content"]

    with st.chat_message("assistant"):
        with st.spinner("Processing your query..."):
            crew_instance = ChatgptCloneCrew()
            inputs = {"user_input": user_query}

            try:
                result_obj = crew_instance.crew().kickoff(inputs=inputs)

                # Extract response text
                if hasattr(result_obj, "raw") and isinstance(result_obj.raw, str):
                    response_text = result_obj.raw
                elif isinstance(result_obj, str):
                    response_text = result_obj
                else:
                    response_text = str(result_obj)

                # Display response with typewriter effect
                # ...
This section:
- Gets the user's query from the session state
- Creates a ChatgptCloneCrew instance
- Passes the query to the crew's kickoff method
- Extracts and displays the response
Enhancing the user experience
Our app includes several features to enhance the user experience:
-
Typewriter effect: Text appears character by character, simulating typing:
# Typewriter effect message_placeholder = st.empty() full_response = "" for char in response_text: full_response += char message_placeholder.markdown(full_response + "▌") time.sleep(0.01) -
Chat history: Conversations are stored in the session state and displayed in a chat-like interface:
# Display existing chat messages for message in st.session_state.messages: with st.chat_message(message["role"]): st.markdown(message["content"]) -
Reset functionality: Users can clear the chat history with a reset button:
if st.button("🗑️", help="Clear chat history"):
    reset_chat()
    st.rerun()
Running the Streamlit app
To run the app, execute the following command:
streamlit run src/crewai_chatgpt_clone/app.pyThis will start a local server and open the app in your browser. You can now interact with your ChatGPT clone through the chat interface, asking questions, searching the web, conducting research, extracting data from websites, and generating images.
The combination of CrewAI for backend intelligence and Streamlit for frontend interaction creates a powerful, user-friendly application that resembles commercial AI assistants while being fully customizable to your specific needs.
Conclusion
Throughout this tutorial, we've built a ChatGPT clone using CrewAI's multi-agent architecture. We started with project initialization, defined specialized agents using the role-goal-backstory framework, created tasks, implemented custom tools using Firecrawl's capabilities, assembled a crew with the CrewBase pattern, and added a user-friendly Streamlit interface. This project demonstrates how CrewAI enables the creation of sophisticated agent systems that can handle a wide variety of user requests through specialized agents working collaboratively.
While our implementation is functional, there's significant room for enhancement. Consider exploring CrewAI's memory capabilities for context retention across conversations, implementing custom LLM connections for model flexibility, using hierarchical processes for more complex workflows, or adding guardrails for better output validation.
For production-grade applications, CrewAI Flows offers more deterministic orchestration with fine-grained state management. The integration with Firecrawl plays a crucial role in this application, providing real-time information access, structured web scraping, and in-depth research capabilities that bridge the knowledge gap between LLMs and the real world. This combination of agent orchestration with web-aware tools unlocks practical applications that can go beyond simple chatbots to truly assist users with complex, dynamic information needs.
Frequently Asked Questions
What is CrewAI used for?
CrewAI is used to build multi-agent systems where specialized AI workers collaborate on tasks with clear roles, goals, and workflows.
Do I need Python to use CrewAI?
Yes. CrewAI is a Python framework, and most integrations and tooling are built around Python workflows.
What is the difference between Crews and Flows?
Crews enable autonomous collaboration, while Flows provide deterministic, event-driven orchestration with tighter control and state management.
How do CrewAI agents use tools?
Agents can be wired to tools that perform actions like web search, data extraction, or image generation, and tasks decide when tools are invoked.
Can I add real-time web data to CrewAI?
Yes. You can connect tools like Firecrawl to search, scrape, and extract live web data so your agents can answer up-to-date questions.
Is CrewAI good for production systems?
It can be, as long as you add evals, logging, and guardrails around tool usage and outputs to ensure reliability.