
The hype around Llama 4 was very short-lived as this herd didn't meet the high expectations set by Meta's announcement post when tried in the wild. However, there are still many pros to the model family such as:
- Efficiency: the MoE architecture activates only a fraction of parameters per token, reducing computational load
- Long context: Scout's 10 million token context window is ideal for analyzing large texts or multiple documents
- Multimodal capabilities: enables applications combining text and images, like visual question answering
- Open access: available under a custom commercial license, fostering innovation
Despite these shortcomings, Llama 4 models can be significantly improved for specific tasks through fine-tuning. In this article, we'll guide you through the complete process of fine-tuning Llama 4 on a custom question-answering dataset, covering everything from dataset preparation to model inference.
Note: If you want to jump straight into the code, you can check out our GitHub repository for the full details.
How to Find a Dataset For Fine-tuning Llama 4?
Finding the right dataset is crucial for successful fine-tuning of any language model, including Llama 4. The dataset should align with your intended use case and contain high-quality examples that demonstrate the behavior you want the model to learn.
Here are key considerations when selecting or creating a dataset for fine-tuning:
- Relevance: The dataset should closely match your target use case
- Quality: Data should be clean, well-formatted, and free of errors
- Size: While bigger isn't always better, aim for at least a few thousand examples
- Diversity: Include various examples covering different aspects of the desired behavior
- Format: Data should follow a consistent instruction-response format
Public datasets
There are already hundreds of high-quality open-source datasets to fine-tune models like Llama 4 and most of them are hosted on HuggingFace.
Despite this high availability of public datasets, there are many scenarios where you might need to create your own datasets to fine-tune models for specific tasks or domains. Here are approaches to build custom datasets:
- Manual creation:
- Write your own instruction-response pairs
- Most time-consuming but highest quality control
- Ideal for specialized domains
- Semi-automated generation:
- Use existing LLMs to generate initial examples
- Human review and editing for quality
- Faster than manual creation while maintaining quality
- Data collection:
- Convert existing knowledge base or documentation
- Extract from customer interactions
- Transform domain-specific content into instruction format
Whichever approach you choose, you will need a web scraping solution to curate initial raw data from the web. This is where Firecrawl comes in.
Firecrawl provides web scraping and crawling capabilities through an API interface. Rather than using CSS selectors or XPath expressions which can break when websites change, it uses AI-powered extraction to identify and collect data using natural language descriptions. It can also convert entire websites into a single text document under the LLMs.txt standard, which is an ideal format to generate high-quality datasets for LLMs.
In this article, we'll use Firecrawl's markdown scraping mode, where it can transform raw HTML webpages into clean markdown documents. Let's get started.
How to Create a Dataset From Scratch to Fine-tune Llama 4?
For the dataset, we will choose an online knowledge base on the Bullet Echo mobile game. Bullet Echo is my favorite multiplayer game with short battle royale matches you can play in 2-3 minutes. To progress through ranks, you must be a tactical master as the gameplay involves controlling different heroes with different abilities in a top-down 2D shooting format:

The entire game details are maintained by the community at Bullet Echo Fandom:
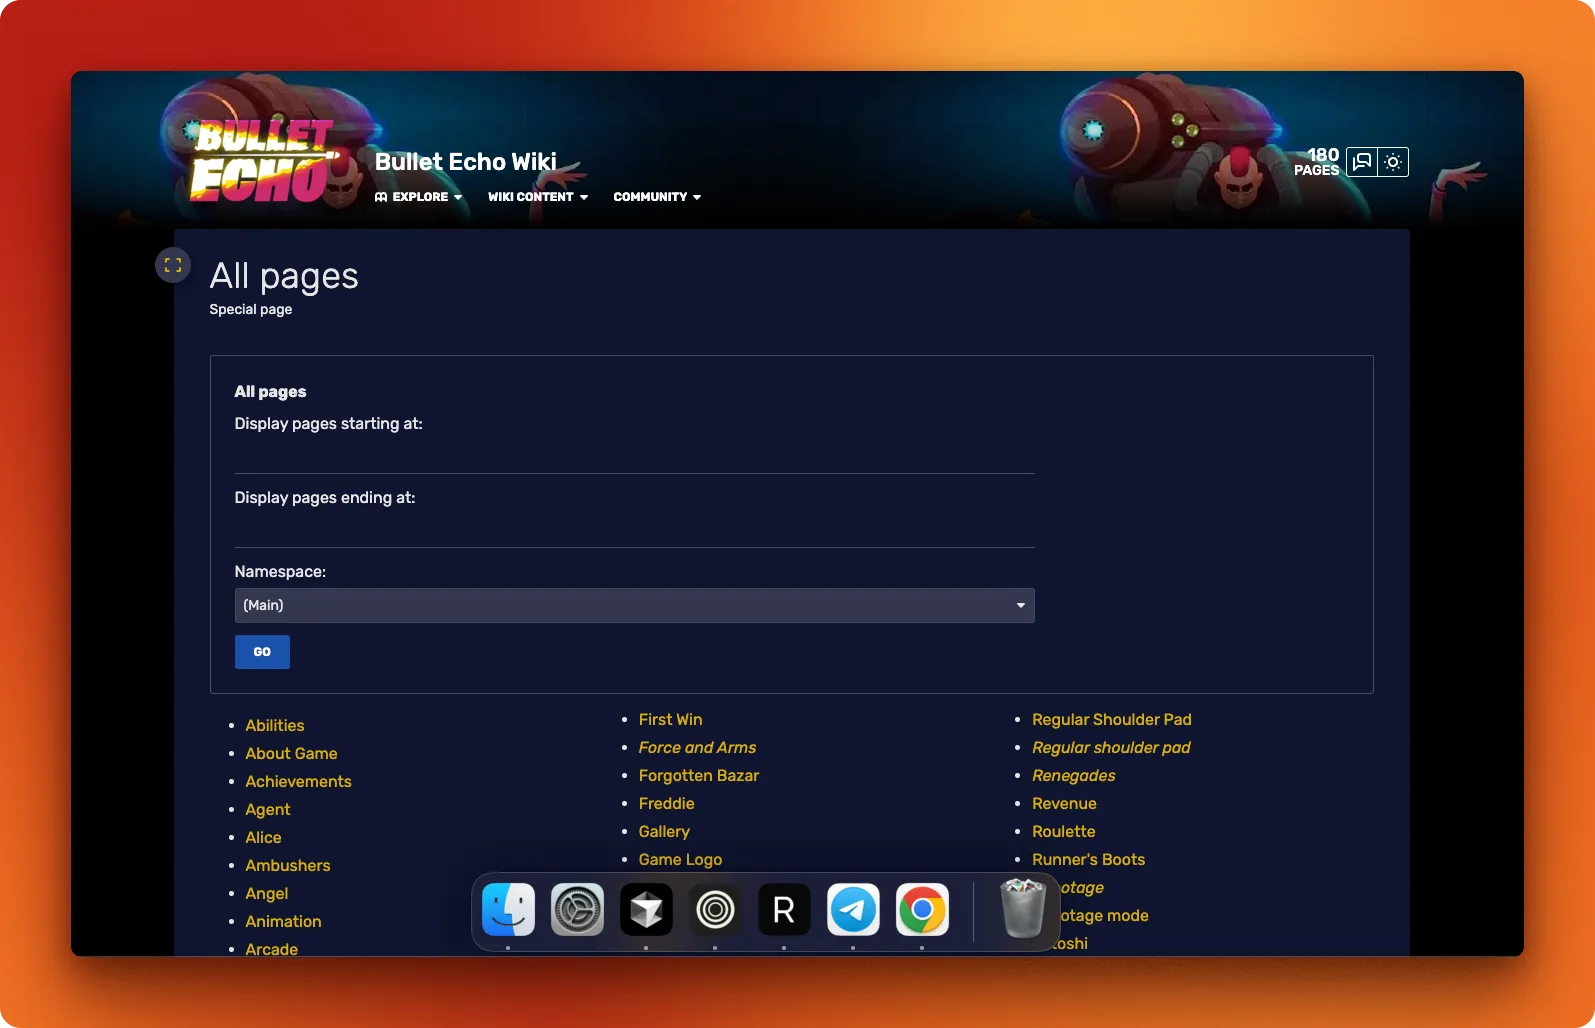
The wiki database is divided into 180 article and our job is to scrape all these articles and turn them into a clean dataset in the question-answer format you see below:
{
  {
    "id": "c7296197-34a1-4eba-bc54-f2044c01af15",
    "question": "Why might a player choose a tank character like Ramsay or Leviathan in Bullet Echo?",
    "answer": "A player might choose a tank character like Ramsay or Leviathan in Bullet Echo because tanks are designed to be more durable and absorb more damage, helping protect their team and lead pushes during gameplay."
  },
  {
    "id": "b1b148c6-e0d7-491b-a87a-f299824cb934",
    "question": "What are base stats in Bullet Echo and how do they affect gameplay?",
    "answer": "Base stats in Bullet Echo refer to the fundamental characteristics of a hero, such as health, damage, speed, and armor. These stats influence how effectively a hero can survive, move, and engage in combat, making them crucial for gameplay performance."
  },
  ...
}
All QA pairs combined must teach an LLM the game trivia in its entirety. So, let's see how to go from an initial catalogue of articles to a JSON dataset above step-by-step.
1. Scrape all article links
Our first step involves the following mini-steps:
- Scrape all article links from
https://bullet-echo.fandom.com/wiki/Special:AllPagespage, which contains 180 links - Use Firecrawl's batch-scraping feature to download each link's contents as markdown.
- Save each page's content as a Markdown file, creating a document database
Let's examine how the scrape.py script accomplishes this:
import time
from pathlib import Path
from typing import List

from firecrawl import FirecrawlApp
from pydantic import BaseModel
from dotenv import load_dotenv

# Load environment variables
load_dotenv()

# Initialize Firecrawl app
app = FirecrawlApp()
This initial section imports necessary libraries: time for managing delays between API calls, Path for file handling, List for type annotations, and the core components for our scraping task - FirecrawlApp, BaseModel from Pydantic, and load_dotenv for environment configuration.
# Define data models
class Article(BaseModel):
    url: str
    title: str


class ArticleList(BaseModel):
    articles: List[Article]
This is where Firecrawl's AI-powered extraction shines. Instead of writing brittle CSS selectors or XPath expressions, we define Pydantic models that describe what we want to extract. By creating these structured classes, we're essentially telling Firecrawl's AI to identify and extract content matching this structure - articles with URLs and titles - regardless of the specific HTML formatting.
def save_article(status_data, path):
    """
    Save each article to markdown file

    Args:
        status_data: Data returned from the batch scrape status
        path: Directory path to save the markdown files
    """
    # Create the directory if it doesn't exist
    Path(path).mkdir(parents=True, exist_ok=True)

    for s in status_data["data"]:
        url = s["metadata"].get("url")
        title = s["metadata"].get("og:title")

        if url and title:
            filename = Path(path) / f"{title}.md"
            # Check if the file already exists
            if not filename.exists():
                with open(filename, "w") as f:
                    f.write(status_data["markdown"])
This helper function handles saving the scraped content. It creates the output directory if needed, extracts metadata like URL and title from each result, and writes the markdown content to files named after each article title.
def main():
    # Scrape the wiki pages list
    base_url = "https://bullet-echo.fandom.com/wiki/Special:AllPages"

    result = app.scrape_url(
        base_url,
        params={
            "formats": ["extract"],
            "extract": {"schema": ArticleList.model_json_schema()},
        },
    )
In the main function, we start by scraping the wiki's index page. Notice how we pass our Pydantic model's schema as a parameter to Firecrawl. This is the key to AI-powered extraction - we're providing a structured description of what to extract rather than specifying HTML elements.
    # Extract all article URLs
    all_articles = [a["url"] for a in result["extract"]["articles"]]
    print(f"Found {len(all_articles)} articles")

    # Write the links to a text file
    with open("all_articles.txt", "w") as f:
        for article in all_articles:
            f.write(article + "\n")
After receiving the structured data from Firecrawl, we extract the URLs, print a count, and save them to a text file for reference.
    # Batch scrape the article contents
    job = app.async_batch_scrape_urls(all_articles)
    job_id = job["id"]

    # Monitor the job status and save results
    while True:
        status = app.check_batch_scrape_status(job_id)
        if status["status"] == "completed":
            print("Batch scrape completed successfully!")
            break

        # Save the partial results
        save_article(status, "bullet-echo-wiki")

        print("Waiting for batch scrape to complete...")
        time.sleep(30)


if __name__ == "__main__":
    main()
Finally, we use Firecrawl's batch scraping capability to process all articles asynchronously. The script initiates the job, then enters a monitoring loop that checks status every 30 seconds, saves any completed results, and continues until all articles are processed. The if __name__ == "__main__" ensures the script runs when executed directly.
After this step, you must have a bullet-echo-wiki directory containing markdown documents with all information about the game.
2. Chunk the documents
Now that we have our collection of markdown files, we need to break them down into smaller, manageable pieces. This chunking process is crucial for several reasons:
- Large documents contain too much information for effective QA generation
- Smaller chunks help maintain context coherence when generating questions later
- Breaking content into specific topics leads to more focused and relevant QA pairs
- It allows for parallel processing, significantly speeding up the dataset creation
Let's examine how our chunk.py script handles this task:
import json
import uuid
import logging
from typing import List, Dict, Any, Optional, Callable
from concurrent.futures import ThreadPoolExecutor
from pathlib import Path

from langchain_text_splitters import RecursiveCharacterTextSplitter
from openai import OpenAI
Our script begins by importing necessary libraries. We're using langchain_text_splitters for intelligent document chunking and the OpenAI client for improving chunk coherence. The script also includes logging and error handling throughout, which we won't detail here.
def create_text_splitter(
    chunk_size: int = 512,
    chunk_overlap: int = 128
) -> RecursiveCharacterTextSplitter:
    return RecursiveCharacterTextSplitter(
        chunk_size=chunk_size,
        chunk_overlap=chunk_overlap,
    )
This function creates a text splitter with configurable chunk size and overlap. The RecursiveCharacterTextSplitter is particularly effective for markdown content as it intelligently breaks text along semantic boundaries like paragraphs and sections rather than arbitrary character counts.
def split_text(
    text: str,
    splitter: Optional[RecursiveCharacterTextSplitter] = None,
    chunk_size: int = 1024,
    chunk_overlap: int = 256,
) -> List[str]:
    if splitter is None:
        splitter = create_text_splitter(chunk_size, chunk_overlap)

    splits = splitter.split_text(text)
    return splits
Here we actually apply the splitter to our text. Notice how we allow passing a pre-configured splitter or creating one on-the-fly with custom parameters. This flexibility is important when processing different types of content.
def improve_chunk_coherence(
    text: str,
    client: Optional[OpenAI] = None,
    model: str = "gpt-4o-mini"
) -> str:
    if client is None:
        client = create_openai_client()

    prompt = f"""
    You are a helpful assistant that improves the coherence of text.
    Please improve the coherence of the following text:
    {text}

    Don't make up facts or hallucinate. Your job is
    to make the text more coherent and easier to understand, only.

    If the text contains URLs or hyperlinks, remove them while preserving their text. For example:
    [This is a link](https://www.example.com) -> This is a link

    Only return the improved text, no other text or commentary.
    """

    response = client.responses.create(
        model=model,
        input=prompt,
    )
    return response.output_text
One challenge with chunking is that it can break the flow of text, leading to chunks that lack context or proper transitions. This function addresses that issue by using a language model to improve the coherence of each chunk, ensuring our dataset consists of well-formed, readable pieces of text.
def process_chunks_in_parallel(
    chunks: List[str],
    processing_function: Callable[[str], str],
    max_workers: int = 6
) -> List[str]:
    with ThreadPoolExecutor(max_workers=max_workers) as executor:
        processed_chunks = list(executor.map(processing_function, chunks))

    return processed_chunks
To speed up processing, especially when using the OpenAI API for coherence improvement, we implement parallel processing. This significantly reduces the time needed to process large numbers of chunks.
def add_metadata_to_chunks(
    chunks: List[str],
    source_file: Optional[str] = None
) -> List[Dict[str, Any]]:
    result = []

    for chunk in chunks:
        chunk_dict = {"content": chunk, "chunk_id": str(uuid.uuid4())}
        if source_file:
            chunk_dict["source_file"] = source_file
        result.append(chunk_dict)

    return result
After creating and refining our chunks, we need to add metadata to track their origin. Each chunk gets a unique ID, and we preserve information about which source file it came from. This will be valuable for tracing and debugging our dataset later.
def process_directory(
    directory_path: str,
    output_file: str,
    chunk_size: int = 512,
    chunk_overlap: int = 128,
    improve_coherence: bool = True,
    max_workers: int = 6,
    model: str = "gpt-4o-mini",
    file_extension: str = ".md",
) -> List[Dict[str, Any]]:
    # Get all markdown files in the directory
    directory = Path(directory_path)
    markdown_files = [f for f in directory.glob(f"**/*{file_extension}")]

    # Create OpenAI client to reuse across files
    client = create_openai_client() if improve_coherence else None

    # Process each file and collect all chunks
    all_chunks = []

    for file_path in markdown_files:
        with open(file_path, "r", encoding="utf-8") as f:
            text = f.read()

        # Add file information to the processing context
        file_relative_path = file_path.relative_to(directory).as_posix()

        # Split text into chunks
        splitter = create_text_splitter(chunk_size, chunk_overlap)
        chunks = split_text(text, splitter)

        # Improve coherence if requested
        if improve_coherence and client:
            processing_fn = lambda chunk: improve_chunk_coherence(
                chunk, client, model
            )
            chunks = process_chunks_in_parallel(chunks, processing_fn, max_workers)

        # Add metadata to chunks, including file source information
        chunks_with_metadata = add_metadata_to_chunks(chunks, file_relative_path)

        all_chunks.extend(chunks_with_metadata)

    # Save all chunks to a single JSON file
    if all_chunks:
        save_chunks_to_json(all_chunks, output_file)

    return all_chunks
The heart of our script is this process_directory function, which orchestrates the entire chunking process. It:
- Finds all markdown files in the target directory
- Reads each file and splits its content into chunks
- Optionally improves chunk coherence using the OpenAI API
- Adds metadata to each chunk
- Combines all chunks into a single collection
- Saves the result to a JSON file
if __name__ == "__main__":
    # Process the bullet-echo-wiki directory
    directory_path = "data/raw/bullet-echo-wiki"
    output_file = "data/raw/all_chunks.json"

    chunks = process_directory(
        directory_path=directory_path,
        output_file=output_file,
        chunk_size=512,
        chunk_overlap=128,
        improve_coherence=False,
        max_workers=6,
        model="gpt-4o-mini",
    )
When we run the script, it processes our entire bullet-echo-wiki directory. We've set a chunk size of 512 characters with a 128-character overlap between chunks. For this example, we've disabled coherence improvement, but it can be enabled for production datasets.
The output is a JSON file containing all our chunks, each with a unique ID and source information. For example:
[
  {
    "content": "Bullet Echo is a top-down multiplayer shooter with tactical gameplay. Players choose specialized characters with unique abilities and weapons, navigating dark environments where visibility is limited to their character's line of sight and sound indicators.",
    "chunk_id": "550e8400-e29b-41d4-a716-446655440000",
    "source_file": "Gameplay.md"
  },
  {
    "content": "The Tank class in Bullet Echo features heroes with high health and armor stats but slower movement speed. These heroes excel at absorbing damage for the team and creating space for allies. Popular tank heroes include Bastion, Cyclops, and Leviathan.",
    "chunk_id": "550e8400-e29b-41d4-a716-446655440001",
    "source_file": "Heroes/Tank_Class.md"
  },
  ...
]
These chunks (over 5k chunks) form the foundation for our next step: generating question-answer pairs. By breaking our content into these digestible pieces, we ensure that each QA pair will focus on a specific topic from the game, making the resulting dataset more diverse and comprehensive.
After running this script, we have a single JSON file containing all content from our wiki, neatly divided into chunks that are ready for the QA generation process.
3. Filter the documents
After chunking our documents, we inevitably end up with some content that isn't relevant or useful for our training dataset. This might include:
- Navigation elements and website boilerplate text
- Empty or nearly empty chunks
- Content unrelated to Bullet Echo
- Duplicate information
- Promotional content or advertisements
Filtering is a critical step to ensure our QA pairs are generated from high-quality, relevant content. Without this step, we'd waste computational resources generating questions about irrelevant information and potentially introduce noise into our fine-tuning dataset, which could degrade model performance.
Let's explore how our filter.py script handles this task:
import openai
import json
import logging
import time
import threading
from concurrent.futures import ThreadPoolExecutor
from pathlib import Path
from dotenv import load_dotenv
from typing import List, Dict, Any, Optional
from chunk import create_openai_client

load_dotenv()
We start with the necessary imports, including the OpenAI client which we'll use to evaluate the relevance of each chunk. We're also importing the create_openai_client function from our previous chunk.py script to maintain consistency.
# Simple rate limiter using a semaphore
class SimpleRateLimiter:
    def __init__(self, max_calls: int = 500, per_seconds: int = 60):
        # Calculate seconds per request to stay under the limit
        self.seconds_per_request = per_seconds / max_calls
        self.lock = threading.Lock()
        self.last_request_time = time.time()

    def wait(self):
        with self.lock:
            # Calculate time since last request
            current_time = time.time()
            elapsed = current_time - self.last_request_time

            # If not enough time has passed, sleep
            if elapsed < self.seconds_per_request:
                sleep_time = self.seconds_per_request - elapsed
                time.sleep(sleep_time)

            # Update last request time
            self.last_request_time = time.time()
Since we'll be making many API calls to evaluate over 5k chunks, we implement a simple rate limiter to ensure we don't exceed OpenAI's rate limits (rate limits vary based on your usage tier; mine is at the lowest tier 1, which means I have to tread very lightly). This class calculates how much time should elapse between requests and enforces that timing with a thread lock.
def is_chunk_relevant(
    chunk: Dict[str, Any],
    client: Optional[openai.OpenAI] = None,
    model: str = "gpt-4.1-mini",
    rate_limiter: Optional[SimpleRateLimiter] = None,
) -> bool:
    if client is None:
        client = create_openai_client()

    content = chunk.get("content", "")

    # Skip empty chunks
    if not content or len(content.strip()) < 20:
        return False

    # Apply rate limiting if provided
    if rate_limiter:
        rate_limiter.wait()

    prompt = f"""
    You are a content filter for a Bullet Echo game dataset. Analyze this text and determine if it's relevant.

    Text: {content}

    Rules:
    1. KEEP content if it contains useful information about Bullet Echo game (characters, gameplay, mechanics, strategies, etc.)
    2. REJECT content if it's just navigation links, table of contents, calls to action, or generic website components
    3. REJECT content if it's completely unrelated to Bullet Echo
    4. REJECT content that's just advertisements or promotional material

    Respond with ONLY:
    - "KEEP" if the content is relevant and useful about Bullet Echo
    - "REJECT" if the content should be filtered out
    """

    response = client.chat.completions.create(
        model=model,
        messages=[{"role": "user", "content": prompt}],
        temperature=0,
        max_tokens=10,
    )
    result = response.choices[0].message.content.strip().upper()
    return result == "KEEP"
This is the heart of our filtering logic - a function that evaluates each chunk using GPT-4.1-mini to determine if it contains relevant Bullet Echo game information. The prompt asks the model to classify content based on specific rules, returning either "KEEP" or "REJECT". We set temperature to 0 for deterministic responses and limit the token count since we only need a single-word answer.
def filter_chunks(
    input_file: str,
    output_file: str,
    max_workers: int = 6,
    model: str = "gpt-4.1-mini",
    max_requests_per_minute: int = 450,  # Slightly below 500 for safety
) -> List[Dict[str, Any]]:
    with open(input_file, "r", encoding="utf-8") as f:
        all_chunks = json.load(f)

    # Create OpenAI client to reuse
    client = create_openai_client()

    # Create simple rate limiter
    rate_limiter = SimpleRateLimiter(
        max_calls=max_requests_per_minute, per_seconds=60
    )

    # Function to determine if each chunk is relevant
    def process_chunk(chunk):
        is_relevant = is_chunk_relevant(chunk, client, model, rate_limiter)
        if is_relevant:
            return chunk
        return None

    # Adjust worker count based on rate limit
    # Using fewer workers makes rate limiting more effective
    suggested_workers = min(max_workers, max(1, max_requests_per_minute // 60))

    with ThreadPoolExecutor(max_workers=suggested_workers) as executor:
        filtered_chunks = list(executor.map(process_chunk, all_chunks))

    # Remove None values (filtered out chunks)
    filtered_chunks = [chunk for chunk in filtered_chunks if chunk is not None]

    # Save filtered chunks
    output_path = Path(output_file)
    output_path.parent.mkdir(parents=True, exist_ok=True)

    with open(output_path, "w", encoding="utf-8") as f:
        json.dump(filtered_chunks, f)

    return filtered_chunks
The filter_chunks function orchestrates the entire filtering process. It:
- Loads all chunks from the JSON file created in the previous step
- Sets up a shared OpenAI client and rate limiter
- Creates a thread pool for parallel processing
- Maps each chunk through our relevance classifier
- Removes chunks that were classified as irrelevant (returned as None)
- Saves the filtered set to a new JSON file
An interesting detail here is the dynamic adjustment of worker count based on rate limits. Since we're limited to around 450 requests per minute, we adjust the number of parallel workers to avoid overwhelming the API.
if __name__ == "__main__":
    # Filter chunks from the all_chunks.json file
    input_file = "data/raw/all_chunks.json"
    output_file = "data/processed/filtered_chunks.json"

    filtered_chunks = filter_chunks(
        input_file=input_file,
        output_file=output_file,
        max_workers=6,
        model="gpt-4.1-mini",
        max_requests_per_minute=450,  # Setting slightly below 500 for safety
    )
When executed directly, the script processes our chunked data, evaluating each piece with GPT-4.1-mini. The result is a refined collection of chunks that are directly relevant to Bullet Echo game information.
The filtering process actually removed about %80 of the dataset (over 1100 chunks), leaving us with a much cleaner dataset. At this stage, our data might look like:
[
  {
    "content": "Bullet Echo heroes are divided into classes based on their abilities and playstyles. The primary hero classes are: Scout (fast, low health, stealth abilities), Assault (balanced stats, offensive capabilities), Tank (high health, slow movement), Sniper (long-range damage, vulnerable up close), and Support (team-focused abilities and buffs).",
    "chunk_id": "a3e691c9-12f4-4c8c-b4d5-c7d4e8f9a0b1",
    "source_file": "Heroes/Classes.md"
  },
  {
    "content": "In Bullet Echo, each character's vision is represented by a cone of light that extends outward from them. Players can only see enemies when they enter this light cone. Firing weapons temporarily increases visibility, revealing your position to opponents.",
    "chunk_id": "55c2a7e8-93d1-47b6-8e34-d1c2b3a4f5g6",
    "source_file": "Gameplay/Mechanics.md"
  }
]
With our content now filtered to retain only the most relevant information about Bullet Echo, we're ready to move on to generating question-answer pairs. The filtering step is crucial because:
- It significantly improves the quality of our training data
- It reduces computational resources needed for QA generation
- It ensures our fine-tuned model will focus on accurate Bullet Echo knowledge
- It removes potential confusion from irrelevant or promotional content
This quality-focused approach will ultimately lead to a more accurate, domain-specific fine-tuned model.
4. Generate QA pairs
With our filtered dataset containing only relevant information about Bullet Echo, we're now ready for the most critical step in our pipeline: transforming these content chunks into high-quality question-answer pairs. This transformation is what will enable our fine-tuned model to answer specific questions about the game effectively.
Let's examine how our generate_qa_pairs.py script handles this task:
import json
import uuid
import logging
import time
import threading
import os
from typing import List, Dict, Any, Optional
from pathlib import Path
from concurrent.futures import ThreadPoolExecutor

from pydantic import BaseModel
from openai import OpenAI
Again, we start with necessary imports. We're using Pydantic models for structured data handling and the OpenAI client to leverage GPT models for generating our QA pairs. The script includes similar rate limiting capabilities as our filtering script, which is crucial when making thousands of API calls.
PROMPT = """
    You are an expert at generating question-answer pairs from a given text. For each given text, you must generate 3 QA pairs.

    Your generated questions-answer pairs will be fed into an LLM to train it on how to answer questions about the Bullet Echo mobile game.

    In each question-answer pair, you must try to teach as much about the Bullet Echo mobile game as possible to the LLM. Generate the pairs in a way that you would want be taught this new mobile game.

    - Your questions must not contain references to the text itself.
    - Your questions must be about the Bullet Echo mobile game.
    - Your questions must be about the game's mechanics, features, and gameplay.
    - Your questions must be about the game's story, characters, and world.
    - Your questions must be about the game's settings and options.
    - Your questions must be about the game's secrets and Easter eggs.
    - Do not make up facts about the game, only use information from the text.

    Here is the text:

    {text}
"""
This prompt is the heart of our QA generation approach. It provides detailed instructions to the GPT model about what types of questions to generate, ensuring coverage of different aspects of the game while staying faithful to the source material. Notice how we request 3 QA pairs per chunk, which gives us a diverse dataset from each piece of content.
# Define Pydantic models for parsing the response
class Pair(BaseModel):
    question: str
    answer: str


class QAPairs(BaseModel):
    pairs: List[Pair]
These Pydantic models define the structure we expect from the OpenAI API response. Using these models with OpenAI's parsing capabilities ensures we receive properly structured data that we can directly use.
def generate_qa(
    text: str, model: str = "gpt-4o", rate_limiter: Optional[SimpleRateLimiter] = None
) -> QAPairs:
    client = OpenAI()

    # Apply rate limiting if provided
    if rate_limiter:
        rate_limiter.wait()

    response = client.beta.chat.completions.parse(
        model=model,
        messages=[
            {"role": "system", "content": PROMPT},
            {"role": "user", "content": text},
        ],
        response_format=QAPairs,
    )

    return response.choices[0].message.parsed
This function makes a single API call to generate QA pairs from a text chunk. We're using OpenAI's parse method, which automatically handles the conversion of the response to our Pydantic model. Notice we provide our carefully crafted prompt as the system message and the content chunk as the user message.
def generate_qa_pairs_from_chunks(
    chunks: List[Dict[str, Any]],
    model: str = "gpt-4o",
    max_workers: int = 3,
    max_requests_per_minute: int = 450,
    save_interval: int = 10,
    output_file: str = "qa_dataset.json",
) -> List[Pair]:
    # Create rate limiter
    rate_limiter = SimpleRateLimiter(max_calls=max_requests_per_minute, per_seconds=60)

    # Adjust worker count based on rate limit
    suggested_workers = min(max_workers, max(1, max_requests_per_minute // 60))

    all_qa_pairs = []

    # Check if we have progress to resume from
    temp_output_file = output_file.replace(".json", "_temp.json")
    if os.path.exists(temp_output_file):
        # Load existing progress code here...
        pass
    else:
        completed_chunk_ids = set()

    # Filter out already processed chunks
    remaining_chunks = [
        chunk for chunk in chunks if chunk.get("chunk_id") not in completed_chunk_ids
    ]

    # Process chunks in batches for periodic saving
    batch_size = save_interval
    processed_count = 0

    for i in range(0, len(remaining_chunks), batch_size):
        batch = remaining_chunks[i : i + batch_size]

        batch_qa_pairs = []
        with ThreadPoolExecutor(max_workers=suggested_workers) as executor:
            # Create a list of tasks
            tasks = []
            for chunk in batch:
                tasks.append((chunk["content"], chunk.get("chunk_id", "unknown")))

            # Map function to process each chunk with its ID
            def process_chunk(task):
                content, chunk_id = task
                result = generate_qa(content, model, rate_limiter)
                # Add source chunk ID to each pair for tracking
                for pair in result.pairs:
                    pair_dict = pair.dict()
                    pair_dict["source_chunk_id"] = chunk_id
                    batch_qa_pairs.append(pair_dict)
                return result.pairs

            # Execute tasks
            list(executor.map(process_chunk, tasks))

        # Add the new pairs to our results
        for pair_dict in batch_qa_pairs:
            all_qa_pairs.append(
                Pair(question=pair_dict["question"], answer=pair_dict["answer"])
            )

        # Save intermediate progress
        processed_count += len(batch)
        save_intermediate_results(batch_qa_pairs, temp_output_file, append=bool(i > 0))

    return all_qa_pairs
This function orchestrates the batch processing of our chunks. The notable features include:
- Resumable processing - if the script is interrupted, it can pick up where it left off
- Batch processing with periodic saving of progress
- Parallel processing with rate limiting to optimize API usage
- Source tracking - each QA pair maintains a link to its source chunk
def format_qa_pairs(qa_pairs: List[Pair]) -> List[Dict[str, Any]]:
    qa_dataset = []

    for pair in qa_pairs:
        qa_dataset.append(
            {
                "id": str(uuid.uuid4()),
                "question": pair.question,
                "answer": pair.answer,
            }
        )

    return qa_dataset
This function converts our QA pairs into a standardized format with unique identifiers for each pair. The resulting dataset is ready for fine-tuning or other downstream tasks.
if __name__ == "__main__":
    # Example usage
    chunks_file = "data/processed/filtered_chunks.json"
    output_file = "data/output/qa_dataset.json"

    process_chunks(
        chunks_file=chunks_file,
        output_file=output_file,
        model="gpt-4.1",
        max_workers=3,
        max_requests_per_minute=300,
        save_interval=10,  # Save progress every 10 chunks
    )
When executed directly, the script processes our filtered chunks using GPT-4.1 to generate QA pairs, with conservative rate limiting and regular progress saving. We're typically generating 3 QA pairs per chunk, so our 1100 filtered chunks will yield around 3300 QA pairs in the final dataset.
The resulting dataset has this structure:
[
  {
    "id": "b1b148c6-e0d7-491b-a87a-f299824cb934",
    "question": "What are base stats in Bullet Echo and how do they affect gameplay?",
    "answer": "Base stats in Bullet Echo refer to the fundamental characteristics of a hero, such as health, damage, speed, and armor. These stats influence how effectively a hero can survive, move, and engage in combat, making them crucial for gameplay performance."
  },
  {
    "id": "c7296197-34a1-4eba-bc54-f2044c01af15",
    "question": "Why might a player choose a tank character like Ramsay or Leviathan in Bullet Echo?",
    "answer": "A player might choose a tank character like Ramsay or Leviathan in Bullet Echo because tanks are designed to be more durable and absorb more damage, helping protect their team and lead pushes during gameplay."
  },
  ...
]
This approach to QA generation has several advantages:
- Diversity: We get multiple question types from each content chunk
- Consistency: The structured prompt ensures we cover key aspects of the game
- Quality control: By using GPT-4.1, we get high-quality, natural-sounding questions and answers
- Factual accuracy: The model generates questions only from the given content, avoiding hallucination
With our QA dataset generated, we're ready for the final step: uploading it to HuggingFace to make it available for fine-tuning.
5. Upload the dataset to HF
The final step in our dataset preparation pipeline is to upload our QA pairs to Hugging Face, making them easily accessible for fine-tuning. Hugging Face has become the standard repository for datasets and models in the AI community, offering versioning, easy access, and integration with popular training frameworks.
Let's look at how our upload_to_hf.py script handles this task:
import os
import json
from pathlib import Path
import logging
from dotenv import load_dotenv
from datasets import Dataset, DatasetDict
from huggingface_hub import login, HfApi, create_repo

# Load environment variables
load_dotenv()
We import the necessary libraries, including the Hugging Face datasets package for dataset handling and huggingface_hub for API interaction.
def prepare_dataset(input_file: Path) -> DatasetDict:
    """Prepare the dataset for HuggingFace Hub upload."""
    with open(input_file, "r", encoding="utf-8") as f:
        data = json.load(f)

    # Create Dataset object with all fields
    dataset = Dataset.from_dict(
        {
            "id": [item["id"] for item in data],
            "question": [item["question"] for item in data],
            "answer": [item["answer"] for item in data],
        }
    )

    # Split into train/validation sets
    splits = dataset.train_test_split(
        test_size=0.1, seed=42, shuffle=True  # 10% for validation
    )

    # Create DatasetDict
    dataset_dict = DatasetDict(
        {"train": splits["train"], "validation": splits["test"]}
    )

    return dataset_dict
This function transforms our JSON dataset into Hugging Face's dataset format. The key steps are:
- Loading the QA pairs from our JSON file
- Converting to a Hugging Face
Datasetobject - Splitting the data into training (90%) and validation (10%) sets
- Creating a
DatasetDictwith both splits
This structure is ideal for fine-tuning as it provides both training data and a held-out validation set to evaluate model performance.
def push_to_hub(
    dataset_dict: DatasetDict, repo_name: str, token: str = None, private: bool = False
):
    """Push the dataset to HuggingFace Hub with versioning."""
    # Login to Hugging Face
    api = HfApi(token=token)
    if token:
        login(token)

    # Ensure repository exists
    try:
        api.repo_info(repo_id=repo_name, repo_type="dataset")
    except Exception:
        create_repo(
            repo_id=repo_name,
            repo_type="dataset",
            private=private,
            token=token,
            exist_ok=True,
        )

    # Create repository name
    repo_id = f"{repo_name}"

    # Push to hub
    dataset_dict.push_to_hub(
        repo_id,
        private=private,
        commit_message="Upload OpenAI Agents Python QA dataset",
    )
This function handles the actual upload to Hugging Face:
- Authenticating with the Hugging Face API using a token
- Creating a repository if it doesn't already exist
- Pushing our dataset to the repository with an appropriate commit message
def main():
    """Main function to prepare and upload dataset."""
    # Configuration
    input_file = Path("data/output/qa_dataset.json")
    repo_name = "bexgboost/bullet-echo-wiki-qa"

    # Get HF token from environment or input
    token = os.getenv("HF_TOKEN")
    if not token:
        token = input("Enter your HuggingFace token: ")

    # Prepare and push dataset
    dataset_dict = prepare_dataset(input_file)
    push_to_hub(dataset_dict, repo_name, token, private=False)


if __name__ == "__main__":
    main()
When executed directly, the script loads our QA dataset, prepares it for Hugging Face, and uploads it to a public repository (in this case, "bexgboost/bullet-echo-wiki-qa").
After running this script, our dataset is available on Hugging Face Hub, where it can be:
- Browsed through a web interface to inspect the question-answer pairs
- Downloaded for local use with a single line of code
- Directly used in fine-tuning scripts without downloading
- Versioned as we make updates or improvements
The public URL for our dataset would be: https://huggingface.co/datasets/bexgboost/bullet-echo-wiki-qa
With this final step, we've completed our entire dataset creation pipeline:
- Scraping the original content with Firecrawl
- Chunking the documents into manageable pieces
- Filtering to keep only relevant content
- Generating high-quality QA pairs
- Uploading the dataset to Hugging Face
This dataset is now ready for fine-tuning Llama 4 models, which we'll cover in the next section.
Hardware requirements for fine-tuning Llama 4
Now that we understand what kind of dataset we need, let's address the biggest hurdle to our Llama 4 fine-tuning process - the hardware. Meta chose some sneaky names like Scout, Maverick and Behemoth with 17B, 17B, and 288B active parameters respectively, while shadowing the fact that these are mixture of experts (MoE) models with significantly larger total parameter counts.
So, unlike fine-tuning other open-source models like Gemma 3 on Google Colab, we need to rely on bigger hardware. Specifically:
Llama 4 Scout (109B total parameters)
- VRAM: 120-160GB with QLoRA fine-tuning
- Quantized model (4-bit): 54.5GB
- Adapters (1% of parameters): 2.18GB
- Gradients, optimizer states, activations: ~40-60GB
- Requires 2-4 NVIDIA H100 GPUs (80GB each)
- RAM: 128-256GB
- For data handling, preprocessing, and large datasets
- Disk space: At least 400GB for model weights, datasets, and checkpoints
Llama 4 Maverick (400B total parameters)
- VRAM: 300-400GB with QLoRA fine-tuning
- Quantized model (4-bit): 200GB
- Adapters, gradients, and optimizer states: ~32GB
- Overhead: ~50-100GB
- Requires 4-8 NVIDIA H100 GPUs
- RAM: 128-256GB per node
- For large data batches and gradient accumulation
- Disk space: At least 1.2 TB for model weights, and checkpoints
While QLoRA reduces memory requirements significantly, fine-tuning MoE models like Llama 4 Scout still exceeds the capabilities of consumer-grade hardware, making cloud GPU instances necessary for the task.
Setting up RunPod for fine-tuning Llama 4
With our dataset prepared and hardware requirements understood, let's set up a suitable environment for fine-tuning. For this task, we'll use RunPod, a cloud platform that provides access to high-end GPUs needed for fine-tuning large models like Llama 4.
RunPod offers the powerful GPUs we need without requiring us to invest in expensive hardware. Here's a step-by-step guide to get your environment ready:
-
Create an account: Go to RunPod and create an account.
-
Fund your account: Navigate to the Billing menu and add funds (around $25 is recommended) using a credit card or cryptocurrency.
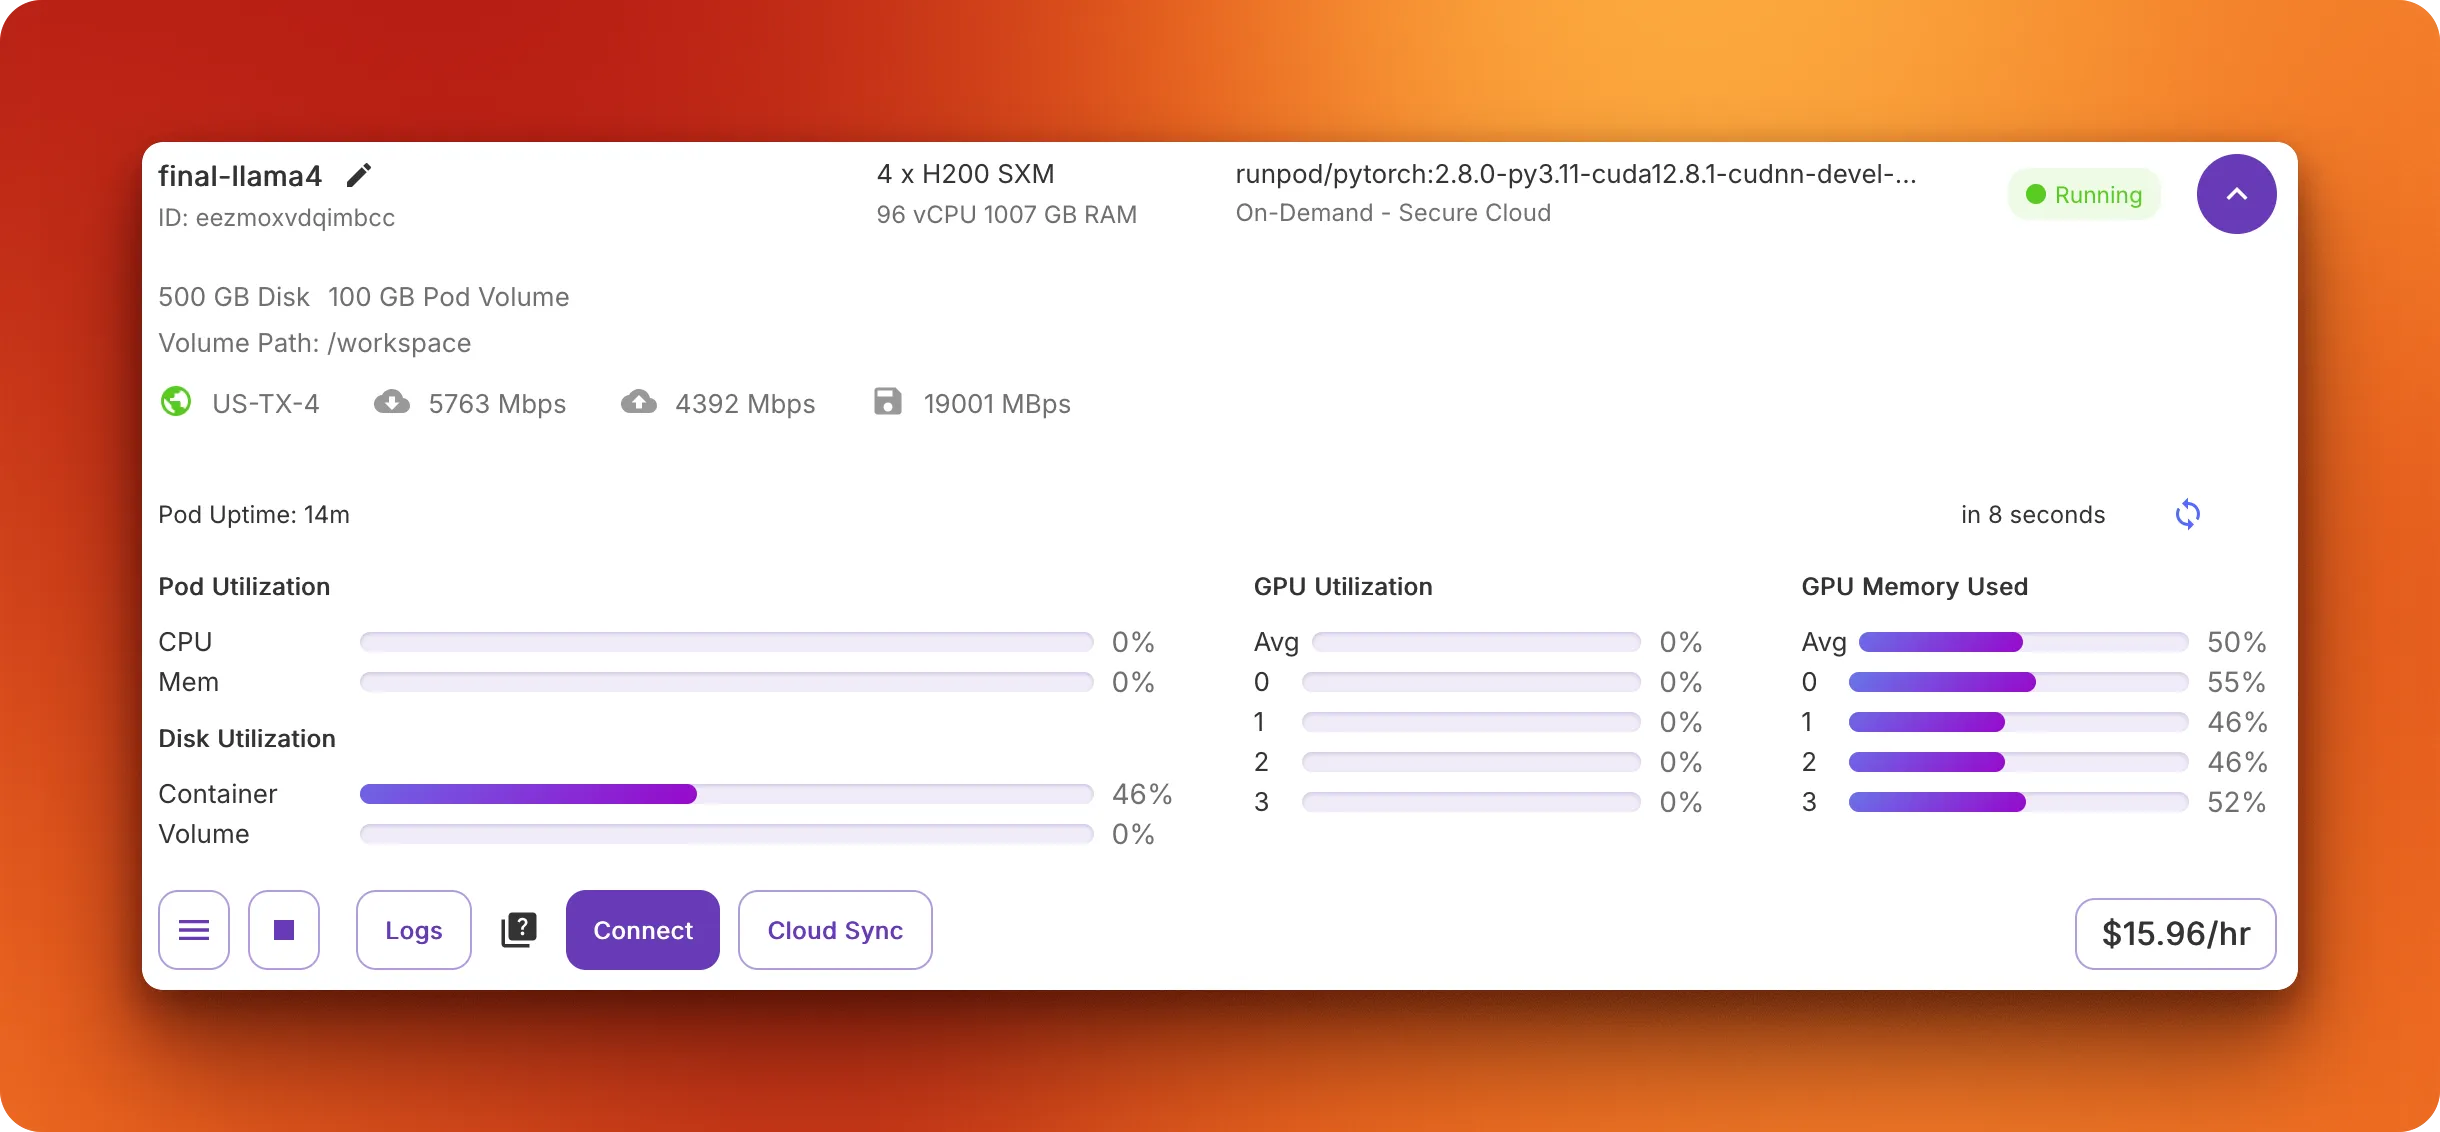
- Configure your pod: Go to the "My Pods" menu to set up your virtual server with the necessary resources:
- Select H200 SXM GPU
- Name your pod
- Choose "RunPod PyTorch 2.8.0" template
- Change the GPU count to 4 for faster training which leads to lower costs in the long run
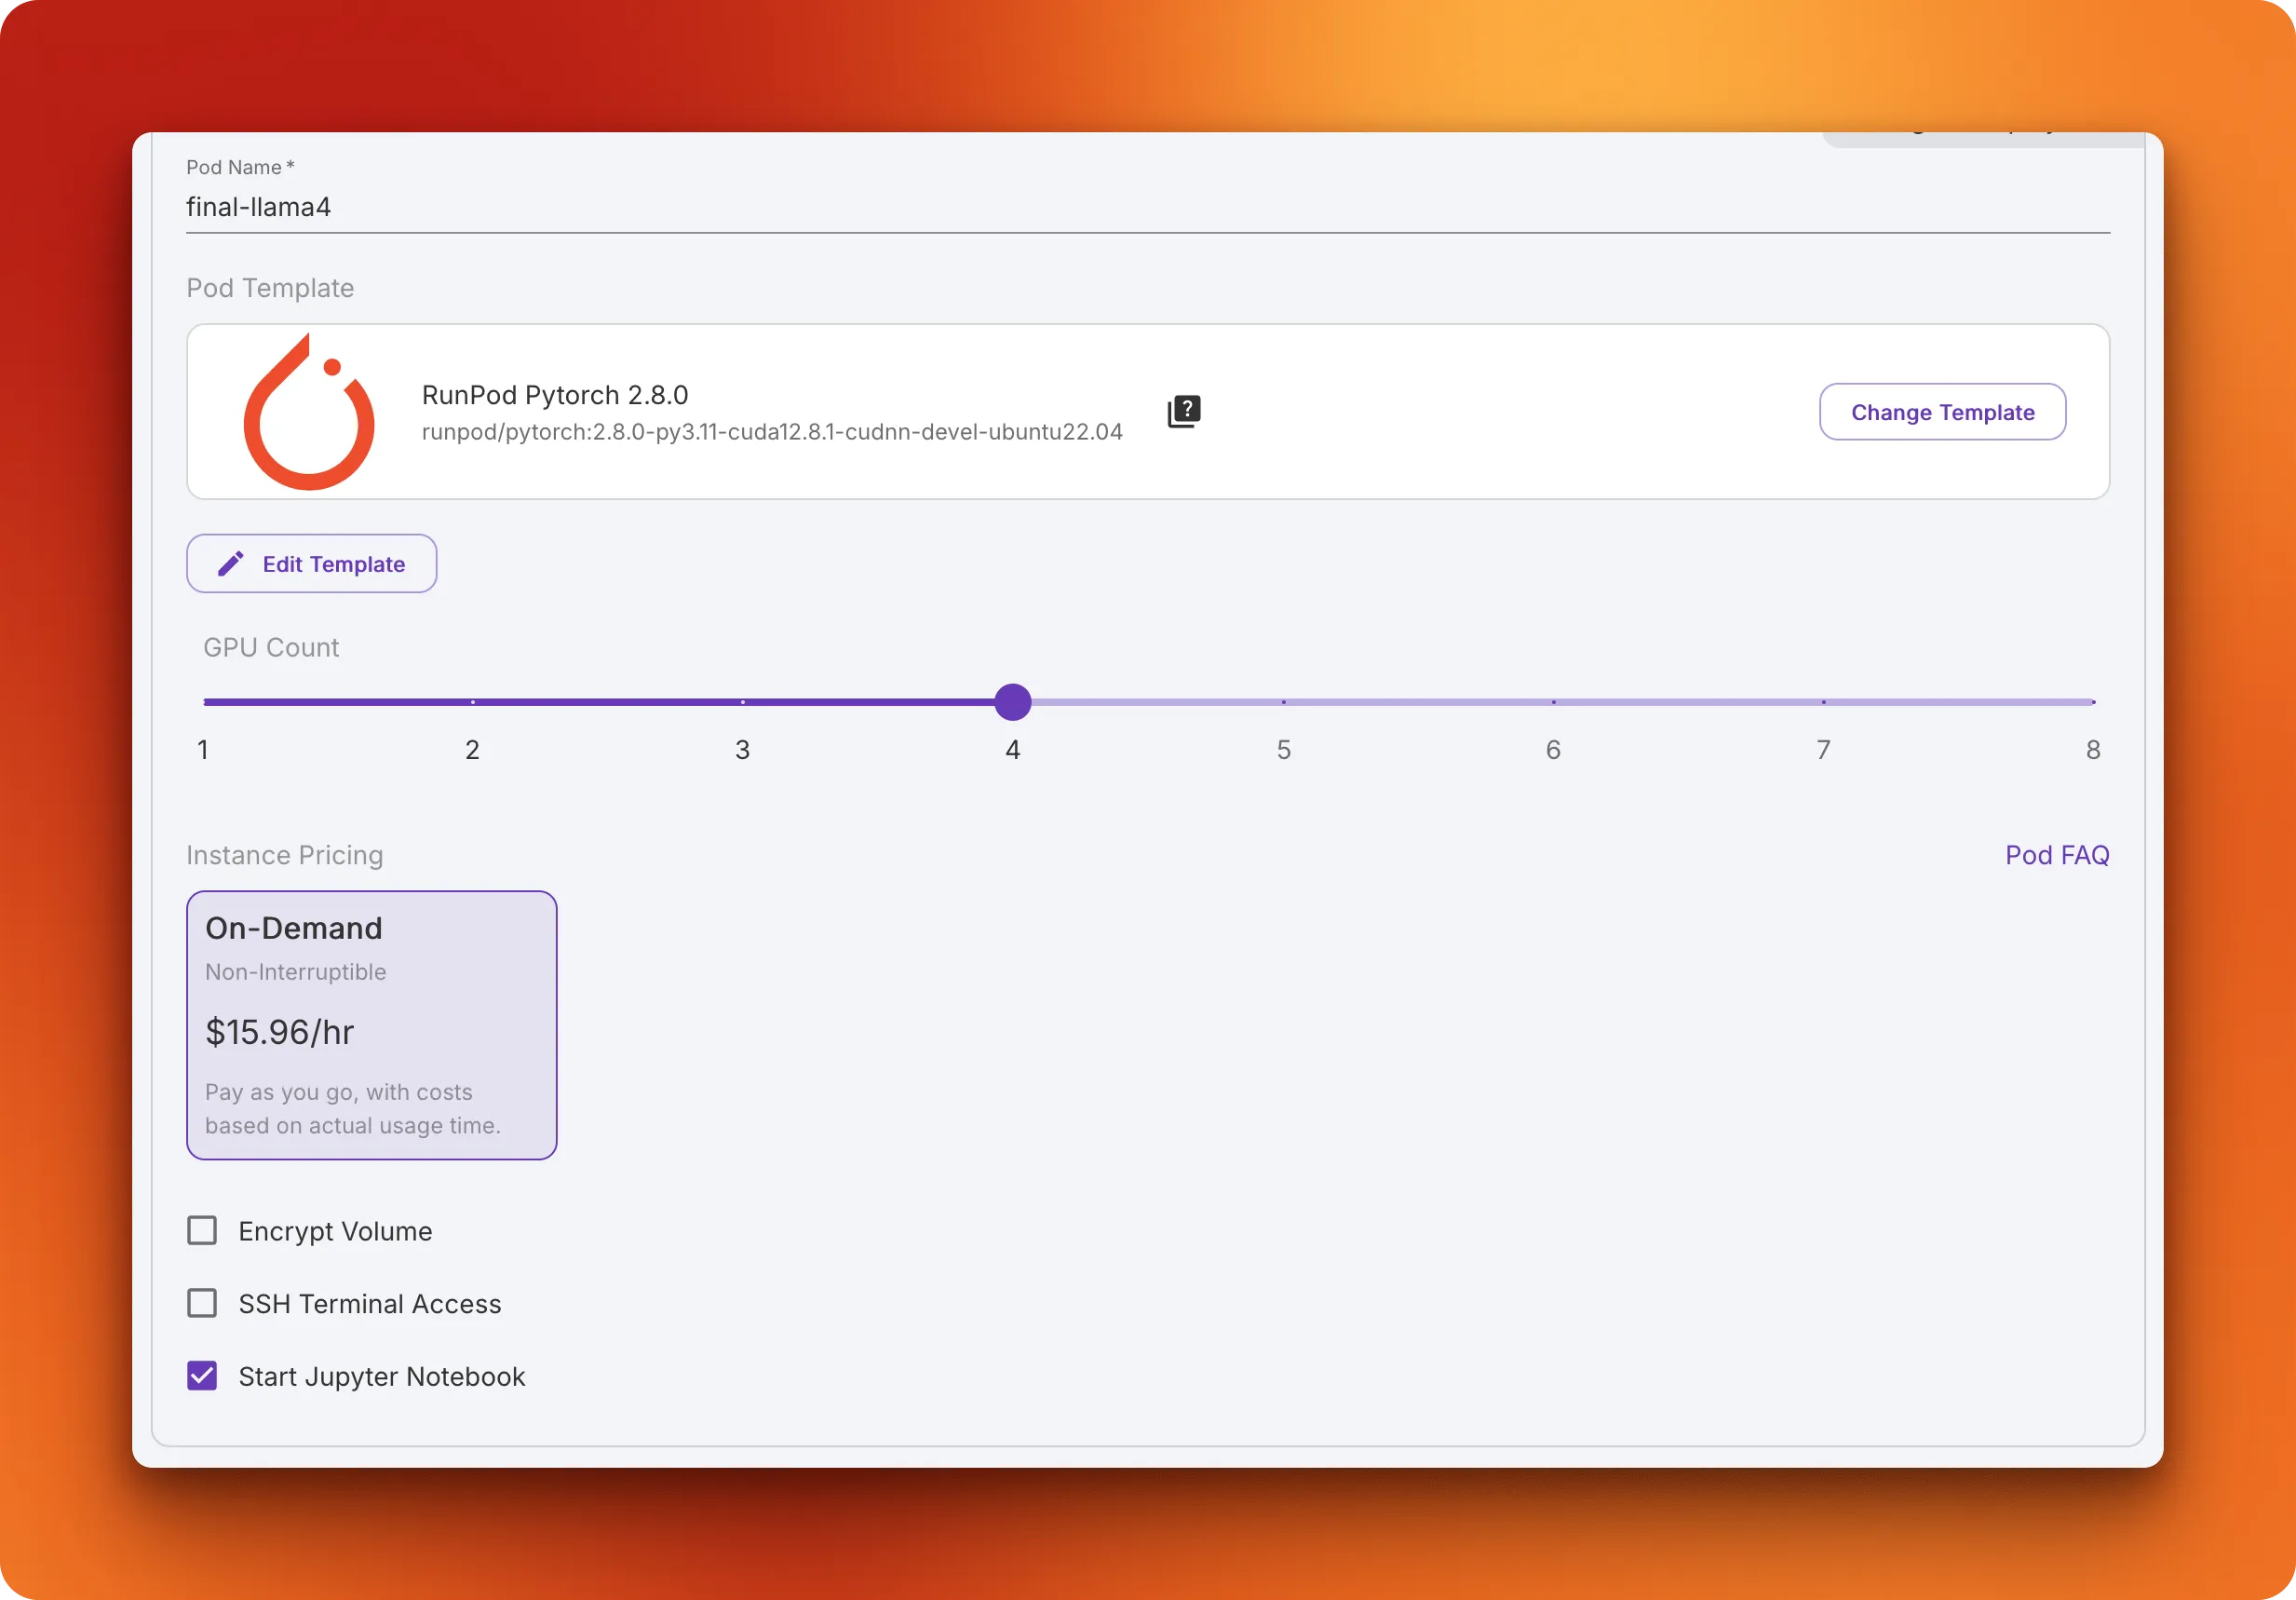
- Add storage and set up environment variables:
- Increase the container disk size to 500GB to avoid out-of-memory errors
- Add the
HF_TOKENenvironment variable with your Hugging Face access token - This token is required for loading and saving models
- Click "Deploy On-Demand"
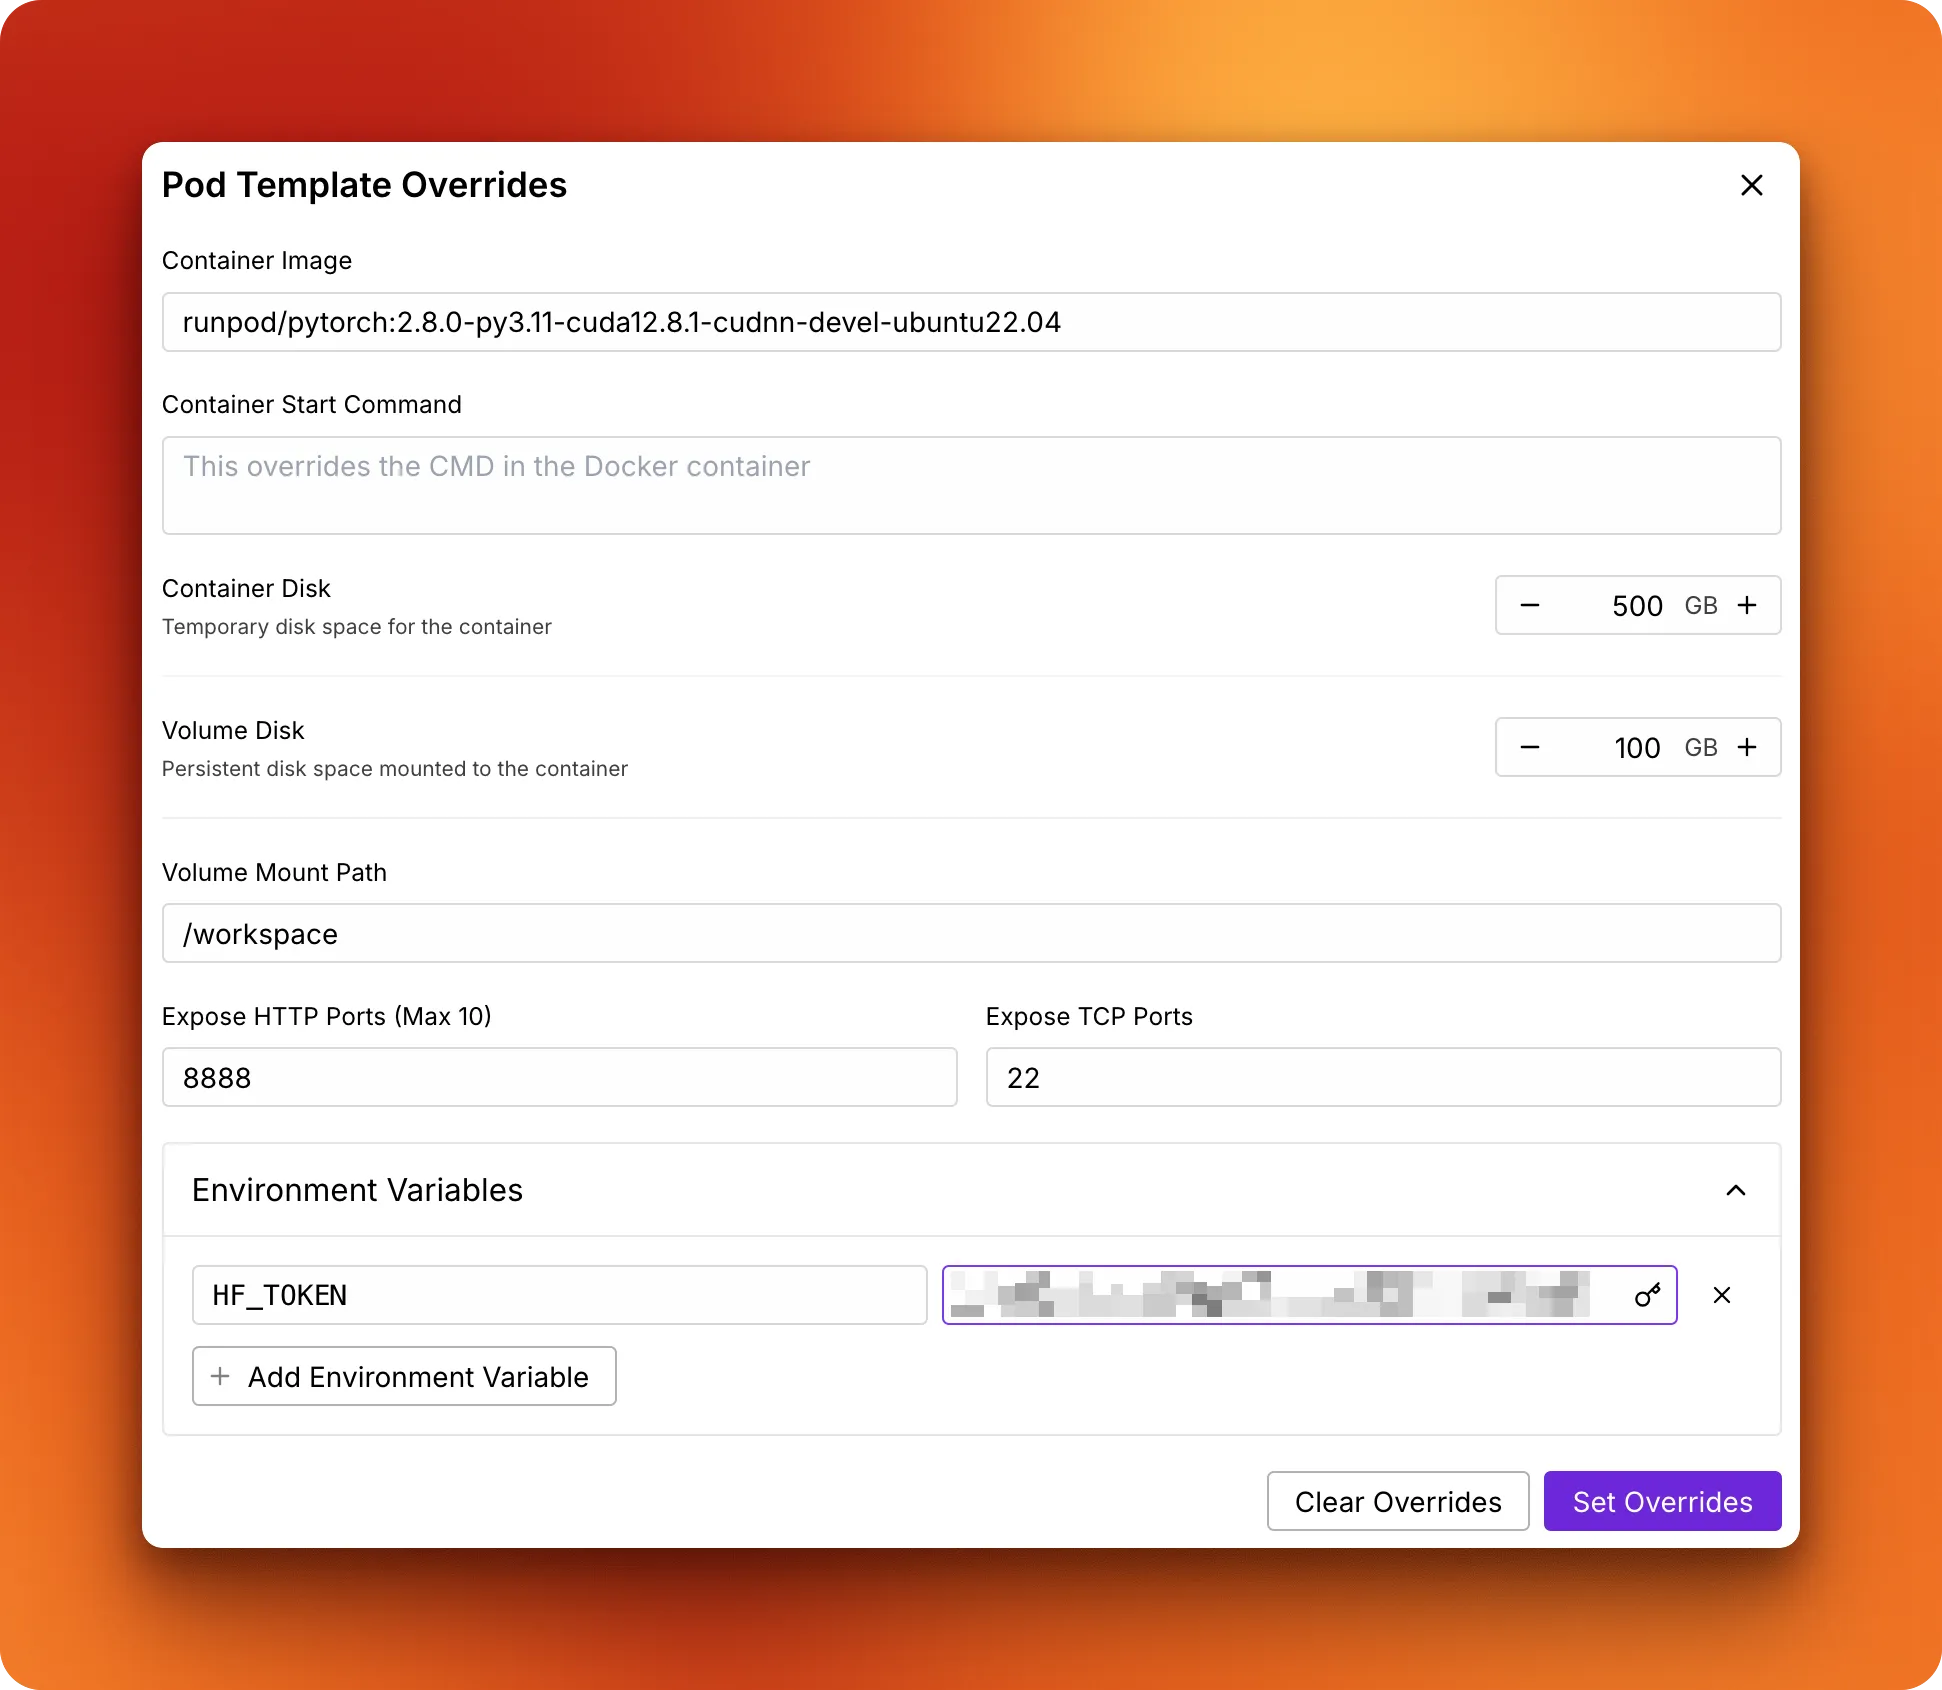
- Connect to your pod: Once setup is complete, click the "Connect" button and launch the JupyterLab instance.
- Create a new notebook: Create a new notebook in JupyterLab to start working on your fine-tuning project.
With this setup, you'll have a powerful environment with multiple H200 GPUs that can handle the memory requirements of Llama 4 models. The entire fine-tuning process with this setup can be completed in about 30 minutes, including model loading, training, and saving.
Now that our dataset is ready and our environment is set up, let's move on to the fine-tuning process.
Step-by-step guide to fine-tuning Llama 4 with Transformers
With our environment configured and dataset prepared, let's dive into the fine-tuning process. We'll implement parameter-efficient fine-tuning with LoRA to adapt Llama 4 for specialized Bullet Echo knowledge while maximizing GPU utilization. This approach reduces both training time and memory requirements without sacrificing model quality.
1. Environment setup
To fine-tune Llama 4, we need to install several specialized packages. These include the latest versions of transformers, accelerate, peft, trl, and bitsandbytes, which enable efficient training of large language models:
pip install git+https://github.com/huggingface/transformers
pip install -U datasets accelerate peft trl bitsandbytes
pip install huggingface_hub[hf_xet]
Next, we need to authenticate with Hugging Face to access the Llama 4 model and push our fine-tuned version. Our script handles this through a simple function:
def setup_environment():
    """Setup environment and login to Hugging Face Hub"""
    hf_token = os.environ.get("HF_TOKEN")
    if not hf_token:
        print("Warning: HF_TOKEN environment variable not found")
    else:
        login(hf_token)
This function checks for the HF_TOKEN environment variable that we set up earlier in RunPod, ensuring we have the necessary permissions to download the model and upload our fine-tuned version later.
2. Configuration overview
Before diving into the code, we need to configure various parameters that will guide our fine-tuning process. These settings determine everything from which model we'll use to how we'll train it:
# Model and dataset
MODEL_ID = "meta-llama/Llama-4-Scout-17B-16E"
DATASET_NAME = "bexgboost/bullet-echo-wiki-qa"
OUTPUT_DIR = "output"

# Repository config for Hugging Face Hub
REPO_ID = "bexgboost/llama4-bullet-echo-finetuned"
COMMIT_MESSAGE = "Upload fine-tuned Llama-4 model for Bullet Echo Q&A"

# Training parameters
NUM_EPOCHS = 3
BATCH_SIZE = 4
GRADIENT_ACCUMULATION_STEPS = 8
LEARNING_RATE = 3e-4
WEIGHT_DECAY = 0.01
WARMUP_RATIO = 0.1
BF16 = True

# LoRA parameters
LORA_ALPHA = 32
LORA_DROPOUT = 0.1
LORA_RANK = 64
TARGET_MODULES = [
    "q_proj", "k_proj", "v_proj", "o_proj",
    "gate_proj", "up_proj", "down_proj",
]
Each parameter group serves a specific purpose:
-
Model and dataset: We're using Llama 4 Scout, a 17B MoE model, and our custom Bullet Echo dataset that we created in previous steps.
-
Training parameters: These control the learning process. We're using a relatively high batch size (24) to leverage our H200 GPUs, with bfloat16 precision for optimal performance. The learning rate (3e-4) is carefully tuned for LoRA fine-tuning.
-
LoRA parameters: These define how we modify the model. LoRA rank (32) determines the dimensionality of our adaptation, while target modules specify which parts of the model we'll fine-tune. We're targeting attention layers and MLP projections to maximize learning while minimizing parameter count.
We'll reference these parameters in more detail as we implement each step of the fine-tuning process.
3. Loading and quantizing the model
Loading a 17B parameter model like Llama 4 Scout requires careful memory management. We use 4-bit quantization to drastically reduce the memory footprint while preserving model quality:
def setup_model_and_tokenizer():
    """Load and configure the model and tokenizer"""
    # Configure quantization
    bnb_config = BitsAndBytesConfig(
        load_in_4bit=True,
        bnb_4bit_use_double_quant=False,
        bnb_4bit_quant_type="nf4",
        bnb_4bit_compute_dtype=torch.bfloat16,
    )

    # Load model with quantization
    model = Llama4ForConditionalGeneration.from_pretrained(
        MODEL_ID,
        device_map="auto",
        torch_dtype=torch.bfloat16,
        quantization_config=bnb_config,
        trust_remote_code=True,
    )

    # Configure model parameters
    model.config.use_cache = False
    model.config.pretraining_tp = 1
    model.gradient_checkpointing_enable()  # Enable gradient checkpointing

    # Load tokenizer
    tokenizer = AutoTokenizer.from_pretrained(MODEL_ID, trust_remote_code=True)

    return model, tokenizer
Let's break down what's happening:
-
Quantization configuration: The
BitsAndBytesConfigsets up 4-bit quantization using the "normal float 4" (nf4) format, which preserves more of the model's accuracy compared to standard 4-bit quantization. We've specified bfloat16 as the compute dtype, which is optimal for H200 GPUs. -
Model loading: We load the model with several optimizations:
device_map="auto"automatically distributes the model across available GPUstorch_dtype=torch.bfloat16uses bfloat16 precision for calculationsquantization_config=bnb_configapplies our 4-bit quantization settings
-
Model configuration: We disable the KV cache during training with
use_cache=Falseand enable gradient checkpointing to further reduce memory usage at the cost of some computation speed. -
Tokenizer: The tokenizer handles converting text to tokens and back, using the same vocabulary as the pre-trained model.
With these optimizations, we can load Llama 4 Scout efficiently across our 4 H200 GPUs. The quantization reduces the memory footprint from 200+GB that would be required for full precision to approximately 54GB of VRAM, allowing us to allocate more resources to batch size and training speed rather than just model loading.
4. Preparing the dataset
With our model loaded, we need to prepare our Bullet Echo dataset for fine-tuning. This involves several steps, from loading to formatting and tokenization.
First, let's load our dataset from Hugging Face:
def load_and_process_data(tokenizer):
    # Load dataset
    dataset = load_dataset(DATASET_NAME, split="train", trust_remote_code=True)
We're using the Hugging Face load_dataset function to directly access our custom Bullet Echo dataset that we created and uploaded in previous steps.
Next, we need to format each question-answer pair with clear instructions for the model:
    # Function to format prompts
    def format_prompt(example):
        formatted_text = f"""
        As an expert in the mobile game Bullet Echo, answer the following
        question:

        {example['question']}

        Here is my response:
        {example['answer']}
        """
        return {"formatted_text": formatted_text}

    # Apply formatting
    formatted_dataset = dataset.map(format_prompt)
This formatting adds context about the task and frames each QA pair as an instruction-response sequence. By teaching the model to respond to structured prompts, we ensure consistent and on-topic answers during inference.
Once formatted, we need to tokenize the text into numerical representations:
    # Function to tokenize inputs
    def tokenize_function(examples):
        model_inputs = tokenizer(
            examples["formatted_text"],
            truncation=True,
            padding="max_length",
            max_length=512,
            return_tensors="pt",
        )
        model_inputs["labels"] = model_inputs["input_ids"].clone()
        return model_inputs

    # Apply tokenization
    tokenized_dataset = formatted_dataset.map(
        tokenize_function, batched=True, remove_columns=formatted_dataset.column_names
    )
The tokenization process converts text into token IDs that the model can process. We set labels equal to input_ids for causal language modeling, which teaches the model to predict the next token in the sequence. The batched=True parameter allows efficient processing of multiple examples at once.
Finally, we split the dataset and create a data collator:
    # Split into train and validation sets
    tokenized_dataset = tokenized_dataset.train_test_split(
        test_size=VALIDATION_SPLIT, seed=42
    )

    # Create data collator for language modeling
    data_collator = DataCollatorForLanguageModeling(tokenizer=tokenizer, mlm=False)

    return tokenized_dataset["train"], tokenized_dataset["test"], data_collator, dataset
A validation split helps us monitor training progress and prevent overfitting. The DataCollatorForLanguageModeling handles dynamic padding and ensures our batches are correctly formatted for causal language modeling (mlm=False).
5. Applying parameter-efficient fine-tuning with LoRA
Fine-tuning a 17B parameter model traditionally requires enormous computational resources. Low-Rank Adaptation (LoRA) solves this by modifying only a small subset of parameters, making the process much more efficient.
First, let's configure our LoRA parameters:
def apply_lora(model):
    # Define LoRA configuration
    peft_config = LoraConfig(
        lora_alpha=LORA_ALPHA,
        lora_dropout=LORA_DROPOUT,
        r=LORA_RANK,
        bias="none",
        task_type="CAUSAL_LM",
        target_modules=TARGET_MODULES,
    )
This configuration defines how LoRA will be applied to our model:
lora_alpha=32controls the scaling factor for the LoRA updateslora_dropout=0.1adds regularization to prevent overfittingr=64is the rank of our low-rank matrices, controlling adaptation capacitytarget_modulesspecifies which layers we'll adapt (attention and MLP components)
Next, we apply this configuration to our model:
    # Apply LoRA to model
    peft_model = get_peft_model(model, peft_config)
The get_peft_model function wraps our base model with LoRA adapters according to our configuration. These adapters will be trained while keeping the base model frozen.
Finally, let's analyze how efficient our approach is:
    # Print trainable parameters
    trainable_params = 0
    all_params = 0
    for name, param in peft_model.named_parameters():
        all_params += param.numel()
        if param.requires_grad:
            trainable_params += param.numel()

    print(
        f"Trainable parameters: {trainable_params:,} ({trainable_params / all_params:.2%} of all parameters)"
    )

    return peft_model, peft_config
This code calculates and displays the number of trainable parameters versus the total parameters. With our configuration, we typically end up training less than 1% of the model's parameters. For Llama 4 Scout, we're training approximately 248 million parameters instead of the full 17 billion, a reduction of over 99%.
The output might look something like:
Trainable parameters: 247,857,152 (0.24% of all parameters)This dramatic reduction in trainable parameters is what makes fine-tuning feasible on consumer hardware while still achieving excellent results. LoRA works by approximating weight updates using low-rank matrices, effectively capturing the necessary adaptations while using far fewer parameters.
If you want to learn more about LoRA, you can read this excellent guide.
6. Training process
With our model set up with LoRA adapters and our dataset prepared, we're now ready to begin the actual training process. We'll use the SFTTrainer from the TRL library, which is specifically designed for supervised fine-tuning.
First, let's calculate our training steps and warmup period:
def train_model(model, train_dataset, val_dataset, data_collator, peft_config, tokenizer):
    # Calculate training steps
    num_update_steps_per_epoch = max(
        len(train_dataset) // (BATCH_SIZE * GRADIENT_ACCUMULATION_STEPS), 1
    )
    max_train_steps = NUM_EPOCHS * num_update_steps_per_epoch

    # Calculate warmup steps
    warmup_steps = int(WARMUP_RATIO * max_train_steps)
This calculation uses our NUM_EPOCHS (3), BATCH_SIZE (4), and GRADIENT_ACCUMULATION_STEPS (8) parameters to determine the total number of update steps. We set WARMUP_RATIO to 0.1, meaning 10% of training steps will use a gradually increasing learning rate, which helps stabilize early training.
Next, we configure our training arguments:
    # Define training arguments
    training_args = TrainingArguments(
        output_dir=OUTPUT_DIR,
        per_device_train_batch_size=BATCH_SIZE,
        per_device_eval_batch_size=BATCH_SIZE,
        gradient_accumulation_steps=GRADIENT_ACCUMULATION_STEPS,
        learning_rate=LEARNING_RATE,
        weight_decay=WEIGHT_DECAY,
        max_grad_norm=MAX_GRAD_NORM,
        num_train_epochs=NUM_EPOCHS,
        logging_steps=LOGGING_STEPS,
        save_steps=SAVE_STEPS,
        save_total_limit=3,
        warmup_steps=warmup_steps,
        fp16=FP16,
        bf16=BF16,
        seed=42,
        gradient_checkpointing=GRADIENT_CHECKPOINTING,
    )
Let's break down how our configuration parameters influence training:
-
BATCH_SIZE=4: We use a relatively small batch size of 4 per device due to memory constraints, even with 4-bit quantization. -
GRADIENT_ACCUMULATION_STEPS=8: This allows us to simulate a larger batch size of 32 (4×8) by accumulating gradients over multiple forward passes before updating weights, balancing memory usage with training stability. -
LEARNING_RATE=3e-4: A carefully tuned value for LoRA fine-tuning that's higher than typical full-model fine-tuning rates (which might be around 1e-5), since we're updating fewer parameters. -
WEIGHT_DECAY=0.01: Adds L2 regularization to prevent overfitting by penalizing large weights. -
MAX_GRAD_NORM=1.0: Clips gradients to prevent exploding gradient problems, stabilizing training. -
BF16=True: We use bfloat16 precision which is ideal for H200 GPUs, offering a good balance between memory usage and numerical stability compared to fp16. -
GRADIENT_CHECKPOINTING=True: Trades computation for memory by not storing all activations during the forward pass, instead recomputing them during backpropagation.
Now we initialize the trainer and start training:
    # Initialize trainer
    trainer = SFTTrainer(
        model=model,
        args=training_args,
        train_dataset=train_dataset,
        eval_dataset=val_dataset,
        peft_config=peft_config,
        data_collator=data_collator,
    )

    # Train model
    print("Starting training...")
    train_results = trainer.train()
    print("Training complete.")
The SFTTrainer handles all the complexity of training the model, including forward and backward passes, gradient updates, learning rate scheduling, and checkpointing.
Finally, we evaluate the model on our validation set:
    # Evaluate model
    print("Evaluating model...")
    eval_results = trainer.evaluate()

    # Print evaluation results
    print("Evaluation results:")
    for key, value in eval_results.items():
        if isinstance(value, float):
            print(f"  {key}: {value:.4f}")
        else:
            print(f"  {key}: {value}")

    return trainer, train_results, eval_results
The entire training process for our dataset takes approximately 1.5 hours with our configuration. Running for 3 epochs provides a good balance between learning the data and avoiding overfitting, while our learning rate and regularization settings ensure stable training throughout.
7. Testing the fine-tuned model
After completing the training, we need to verify that our model has actually learned to answer Bullet Echo questions effectively. We'll sample a few questions from our dataset and compare the model's responses to the expected answers.
First, we set up our testing function:
def test_finetuned_model(model, tokenizer, dataset, test_samples=3):
    """Test the fine-tuned model with multiple examples"""
    # Prompt template
    prompt_style = """
    As an expert in the mobile game Bullet Echo, answer the following
    question:

    {}

    Here is my response:
    """
We use the same prompt format as during training to ensure consistency. This template places the model in the right context for answering game-specific questions.
Next, we randomly select some questions to test:
    print("\nTesting fine-tuned model on sample questions:")

    # Get random sample indices
    sample_indices = np.random.choice(
        range(len(dataset)), size=min(test_samples, len(dataset)), replace=False
    )

    text_streamer = TextStreamer(tokenizer)
The TextStreamer allows us to see the model's output token by token, providing a real-time view of how it generates responses. This is particularly useful for evaluating generation quality.
Now we loop through our selected questions and generate answers:
    for idx in sample_indices:
        # Convert numpy.int64 to Python int
        idx = int(idx)
        question = dataset[idx]["question"]
        expected_answer = dataset[idx]["answer"]

        print(f"\nQuestion: {question}")
        print(f"Expected answer: {expected_answer}")

        # Tokenize input
        inputs = tokenizer(prompt_style.format(question), return_tensors="pt").to(
            model.device
        )

        print("\nModel response:")
        # Generate response with more controlled parameters
        _ = model.generate(
            **inputs,
            streamer=text_streamer,
            max_new_tokens=256,
            temperature=0.7,
            top_p=0.9,
            top_k=50,
            repetition_penalty=1.1,
            do_sample=True,
            use_cache=True,
        )
        print("\n" + "-" * 50)
The generation parameters control the quality and style of the model's responses:
max_new_tokens=256: Limits the response length to 256 tokenstemperature=0.7: Controls randomness; lower values produce more deterministic outputstop_p=0.9andtop_k=50: Nucleus and top-k sampling for diverse yet relevant outputsrepetition_penalty=1.1: Helps prevent the model from repeating itselfdo_sample=True: Enables sampling from the probability distributionuse_cache=True: Enables KV-caching for faster generation (disabled during training)
Here's an example of test output you might see:
Shenji wields a powerful sniper rifle as his primary weapon. His unique ability allows him to scan areas for enemies, providing valuable intel on enemy positions.
Additionally, he has passive bonuses that enhance his effectiveness when engaging targets at long range.
These features make Shenji particularly effective at holding down lanes or controlling open spaces during matches.
With proper use of his scanning ability, players can anticipate ambushes and plan their attacks more effectively with this character.
Mastering Shenji requires understanding how best to utilize both his ranged firepower and reconnaissance skills within team strategies.
By leveraging these strengths along with teamwork tactics such as...
--------------------------------------------------
This testing phase lets you verify that:
- The model understands the game's terminology and concepts
- There are some inaccuracies but the overall response is acceptable
These findings suggest that the model can significantly benefit from longer training runs with more epochs. Due to time constraints, we only limited training to three epochs (which took about 1.5 hours), resulting in a much higher training loss:
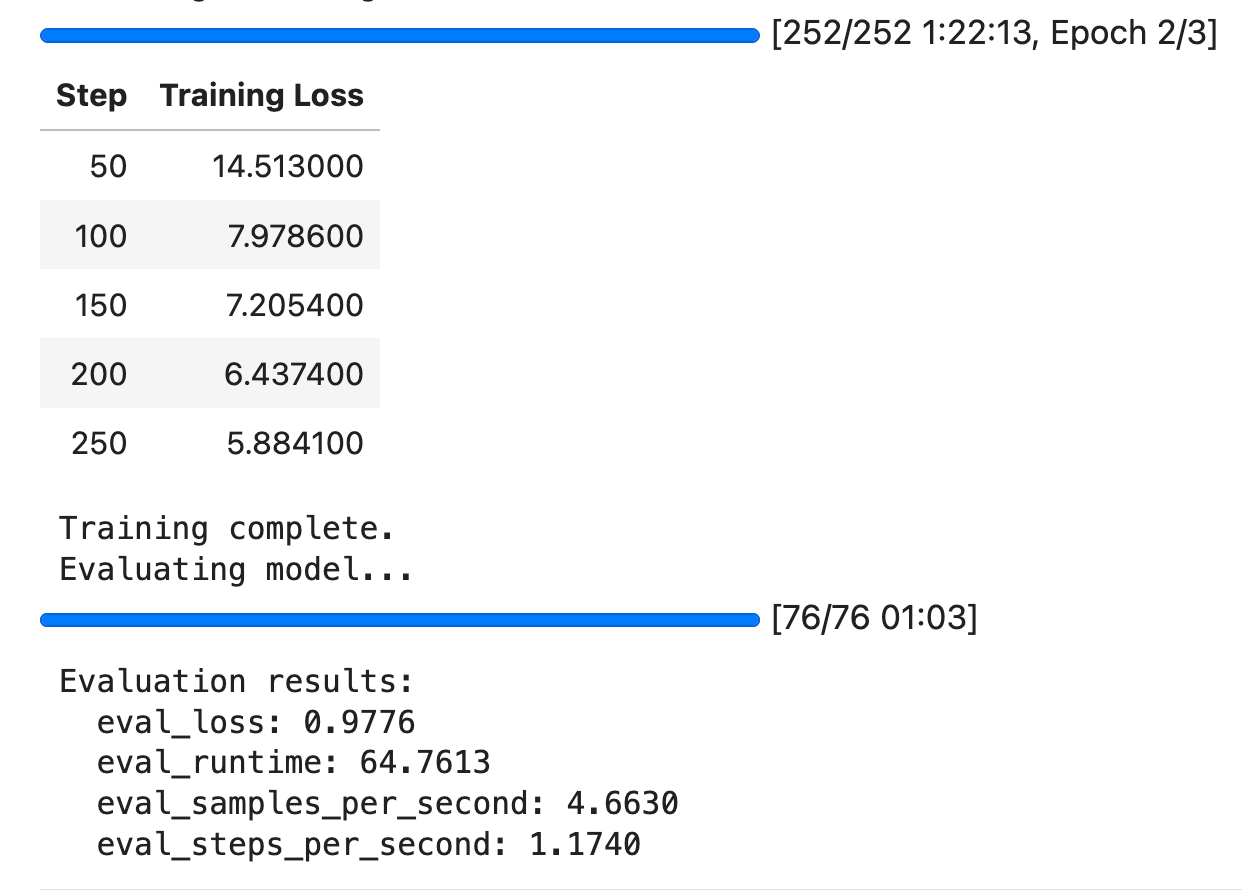
The image also verifies that the loss was going down, suggesting room for improvement.
8. Merging and deploying the model
After successfully fine-tuning and testing our model, the final step is to prepare it for deployment. This involves merging the LoRA adapters with the base model and uploading everything to Hugging Face Hub for easy access.
First, let's look at how we merge the adapters with the base model:
def save_and_push_to_hub(trainer, tokenizer):
    """Push model directly to Hugging Face Hub with merged weights"""
    # Get the base model and adapter
    base_model = trainer.model.get_base_model()

    # Create merged model (adapter + base model) in memory
    print("Merging adapter with base model for efficient inference...")
    merged_model = PeftModel.from_pretrained(
        base_model,
        trainer.model.peft_config,
        is_trainable=False,  # Freezes the model for inference
    )

    # Merge weights - this combines the LoRA weights with the base model
    merged_model = merged_model.merge_and_unload()
This critical step combines our trained LoRA adapters with the base model to create a single, optimized model. The merge_and_unload() method mathematically combines the low-rank matrices with the original weights, resulting in a model that:
- No longer requires the PEFT library for inference
- Has the same parameter count as the original model
- Runs at full efficiency without adapter overhead
- Can be deployed like any standard Transformer model
Next, we push the merged model to Hugging Face Hub:
    # Push to Hub directly
    print(f"Pushing model to Hugging Face Hub: {REPO_ID}")
    try:
        merged_model.push_to_hub(
            repo_id=REPO_ID, commit_message=COMMIT_MESSAGE, use_auth_token=True
        )

        tokenizer.push_to_hub(
            repo_id=REPO_ID, commit_message="Add tokenizer", use_auth_token=True
        )
The push_to_hub method uploads our model and tokenizer to the specified repository. The use_auth_token=True parameter ensures we use the authentication we set up earlier with our HF_TOKEN.
Finally, we create a model card with important information about our fine-tuned model:
        # Create model card with metrics and push directly
        model_card = f"""
        # Llama-4 Fine-tuned for Bullet Echo Q&A

        This model is a fine-tuned version of {MODEL_ID} on the {DATASET_NAME} dataset.

        ## Training metrics
        - Final training loss: {trainer.state.log_history[-1].get('loss', 'N/A')}
        - Final validation loss: {trainer.state.log_history[-1].get('eval_loss', 'N/A')}

        ## Training parameters
        - Epochs: {NUM_EPOCHS}
        - Batch size: {BATCH_SIZE}
        - Learning rate: {LEARNING_RATE}
        - LoRA rank: {LORA_RANK}
        """

        # Push README directly to hub without saving locally
        from huggingface_hub import upload_file
        from io import StringIO

        upload_file(
            path_or_fileobj=StringIO(model_card),
            path_in_repo="README.md",
            repo_id=REPO_ID,
            commit_message="Add model card",
            token=os.environ.get("HF_TOKEN"),
        )

        print(f"Model, tokenizer, and model card successfully pushed to {REPO_ID}")
The model card includes:
- A description of the model
- Training metrics like loss values
- Key training parameters
- The base model and dataset used
This provides users with essential information about how the model was fine-tuned and what performance to expect.
Once uploaded, the model is available at https://huggingface.co/bexgboost/llama4-bullet-echo-finetuned and can be used with just a few lines of code:
from transformers import AutoModelForCausalLM, AutoTokenizer

# Load fine-tuned model
model = AutoModelForCausalLM.from_pretrained("bexgboost/llama4-bullet-echo-finetuned")
tokenizer = AutoTokenizer.from_pretrained("bexgboost/llama4-bullet-echo-finetuned")

# Use the model
prompt = "What are Shenji's main weapon, abilities and passives?"

inputs = tokenizer(prompt, return_tensors="pt")
outputs = model.generate(**inputs, max_new_tokens=256)
print(tokenizer.decode(outputs[0], skip_special_tokens=True))
The merged model provides several advantages over keeping the LoRA adapters separate:
- Simplified deployment: No need for the PEFT library in production
- Improved inference speed: Direct forward pass without adapter overhead
- Easier sharing: Users don't need to understand LoRA to use your model
- Storage efficiency: One model instead of a base model plus adapters
By following this deployment approach, you've created a specialized Bullet Echo assistant that can be easily shared with the vibrant Bullet Echo community.
Conclusion
In this guide, we've walked through the complete process of fine-tuning Llama 4 on a custom dataset, from initial data collection to deployment of a specialized model. We leveraged Firecrawl to scrape and process the Bullet Echo wiki, transforming raw HTML into structured QA pairs through a multi-step pipeline. Then, using parameter-efficient fine-tuning with LoRA, we adapted a 17B parameter Llama 4 model to become an expert on Bullet Echo game mechanics while training less than 0.25% of its parameters, significantly reducing computational requirements.
The techniques demonstrated here can be applied to create specialized AI assistants for any domain or niche. To build your own custom dataset, consider using Firecrawl's AI-powered extraction capabilities, which eliminate the need for brittle selectors and make web scraping accessible even without extensive technical knowledge. Whether you're creating a knowledge base, training dataset, or document collection, Firecrawl's natural language interface provides a powerful starting point for your LLM fine-tuning journey. For another example of how this approach works with different models, check out our guide on fine-tuning Gemma 3 with Firecrawl and Unsloth AI. You can also find the GitHub repository for this article here.