Comprehensive Guide to Building AI Agents Using Google Agent Development Kit (ADK)
What Is Google Agent Development Kit (ADK)?
AI agents are automated software that complete actions from collecting and analyzing data to taking subsequent action with a number of different tools and APIs. Google released the Agent Development Kit (ADK) at Cloud NEXT 2025 and is an open-source framework specifically designed to create such rich agent systems. Google products, such as Agentspace and the Customer Engagement Suite, are powered by ADK, providing developers the enterprise experience for agent development.
ADK includes tools to support the entire agent development lifecycle, including building, testing, evaluating and deploying agent applications. ADK is strongest when managing multi-agent orchestration, allowing developers to create systems in which specialized agent systems can come together in coordinated hierarchies. ADK includes a rich suite of pre-built tools and functionality for the ADK includes support for third party library interoperability, native streaming around data, and debugging using both the command line interface (CLI) and frontend graphical interface functionality.
In this tutorial, we will build an agentic clone of ChatGPT, that includes tools for image generation, web scraping, web search and deep research. You will practically engage with the in's and out's of ADK project structure and core components, while learning the basic patterns for how to create your own rich multi-agent applications. Let's get started!
Google ADK vs. Other Agent Building Frameworks

Despite being relatively new and less-adopted, ADK provides several advantages over other agent building frameworks. According to Firecrawl's analysis of top agent frameworks, ADK ranks among the top open source frameworks for building AI agents. While frameworks like LangGraph or CrewAI focus primarily on agent orchestration, ADK offers a complete solution spanning the entire agent development lifecycle. It integrates deployment and evaluation capabilities natively, and its connection with Google Cloud provides scalability and security that many alternatives lack, particularly beneficial for organizations already using Google's ecosystem.
Alternative Approaches: Compare ADK with other frameworks in our comprehensive agent frameworks guide. For visual development, explore LangFlow or n8n automation.
ADK's architecture includes several production-focused features:
- Deployment options: Direct integration with Vertex AI Agent Engine and support for containerized deployment
- System connectivity: Pre-built connectors to enterprise systems and databases like AlloyDB, BigQuery, and NetApp
- Bidirectional streaming: Support for real-time audio and video interactions
- Evaluation tools: Built-in frameworks to assess response quality and execution paths
- Model flexibility: Compatibility with Gemini models, Vertex AI Model Garden, and third-party models via LiteLLM
ADK supports three core agent types that serve different purposes in multi-agent systems. LLM Agents use language models for reasoning and making dynamic decisions about tools and tasks. Workflow Agents (Sequential, Parallel, Loop) control execution patterns without using LLMs. Custom Agents implement specialized logic for unique requirements not covered by standard types.
The framework enables different methods for agents to interact and delegate tasks within applications. Agents can transfer control to other agents through LLM-driven decisions or by using other agents as tools via AgentTool. This allows complex tasks to be broken down and handled by the most appropriate specialized agent.
Multi-agent architecture in ADK helps create more modular AI systems for production use. Teams can develop specialized agents separately and combine them as needed. Changing individual agents or reorganizing their hierarchy can be done without rebuilding the entire system. This approach works well for enterprise applications where requirements change frequently.
Firecrawl Provides Best Web Tools For Agents

Firecrawl is the context API to search, scrape, and interact with the web at scale. It transforms complex web content into LLM-ready formats, handling the difficult technical challenges of web scraping like proxies and dynamic JavaScript content. Firecrawl's API-first approach makes it easy to integrate powerful web capabilities into any agent application, with SDKs available for Python, Node.js, Go, and Rust.
Key features that make Firecrawl ideal for AI agents:
- Web Scraping: Converts any webpage into clean markdown, HTML, or structured data formats perfect for LLM consumption (see our scraping endpoint guide)
- Web Search: Provides search functionality with optional content scraping to let agents find and process real-time information
- Deep Research: Conducts multi-step research on complex topics by crawling, searching, and analyzing content with AI
- LLMs.txt Generation: Convert websites to llms.txt files for LLM training
- FIRE-1 Agent: An AI agent specialized in web scraping tasks that can be called directly from other agents
- LLMs.txt API: Creates training data for fine-tuning language models by extracting and formatting web content
- Markdown Conversion: Transforms complex HTML into clean, semantic markdown that minimizes token usage in LLM contexts
Our ChatGPT clone will heavily use Firecrawl's capabilities to give our agent real-time web access without the complexity of browser automation or HTML parsing. Firecrawl is officially supported as a third-party tool in Google's ADK, so connecting it through ADK's tool integration is straightforward - our agent will seamlessly search, extract, and process web information to answer user queries. This web connectivity layer is what transforms a basic LLM into a truly capable agent that can retrieve fresh information and interact with online services.
Step-by-step Guide to Building Multi-agent Applications With Google ADK
Now, without further ado, we'll build a ChatGPT clone with Google's ADK, covering environment setup, agent structure, core functionality, Firecrawl web search integration, specialized agents, multi-agent orchestration, and testing.
Step 1: Setting Up Your ADK Project Environment
Google's Agent Development Kit (ADK) provides a powerful framework for building sophisticated AI agents. In this tutorial, we'll walk through creating a ChatGPT-like clone with multiple specialized agents working together. Let's start by setting up our environment properly.
Understanding ADK Project Structure
ADK projects follow a specific directory structure that is required for the framework to function properly, as detailed in the ADK documentation. For our ChatGPT clone project, we'll use this structure that satisfies the requirements:
google-adk-tutorial/
├── app/                          # Application directory
│   ├── main.py                   # Application entry point
│   ├── requirements.txt          # Dependencies
│   └── chatgpt_agentic_clone/    # Agent package
│       ├── __init__.py           # Package initialization
│       └── agent.py              # Agent definitions and tools
├── pyproject.toml                # Project configuration
└── requirements.txt              # Top-level dependencies
This structure separates the agents (in the chatgpt_agentic_clone directory) from the application itself (main.py). The agent package contains our agent definitions, while the main.py handles user interaction and running the agent.
For more details on ADK agent directory structures, you can check out the ADK Quickstart guide and this tutorial from DataCamp.
Setting Up the Environment with UV
For our environment setup, we'll use UV - a modern Python package manager that offers faster installation times and better dependency resolution compared to traditional tools. UV will help us efficiently manage our project dependencies. Here's how to set up our environment:
-
Install UV (if you don't have it already):
pip install uv -
Create a new project directory and navigate to it:
mkdir google-adk-tutorial cd google-adk-tutorial -
Initialize the project with UV:
uv initThis creates a basic project structure with a pyproject.toml file.
-
Add dependencies using UV:
# Add core dependencies
uv add google-adk python-dotenv pydantic

# Add Firecrawl for web tools
uv add firecrawl-py

# Add other dependencies
uv add ipykernel langchain-community litellm markitdown[all] openai
UV will automatically update your pyproject.toml file with these dependencies.
-
Activate the virtual environment:
# Activate it (macOS/Linux) source .venv/bin/activate # Activate it (Windows CMD) .venv\Scripts\activate.bat # Activate it (Windows PowerShell) .venv\Scripts\Activate.ps1 -
Create the directory structure for ADK:
mkdir -p app/chatgpt_agentic_clone touch app/chatgpt_agentic_clone/__init__.py -
Create a .env file for API keys:
touch app/.envAdd your API keys to this file:
# Gemini API Key
GOOGLE_API_KEY=your_google_api_key_here

# Firecrawl API Key (for web tools)
FIRECRAWL_API_KEY=your_firecrawl_api_key_here
You'll need:
- A Google AI Studio API key for the Gemini models. Get one at Google AI Studio.
- A Firecrawl API key for web search and content extraction. Sign up at Firecrawl.
-
Populate the
__init__.pyfile:
Your init file must have the following import for the agent assets to run properly when debugging through the UI:
from . import agentWhy This Structure Matters
This directory structure is not just a convention but a requirement for ADK to function properly. It's particularly important for multi-agent applications because:
- Modularity: Each agent is defined in a separate logical unit, making the code more maintainable
- Reusability: Agents can be easily reused across different applications
- Testability: The separation facilitates easier testing of agent components
- Deployment: ADK expects this structure for various deployment options
With our environment set up, we've laid the foundation for our multi-agent ChatGPT clone. This structure will allow us to create specialized agents that work together, each handling different capabilities like web search, content extraction, research, and image generation.
The rest of the steps involve writing actual code. If you want to explore the finished product, you can do so from our GitHub repository before continuing. We recommend that you have the full project open in a separate tab as we don't go through the code line-by-line, focusing only on the main points.
Step 2: Implementing Specialized Tools for Your Agents
After setting up our environment, the next step is to create the specialized tools that our agents will use. Tools in ADK are Python functions that extend an agent's capabilities beyond just language generation.
Understanding Tools in ADK
Tools enable agents to interact with external systems, APIs, and perform specialized tasks. In our ChatGPT clone, we'll implement five key tools that will give our agents real-world capabilities.
Let's examine our first tool - the web search functionality powered by Firecrawl:
def web_search(query: str) -> Dict:
    """Searches the web for current information using Firecrawl."""
    print(f"--- Tool: web_search called for query: {query} ---")

    try:
        app = FirecrawlApp()
        # THE SEARCH HAPPENS IN THIS LINE
        result = app.search(query, limit=10)

        if result.success:
            formatted_results = []
            for item in result.data:
                formatted_results.append({
                    "title": item.get("title", "No title"),
                    "url": item.get("url", "No URL"),
                    "description": item.get("description", "No description"),
                })

            return {"status": "success", "results": formatted_results}
        else:
            return {
                "status": "error",
                "error_message": f"Search failed: {result.error or 'Unknown error'}",
            }

    except Exception as e:
        return {
            "status": "error",
            "error_message": f"Error during web search: {str(e)}",
        }
Notice how Firecrawl simplifies the web search process - with just a few lines of code, our agent can search the web and get structured results. Without Firecrawl, we would need to implement complex search logic, handle rate limiting, manage proxies, and deal with parsing different website formats.
Similarly, we implement other tools using Firecrawl's API:
def scrape_webpage(url: str, extract_format: str = "markdown") -> Dict:
    """Scrapes content from a webpage using Firecrawl."""
    try:
        app = FirecrawlApp()
        result = app.scrape_url(url, formats=[extract_format])

        # Process and return results
        # ...
    except Exception as e:
        return {"status": "error", "error_message": f"Error scraping webpage: {str(e)}"}
def deep_research(topic: str, max_depth: int = 5, time_limit: int = 180) -> Dict:
"""Performs comprehensive research using Firecrawl."""
try:
app = FirecrawlApp()
result = app.deep_research(topic, max_depth=max_depth, time_limit=time_limit)
# Process and return results
# ...
except Exception as e:
return {"status": "error", "error_message": f"Error during deep research: {str(e)}"}scrape_url and deep_research methods demonstrate the power of Firecrawl's API in simplifying complex web operations. With just a few lines of code, our agents can search the web, extract content from pages, and even conduct deep multi-source research.
We also implement tools for image generation using Gemini:
def generate_image(prompt: str, model: str = GEMINI_IMAGE_GEN_MODEL) -> Dict:
    """Generates an image using Gemini's image generation models."""
    try:
        # Initialize Gemini client and generate image
        # ...
    except Exception as e:
        return {"status": "error", "error_message": f"Error generating image: {str(e)}"}
The Bigger Picture: Tools as Agent Capabilities
Tools are the "hands and feet" of our agents, allowing them to:
- Access real-world data: Get current information not available in the model's training
- Perform specialized tasks: Generate images, extract web content, or conduct research
- Provide grounding: Connect AI responses to verifiable data sources
- Extend capabilities: Add new abilities without retraining the underlying models
As described in the ADK documentation on tools, tools can be categorized into several types, including function tools, built-in tools, and third-party services. The function tools we've implemented follow the function-calling paradigm, where the LLM decides when and how to use each function based on its understanding of the user's request.
ADK's tool mechanism offers significant advantages over custom implementations. The framework automatically handles the complexities of tool invocation, parameter parsing, and response handling. It also manages the conversation context, ensuring that tool results are properly incorporated into the agent's reasoning process. This structured approach to tool integration ensures that our agents can reliably use external capabilities while maintaining coherent conversations.
For more complex scenarios, ADK supports chained tool calls where the output of one tool can be used as input to another. This enables sophisticated workflows where, for example, our agent could search for information, extract specific data from the results, and then use that data to inform further research or image generation.
Beyond Firecrawl, ADK offers integrations with many third-party tools that could extend our ChatGPT clone with additional capabilities like database access, code execution, or integration with other AI services. This extensibility means our architecture can grow to accommodate new requirements without major redesigns.
Step 3: Creating Specialized Agents
With our tools in place, we can now create specialized agents that focus on specific capabilities. Each agent is configured to handle a particular type of task using its designated tools.
search_agent = Agent(
    model=MODEL_GEMINI_3_PRO_PREVIEW,
    name="search_agent",
    instruction="You are a web search specialist. Your role is to search for current information on the web "
    "when users ask about recent events, current facts, or real-time data. "
    "Use the 'web_search' tool to find relevant information, then synthesize and present it clearly. "
    "Always cite your sources by including the URLs. "
    "If the search returns an error, explain the issue to the user and suggest alternatives.",
    description="Searches the web for current information and recent events using the web_search tool.",
    tools=[web_search],
)
Let's break down the key components of an agent definition:
- model: The LLM used by this agent (Gemini in our case)
- name: A unique identifier for the agent
- instruction: Detailed guidance for the agent's behavior and responsibilities
- description: A concise summary of the agent's purpose
- tools: A list of tools this agent can use
We create four specialized agents, each with specific tools from Firecrawl and Gemini:
- search_agent: Uses Firecrawl's search to find current information
- web_extraction_agent: Uses Firecrawl's scraping to extract web content
- research_agent: Uses Firecrawl's deep research for complex topics
- image_generation_agent: Uses Gemini for image creation
Each agent's instructions precisely define when and how to use their tools. For example, the web extraction agent knows to ask clarifying questions if the user's extraction request is vague.
The Bigger Picture: Specialization in Multi-agent Systems
By creating specialized agents, we're implementing a principle known as "separation of concerns" in our multi-agent system. This approach follows the architecture outlined in ADK's Multi-agent Systems documentation. Each specialized agent becomes an expert in its domain, with focused instructions and specific tools that enhance its capabilities.
The LLM agent, as described in the LLM Agents documentation, is the "thinking" component of our system. Unlike deterministic workflow agents, LLM agents use their underlying models to dynamically interpret instructions, context, and user queries, deciding on the fly which tools to use or whether to transfer control to another agent.
One of the key advantages of this architecture is cognitive specialization. Each agent can have tailored instructions that focus its attention on a specific domain, improving its performance on specialized tasks. For example, our web extraction agent includes specific guidance on extracting different content formats and handling structured data, while the search agent focuses on finding and synthesizing information from multiple sources.
This specialization also allows us to optimize each agent's prompts and parameters for its specific task. For search-related tasks, we might prioritize factuality and comprehensiveness, while for content extraction, we might emphasize accuracy and structure. By creating purpose-built agents, we can fine-tune each component of our system to excel at its specific role.
Another benefit of the multi-agent approach is isolation and independent scaling. If one agent's responsibilities grow in complexity, we can refine its implementation without affecting the rest of the system. For instance, if we wanted to enhance our research capabilities with more sophisticated analysis tools, we could focus solely on the research agent without disrupting the other components.
Step 4: Building the Root Agent
The root agent serves as the coordinator for our specialized agents, deciding which specialist to call based on the user's request. Here's how we define it:
root_agent = Agent(
    name="chatgpt_agentic_clone",
    model=MODEL_GEMINI_3_PRO_PREVIEW,
    description="A versatile AI assistant that can answer questions, search the web, extract web content, conduct research, and generate images.",
    instruction="You are a versatile AI assistant similar to ChatGPT. Your primary job is to be helpful, harmless, and honest. "
    "You have several specialized capabilities through your sub-agents: "
    "1. 'search_agent': Use for current events, facts, weather, sports scores, or any real-time information. "
    "2. 'web_extraction_agent': Use when asked to extract or analyze content from specific URLs. "
    "3. 'research_agent': Use for in-depth research on complex topics requiring analysis of multiple sources. "
    "4. 'image_generation_agent': Use when asked to create or generate images. "
    "Important guidelines: "
    "- For general knowledge queries, respond directly using your built-in knowledge. "
    "- For current events or real-time information, delegate to 'search_agent'. "
    "- If asked to get content from a specific URL, delegate to 'web_extraction_agent'. "
    "- If asked for deep research with multiple sources, delegate to 'research_agent'. "
    "- If asked to create or generate an image, delegate to 'image_generation_agent'. "
    "- Be conversational, helpful, and concise. "
    "- Avoid harmful, unethical, or illegal content. "
    "- Admit when you don't know something rather than making up information.",
    sub_agents=[
        search_agent,
        web_extraction_agent,
        research_agent,
        image_generation_agent,
    ],
    before_model_callback=content_filter_callback,
)
The key difference in the root agent definition is the sub_agents parameter, which lists all the specialized agents this root agent can delegate to. The detailed instruction provides guidance on when to use each sub-agent.
How the Root Agent Works
The root agent:
- Receives the user query: All user interactions start here
- Analyzes the query intent: Determines what kind of request it is
- Makes a delegation decision:
- Handles general knowledge questions itself
- Delegates to the search agent for current information
- Delegates to the web extraction agent for URL content
- Delegates to the research agent for complex topics
- Delegates to the image generation agent for visual content
- Returns the response: Presents the final answer to the user
The Bigger Picture: Orchestration in Multi-agent Systems
The root agent implements the "orchestrator" pattern in our multi-agent architecture, a key design described in the ADK Multi-agent Systems documentation. This pattern creates a unified entry point that intelligently routes user requests to specialized components, providing a seamless user experience while leveraging the benefits of multiple specialized agents.
This design aligns with the concept of agent teams in ADK, where multiple agents work together with clearly defined roles and responsibilities. The root agent acts as the team leader, making high-level decisions about which specialist to involve based on the nature of the user's request. This structure mirrors how human teams operate, with a manager distributing tasks to subject matter experts.
The orchestration approach offers several significant advantages for complex AI systems. First, it provides abstraction and simplification for users. They don't need to know which specialist to ask for different tasks; they can simply interact with a single agent interface that handles the complexity behind the scenes. This creates a more intuitive and user-friendly experience.
Second, it enables dynamic composition of capabilities. As described in the Multi-agent Systems documentation, ADK supports various delegation patterns, including hierarchical delegation (parent to child), peer delegation (agent to agent at the same level), and even complex routing through specialized router agents. These patterns allow for sophisticated workflows where multiple agents can collaborate on complex tasks.
A particularly powerful feature of ADK's multi-agent system is the ability to share context and state between agents. When our root agent delegates to a specialist, the conversation history and relevant contextual information automatically transfer to the specialist, ensuring a coherent experience even as different components handle different parts of the interaction. This context sharing is essential for maintaining conversational continuity in a distributed system.
The architecture also supports graceful fallback mechanisms. If a specialist agent encounters a problem or determines it's not the right agent for a particular subtask, it can transfer control back to the parent or to another peer agent. This resilience ensures that the system can handle edge cases and unexpected inputs without breaking the user experience.
Step 5: Implementing Safety with Callbacks
To ensure our agent behaves ethically and safely, we implement a content filter callback:
def content_filter_callback(
    callback_context: CallbackContext, llm_request: LlmRequest
) -> Optional[LlmResponse]:
    """A basic content filter that checks user messages for prohibited content."""
    # Extract the latest user message
    last_user_message_text = ""
    if llm_request.contents:
        for content in reversed(llm_request.contents):
            if content.role == "user" and content.parts:
                if content.parts[0].text:
                    last_user_message_text = content.parts[0].text
                    break

    # Check for prohibited terms
    prohibited_terms = ["harm someone", "illegal activity", "make a bomb"]

    for term in prohibited_terms:
        if term.lower() in last_user_message_text.lower():
            # Block the request with a safe response
            return LlmResponse(
                content=types.Content(
                    role="model",
                    parts=[
                        types.Part(
                            text="I cannot assist with that request as it appears to violate content policies."
                        )
                    ],
                )
            )

    # Allow the request to proceed
    return None
This callback inspects each user message before it reaches the model, checking for prohibited content and blocking problematic requests. The before_model_callback parameter in our root agent definition ensures this check happens before any processing occurs.
The callback follows the pattern outlined in the ADK Callbacks documentation, where callbacks can intercept and modify the agent's behavior at key points in its execution flow. Our implementation uses the CallbackContext to access information about the agent and the LlmRequest to inspect the user's message.
When a prohibited term is detected, the callback returns an LlmResponse with a denial message, effectively blocking the original request from reaching the model. If no issues are found, it returns None, allowing normal processing to continue.
The Bigger Picture: Safety and Control in AI Systems
Callbacks are a critical part of responsible AI development, enabling what the ADK Callbacks documentation calls "cross-cutting concerns" - aspects that affect multiple parts of the system but aren't tied to its core business logic. Safety checks, like our content filter, are a perfect example of these concerns.
The callback architecture in ADK provides several strategic interception points throughout the agent execution lifecycle. As detailed in the Types of Callbacks documentation, we can attach callbacks:
- Before the model (
before_model_callback): To filter inputs or add context before the LLM processes them - After the model (
after_model_callback): To modify or validate the model's outputs - Before tool calls (
before_tool_callback): To intercept and modify tool invocations - After tool calls (
after_tool_callback): To process or modify tool results - After the agent (
after_agent_callback): To perform actions based on the final response
Our content filter uses the before_model_callback, but a comprehensive safety system might use multiple callbacks. For example, we could add an after_model_callback to scan the agent's responses for problematic content, or an after_tool_callback to validate that web search results don't contain harmful information.
Beyond simple content filtering, callbacks enable several advanced safety and control patterns described in the Callback Design Patterns documentation:
- Input/Output Sanitization: Ensuring all content meets safety standards
- Dynamic Context Injection: Adding relevant context or warnings based on the query
- Request Attribution: Tracking the source and nature of requests
- Compliance Logging: Recording interactions for audit purposes
- Runtime Debugging: Monitoring system behavior for issues
In production systems, callbacks often implement sophisticated monitoring and evaluation logic. For example, we might use callbacks to measure the quality of responses, track the performance of different tools, or identify patterns of misuse. These insights can then inform improvements to the system's design.
A particularly powerful pattern is combining callbacks with state management to implement stateful safety checks. For instance, we could track the number of potentially problematic queries from a user and implement escalating responses, from warnings to temporary blocking, if a pattern of misuse is detected.
Step 6: Creating the Application Runtime
With our agents and tools defined, we need to create the application that will run our agent and handle user interactions. The main application consists of several key components:
# Main application initialization
load_dotenv()  # Load API keys from .env
APP_NAME = "chatgpt_agentic_clone_app"
USER_ID = "user_1"
SESSION_ID = "session_001"

# Session management setup
session_service = InMemorySessionService()
session = session_service.create_session(
    app_name=APP_NAME, user_id=user_id, session_id=session_id
)

# Agent runner setup
runner = Runner(
    agent=root_agent, app_name=APP_NAME, session_service=session_service
)
This code initializes the application environment, sets up session management, and creates a runner for our root agent. The session service maintains conversation state, while the runner handles the execution of our agent.
The agent runner processes user messages and handles the responses through an event-driven architecture:
async def call_agent_async(query: str, runner, user_id, session_id):
    """Sends a query to the agent and processes the response."""
    # Format the user query
    content = types.Content(role="user", parts=[types.Part(text=query)])

    # Run the agent and process events
    async for event in runner.run_async(
        user_id=user_id, session_id=session_id, new_message=content
    ):
        # Process different event types
        if event.is_final_response():
            if event.content and event.content.parts:
                # Extract text and handle any special content like images
                response_text = event.content.parts[0].text

                # Check for image data markers and process them
                if "[[IMAGE_DATA:" in response_text:
                    # Extract and process image data
                    # ...

                return {"text": final_response_text, "image_data": image_data}

        # Other event types could be processed here
        # For example: tool_start, tool_end, agent_transfer, etc.
The interactive session maintains the conversation loop:
async def interactive_session(runner, user_id, session_id):
    """Run an interactive session with the agent."""
    print("\n===== ChatGPT-Like Agentic Clone =====")

    while True:
        try:
            user_input = input("\nYou: ").strip()
            if user_input.lower() in ["exit", "quit"]:
                break

            # Send the user input to the agent and get the response
            result = await call_agent_async(user_input, runner, user_id, session_id)

            # Display the response to the user
            print(f"Assistant: {result['text']}")

            # Handle any special content like images
            if result.get('image_data'):
                print("[Image was generated]")
                # Code to display the image would go here

        except KeyboardInterrupt:
            break
        except Exception as e:
            print(f"Error: {e}")
The Bigger Picture: The Runtime Layer in AI Applications
The runtime layer connects our multi-agent system to users, managing the complex interactions between users, agents, and external systems. At its core, it follows the event-driven execution model described in the ADK Runtime documentation, where the agent generates a stream of events that the application processes asynchronously.
This event-driven architecture is fundamental to ADK's design. As explained in the documentation, the runner.run_async() method returns an asynchronous iterator of events, allowing our application to process them as they arrive. This approach enables real-time interactions and efficient handling of long-running operations like tool calls or agent transfers.
The events can include various types, such as:
- Tool start/end events: Indicating when tools are called and their results
- Agent transfer events: Signaling when control passes between agents
- Thinking events: Providing insight into the agent's reasoning process
- Final response events: Delivering the agent's ultimate answer
By processing these events appropriately, our application can provide a rich interactive experience, showing users not just the final answers but also the agent's thought process and intermediate steps.
The session management component, implemented using InMemorySessionService, is another crucial element of the runtime. As detailed in the ADK Sessions documentation, sessions maintain the conversation history and state across interactions. This enables our agents to maintain context, remember previous exchanges, and build on earlier information.
Sessions in ADK have several powerful capabilities beyond simple memory:
- Persistent state: Key-value storage that persists across turns
- Artifact storage: Ability to store and retrieve binary data like images
- Memory management: Automatic pruning of conversation history to prevent context overflow
- Session isolation: Keeping different user conversations separate
In production environments, we might replace the InMemorySessionService with a persistent implementation that stores sessions in a database. This would allow conversations to continue across application restarts and enable scaling the system across multiple servers.
Another advanced feature of the ADK runtime is the ability to configure execution parameters through Runtime Config. This allows for fine-tuning how agents execute, including setting timeouts, controlling parallelism in tool execution, and managing resource usage. In a production deployment, these configurations can be critical for ensuring responsiveness and efficiency.
Step 7: Running and Testing Your Multi-agent System
With all components in place, it's time to run our multi-agent system:
# Navigate to the app directory
cd app

# Run the application
python main.py
This launches the interactive CLI, where you can test various queries that demonstrate the power of our multi-agent system:
- General knowledge: "Who was Marie Curie?"
- Web search: "What's the weather in London right now?"
- Web extraction: "Extract content from
https://github.com/trending" - Deep research: "Do deep research on quantum computing advances"
- Image generation: "Generate an image of a robot playing piano"
Each query type is handled by a different specialized agent, with the root agent orchestrating the process. Behind the scenes, the system is executing a complex workflow:
- The user input is converted into a structured message format
- The runner passes this message to the root agent
- The root agent analyzes the request and decides how to handle it
- If needed, the root agent delegates to a specialized agent
- The specialized agent uses its tools to perform the requested task
- Results flow back through the agent hierarchy
- The final response is displayed to the user
Throughout this process, the system generates events that could be used for logging, monitoring, or providing real-time feedback to the user.
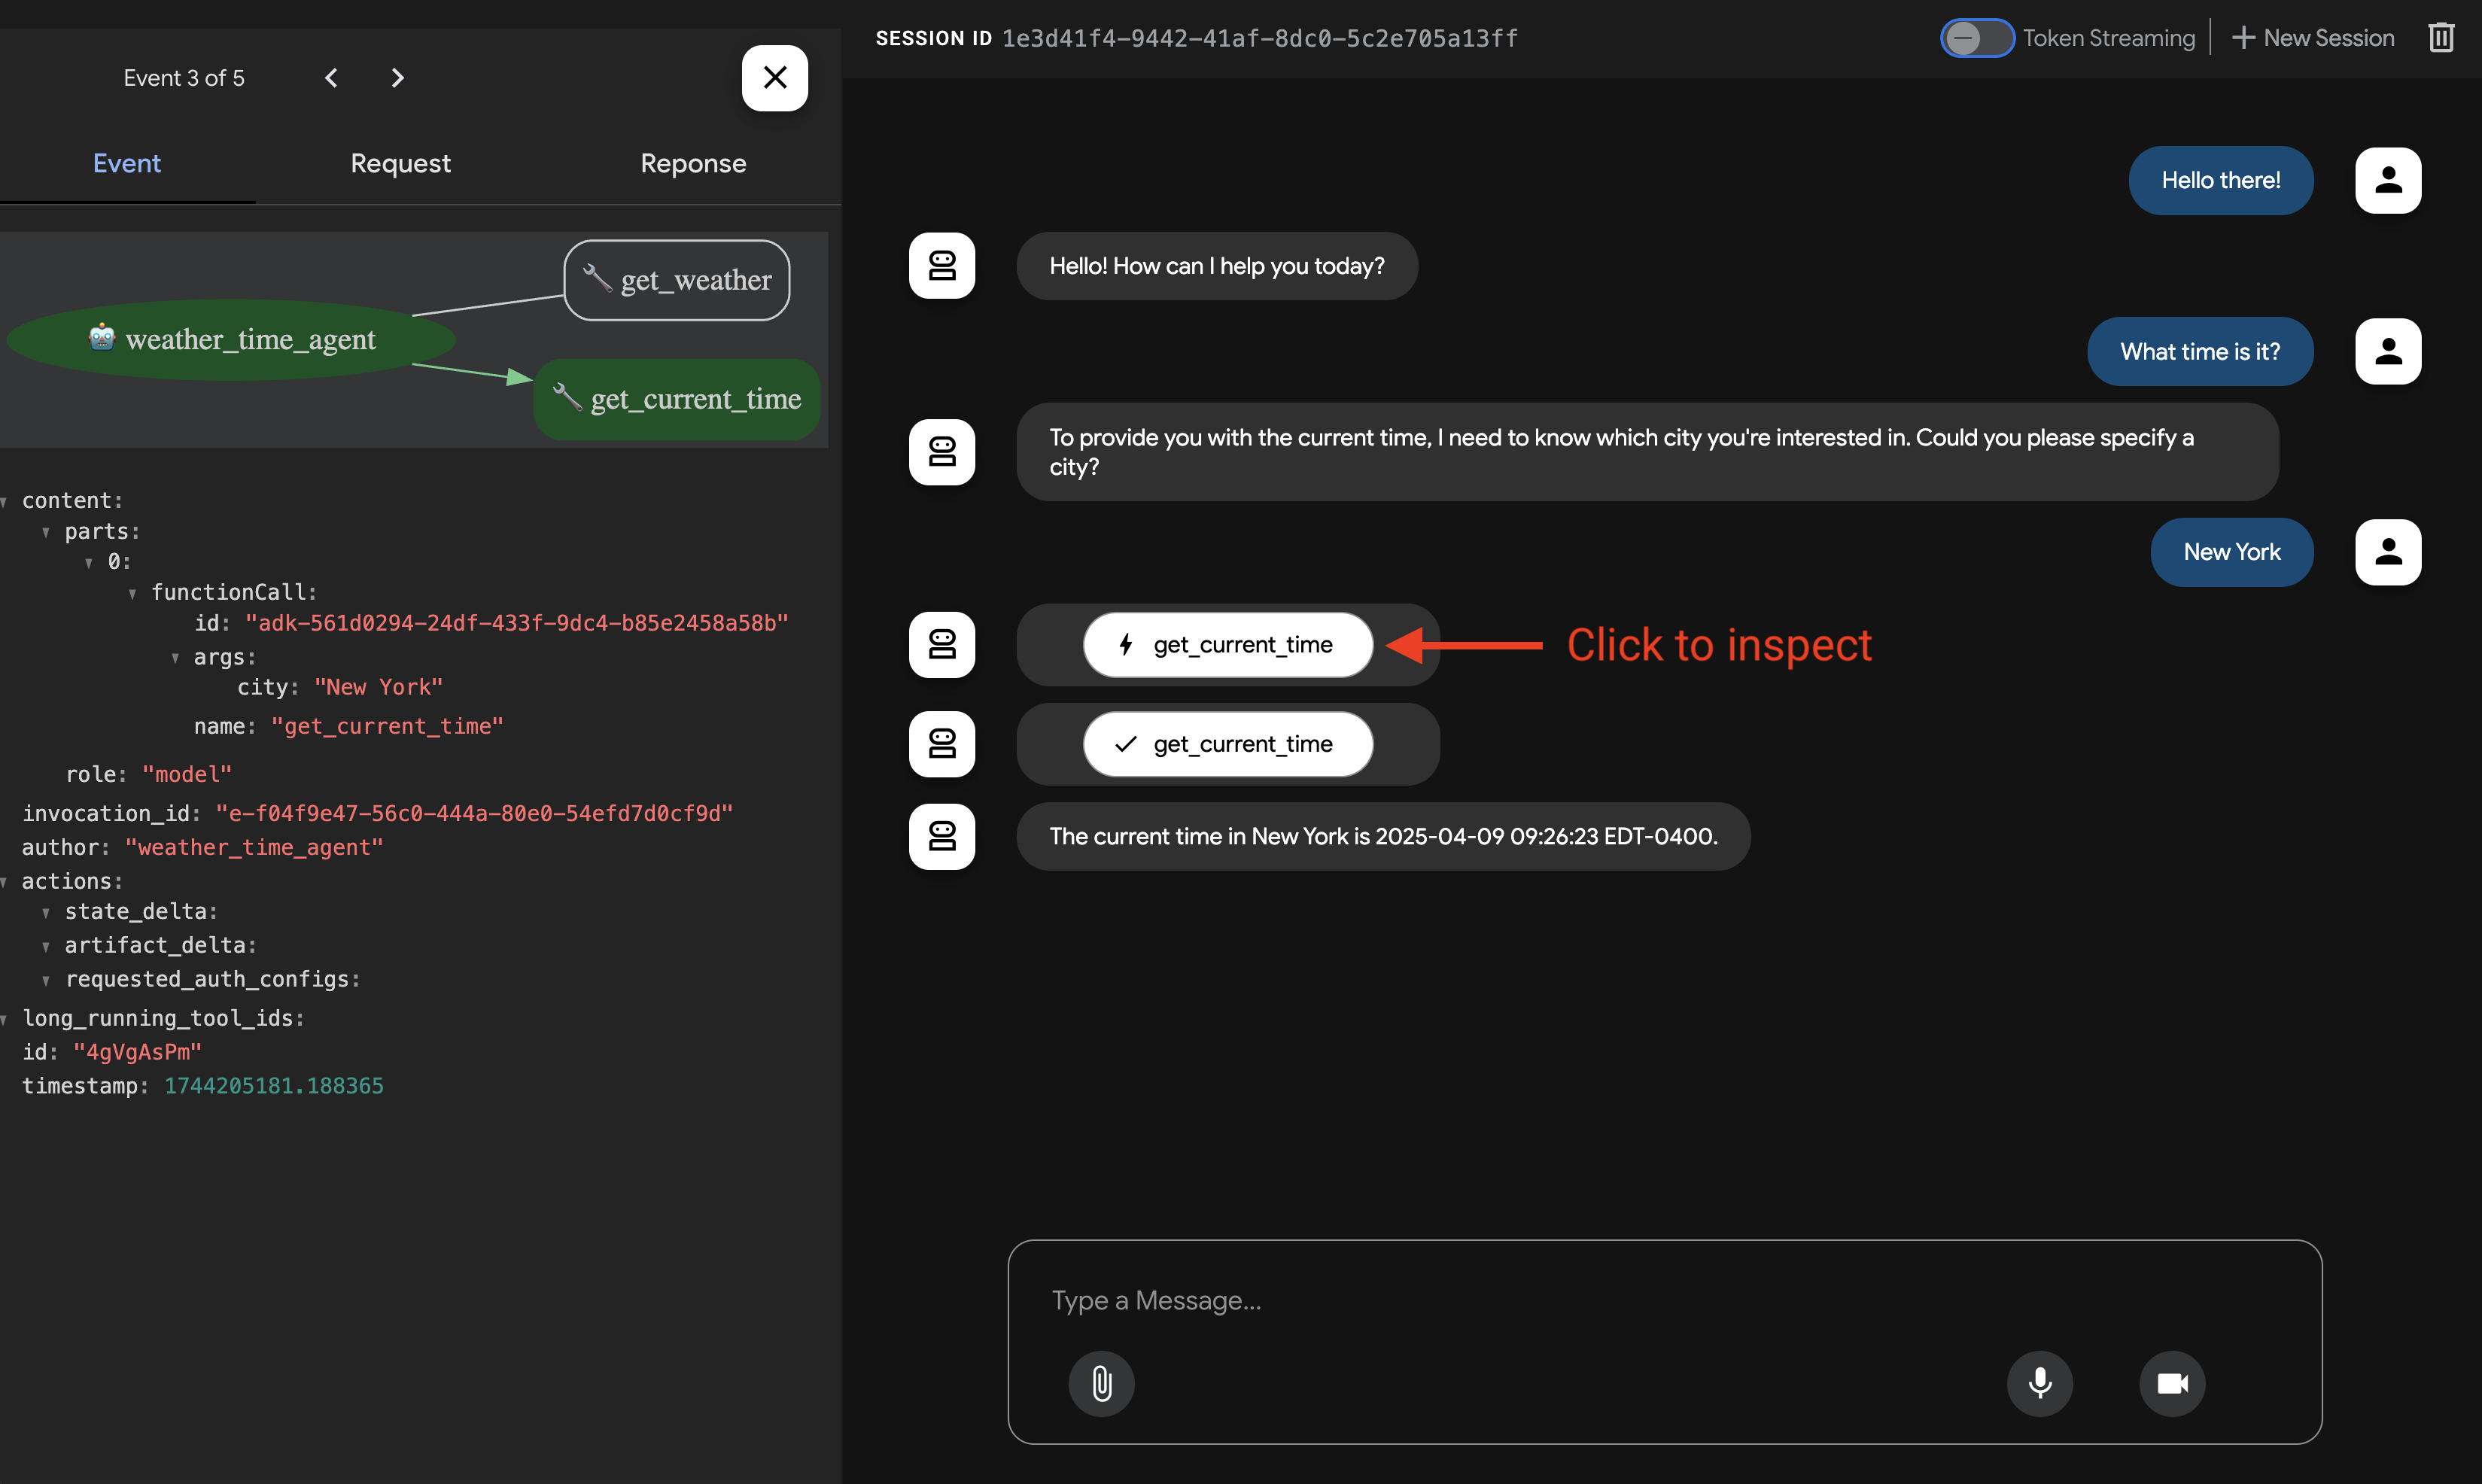
Alternatively, you can use the ADK web UI for a more visual interaction:
# From the project root
adk web
Then open your browser to http://localhost:8000 and select "chatgpt_agentic_clone" from the dropdown. This web interface allows for easier testing and visualization of the agent's responses, including displaying generated images directly in the browser.
The Bigger Picture: From Components to System
Our multi-agent architecture offers several advantages over a single monolithic agent, aligning with best practices outlined in the ADK Multi-agent Systems documentation. This approach creates what the documentation calls a "society of mind," where multiple specialized agents collaborate to solve complex problems.
The system demonstrates several advanced patterns from the ADK documentation:
- Hierarchical Delegation: The root agent delegates tasks to specialists based on the query type
- Dynamic Routing: Requests are automatically sent to the most appropriate agent
- Context Preservation: Conversation history follows the user across agent transfers
- Tool Specialization: Each agent has access only to the tools it needs
This architecture provides significant benefits for both development and production:
- Independent Development: Teams can work on different agents without interfering with each other
- Isolated Testing: Each agent can be tested separately with focused test cases
- Simplified Maintenance: Updates to one capability don't affect others
- Graceful Degradation: If one agent fails, others can still function
For future enhancements, the ADK documentation suggests several advanced patterns we could implement:
- Workflow Agents: Adding sequential, loop, or parallel agents for complex, multi-step processes
- Planning: Implementing a planner to break down complex tasks before execution
- Tool Orchestration: Creating specialized tool orchestration agents that coordinate multiple tools for complex tasks
- Agent Teams: Building teams of specialized agents that collaborate on specific domains
The system could also be extended with additional capabilities from ADK's ecosystem:
- Additional Built-in Tools: Incorporating ADK's built-in tools for capabilities like code execution or document reading
- Google Cloud Tools: Adding Google Cloud integrations for enterprise features like document processing or translation
- OpenAPI Tools: Connecting to external services using OpenAPI specifications
- Streaming: Implementing streaming capabilities for real-time voice or video interactions
With Google's ADK providing the agent framework and Firecrawl handling web interactions, we've built a sophisticated AI system that combines multiple specialized agents into a cohesive, powerful application that can answer questions, search the web, extract content, conduct research, and generate images - all through a simple, conversational interface.
Conclusion And Next Steps
This tutorial demonstrates how Google ADK enables the creation of effective multi-agent systems. To build more advanced agents, explore ADK features like Artifacts for managing binary data, Events for controlling agent execution, and Context for handling conversation state. These components help create agents that can process complex tasks while maintaining natural conversations.
Before deployment, use ADK's Evaluation tools to test your agents thoroughly, then implement them using the options in the Deployment documentation. When your agents need web capabilities, Firecrawl provides a practical API for web search, content extraction, and research that simplifies accessing real-time information without dealing with the technical challenges of web scraping.