How to Build MCP Servers in Python: Complete FastMCP Tutorial for AI Developers

Building MCP servers in Python using FastMCP lets you create custom AI tools that extend language model capabilities for document processing, web scraping, and data analysis. This tutorial covers everything from setup to deployment, enabling you to build production-ready MCP servers that integrate seamlessly with Claude Desktop, Cursor, and other AI applications.
Update (January 2026): FastMCP 3.0 was released on January 19, 2026, introducing powerful new features including component versioning, granular authorization, OpenTelemetry instrumentation, and multiple provider types (FileSystem, Skills, OpenAPI). This tutorial has been updated to reflect FastMCP 3.0 best practices while remaining compatible with earlier versions.
Related reading: Learn about the best MCP servers for Cursor to extend your development workflow, explore MCP vs A2A protocols to understand how MCP compares to other AI integration approaches, browse the best MCP servers for developers across Claude Code, Cursor, and other AI tools, or see which Claude Code plugins bundle MCP servers alongside skills, hooks, and commands.
TL;DR
- FastMCP simplifies MCP development - Decorator-based tool registration reduces setup time by 5x compared to raw SDK implementation
- Three core components power MCP servers - Tools (AI-controlled functions), Resources (application-controlled data), and Prompts (user-invoked templates)
- Built-in debugging accelerates development - MCP Inspector provides web interface for testing tools, resources, and prompts before deployment
- Production requires security layers - Implement file validation, path restrictions, rate limiting, and audit logging for enterprise deployments
- Multiple deployment options available - Local hosting via Claude Desktop/Cursor, PyPI package distribution, or Docker containerization for teams
What you'll learn in this guide
- Why build custom MCP servers?
- Setting up your development environment
- FastMCP vs other MCP solutions
- Building your first MCP server
- Advanced MCP server features
- Testing and debugging
- Deployment and distribution
- Production considerations
- Real-world applications
- Troubleshooting common issues
- Next steps
Why build custom MCP servers?
MCP servers in Python enable developers to create specialized AI tools that address unique business requirements. While thousands of pre-built servers exist at mcp.so, custom solutions offer critical advantages for enterprise workflows.
Key benefits of custom MCP servers:
Building MCP servers provides direct ROI through automation of document-heavy processes. Organizations typically see 60-80% time savings on document analysis tasks when implementing custom MCP solutions for their specific file formats and workflows.
Enterprise use cases:
- Legal firms: Process contracts, briefs, and regulatory documents with specialized extraction rules
- Healthcare: Extract patient data from medical records while maintaining HIPAA compliance
- Research institutions: Analyze academic papers and technical documentation at scale
- HR departments: Process resumes, employee handbooks, and policy documents automatically
For teams building AI applications that need to process web data alongside documents, consider reading our guide on building AI applications with web data and modern RAG tech stack.
Setting up your development environment
Getting started with MCP servers Python requires installing the right tools and dependencies. We'll use UV Python package manager for faster dependency resolution compared to traditional pip installations.
Installing prerequisites
Node.js installation (required for MCP ecosystem):
# macOS
brew install node

# Windows
winget install OpenJS.NodeJS

# Verify installation
node --version
npx --version
UV Python package manager:
# macOS
curl -sSf https://install.python-uv.org | bash
# or
brew install uv

# Windows (PowerShell as Administrator)
powershell -c "irm https://install.python-uv.org | iex"

# Verify installation
uv --version
Quick test with existing MCP server
Before building custom servers, test your setup with an existing solution. We'll use Firecrawl MCP server for web scraping capabilities.
Create the MCP configuration file:
mkdir ~/.cursor
touch ~/.cursor/mcp.json
Add the following configuration:
{
  "mcpServers": {
    "firecrawl-mcp": {
      "command": "npx",
      "args": ["-y", "firecrawl-mcp"],
      "env": {
        "FIRECRAWL_API_KEY": "YOUR-API-KEY"
      }
    }
  }
}
You can connect and try Firecrawl without a key first. When you're ready for higher rate limits, get your free API key at Firecrawl.dev, then restart Cursor. The server will appear in your IDE settings, ready to scrape web pages directly from your chat interface.
Read our detailed guide on How to Set Up and Use Firecrawl MCP in Cursor.
FastMCP vs other MCP solutions
Understanding the landscape helps you choose the right approach for building MCP servers in Python. With the release of FastMCP 3.0 on January 19, 2026, the framework has solidified its position as the fastest way to build production-ready MCP servers. Here's a comprehensive comparison:
| Feature | FastMCP | Raw MCP SDK | TypeScript MCP |
|---|---|---|---|
| Setup Complexity | Minimal (decorators) | High (manual protocol) | Medium (type definitions) |
| Development Time | 1-2 hours | 8-12 hours | 4-6 hours |
| Built-in Debugging | ✅ MCP Inspector | ❌ Manual testing | ✅ Basic tools |
| Error Handling | ✅ Automatic wrapping | ❌ Manual implementation | ✅ TypeScript safety |
| Documentation | ✅ Comprehensive | ❌ Limited examples | ✅ Good coverage |
| Performance | High | High | High |
| Learning Curve | Low | High | Medium |
| Production Ready | ✅ Yes | ⚠️ Requires expertise | ✅ Yes |
FastMCP 3.0 advantages:
- Decorator pattern simplifies tool registration with testable, callable returns
- Built-in validation prevents common errors
- Automatic dependency management handles library requirements
- Development speed 5x faster than raw SDK implementation
- Component versioning enables gradual API evolution with
@tool(version="1.0") - Granular authorization controls access at the component level
- OpenTelemetry integration provides production observability out of the box
- Multiple provider types including FileSystem (hot reload), Skills, and OpenAPI integration
When to choose FastMCP:
- Building document processing tools
- Rapid prototyping requirements
- Team members new to MCP development
- Production deployments with tight timelines
Context: To understand how web data fits into your MCP server workflows, see our comparison of the best web search APIs for 2026, semantic search APIs, and the top web search MCP servers for Claude and Cursor.
Building your first MCP server
Let's build a document reader MCP server that processes PDF and DOCX files. This server demonstrates core MCP concepts while solving real business problems around document analysis.
Installing FastMCP
Install FastMCP 3.0 with CLI tools for the latest features and improvements:
# Install FastMCP 3.0 (stable release)
uv add "fastmcp"

# Or install with CLI tools for debugging
uv add "mcp[cli]"
P.S: We recently explored Why CLIs Are Better for AI Coding Agents Than IDEs. Read to learn more about how CLIs are gaining popularity in 2026 and why.
FastMCP 3.0 was released on January 19, 2026, bringing component versioning, authorization controls, OpenTelemetry integration, and multiple provider types. The CLI extra includes the MCP Inspector for debugging, essential for testing your server components before deployment.
Core MCP components
MCP servers consist of three main components that handle different interaction patterns:
from mcp.server.fastmcp import FastMCP
from mcp.server.fastmcp.prompts import base

mcp = FastMCP("DocumentReader", dependencies=["markitdown[all]"])
Component types:
- Tools: Functions the LLM calls to perform actions (model-controlled)
- Resources: Data sources provided to the LLM as context (application-controlled)
- Prompts: Templates users invoke through UI elements (user-controlled)
Implementing document processing tools
Create tools that extract text from common business document formats:
from mcp.server.fastmcp import FastMCP
from mcp.server.fastmcp.prompts import base
from markitdown import MarkItDown
import os
import logging

# Configure logging for production monitoring
logging.basicConfig(level=logging.INFO)
logger = logging.getLogger(__name__)

mcp = FastMCP("DocumentReader", dependencies=["markitdown[all]"])
md = MarkItDown()

# File size limit (10MB) for production safety
MAX_FILE_SIZE = 10 * 1024 * 1024

def validate_file(file_path: str, allowed_extensions: list) -> tuple[bool, str]:
    """Validate file existence, size, and type."""
    try:
        expanded_path = os.path.expanduser(file_path)

        # Check if file exists
        if not os.path.exists(expanded_path):
            return False, f"File not found: {file_path}"

        # Check file size
        file_size = os.path.getsize(expanded_path)
        if file_size > MAX_FILE_SIZE:
            return False, f"File too large: {file_size / 1024 / 1024:.1f}MB (max 10MB)"

        # Check file extension
        file_ext = os.path.splitext(expanded_path)[1].lower()
        if file_ext not in allowed_extensions:
            return False, f"Unsupported file type: {file_ext}"

        return True, expanded_path

    except Exception as e:
        return False, f"File validation error: {str(e)}"

@mcp.tool(
    annotations={
        "title": "Read PDF Document",
        "readOnlyHint": True,
        "openWorldHint": False
    }
)
def read_pdf(file_path: str) -> str:
    """Extract text content from PDF files for AI analysis.

    Processes PDF documents and returns clean text content suitable for
    language model analysis. Handles both text-based and scanned PDFs.

    Args:
        file_path: Path to the PDF file (supports ~ for home directory)

    Returns:
        Extracted text content or error message
    """
    try:
        # Validate file before processing
        is_valid, result = validate_file(file_path, ['.pdf'])
        if not is_valid:
            return f"Error: {result}"

        logger.info(f"Processing PDF: {file_path}")

        # Extract text using markitdown
        content = md.convert(result).text_content

        # Basic content validation
        if not content.strip():
            return "Warning: PDF appears to be empty or contains only images"

        logger.info(f"Successfully processed PDF: {len(content)} characters extracted")
        return content

    except Exception as e:
        error_msg = f"Error reading PDF: {str(e)}"
        logger.error(error_msg)
        return error_msg

@mcp.tool(
    annotations={
        "title": "Read Word Document",
        "readOnlyHint": True,
        "openWorldHint": False
    }
)
def read_docx(file_path: str) -> str:
    """Extract text content from Word documents for AI analysis.

    Processes DOCX files and returns formatted text content while preserving
    document structure for better language model understanding.

    Args:
        file_path: Path to the Word document (supports ~ for home directory)

    Returns:
        Extracted text content or error message
    """
    try:
        # Validate file before processing
        is_valid, result = validate_file(file_path, ['.docx', '.doc'])
        if not is_valid:
            return f"Error: {result}"

        logger.info(f"Processing DOCX: {file_path}")

        # Extract text using markitdown
        content = md.convert(result).text_content

        if not content.strip():
            return "Warning: Document appears to be empty"

        logger.info(f"Successfully processed DOCX: {len(content)} characters extracted")
        return content

    except Exception as e:
        error_msg = f"Error reading DOCX: {str(e)}"
        logger.error(error_msg)
        return error_msg
Key implementation features:
- File validation prevents processing invalid or oversized files
- Error handling provides clear feedback for troubleshooting
- Logging integration enables production monitoring
- Size limits protect against memory issues with large documents
- Extension checking ensures only supported file types are processed
Adding resource components
Resources provide static or dynamic data that enhances AI context without requiring explicit tool calls:
@mcp.resource("file://document/pdf-example")
def provide_example_pdf():
    """Provide sample PDF content for demonstration and testing.

    This resource makes example document content available to help users
    understand the server's capabilities and expected output format.
    """
    try:
        # Use absolute path for reliability
        pdf_path = os.path.expanduser("~/Documents/example.pdf")

        if not os.path.exists(pdf_path):
            return "Example PDF not available. Please add ~/Documents/example.pdf"

        return md.convert(pdf_path).text_content

    except Exception as e:
        return f"Error providing example PDF: {str(e)}"

@mcp.resource("file://document/recent/{filename}")
def provide_recent_document(filename: str):
    """Access recently used documents dynamically.

    Provides quick access to documents in a designated recent files folder,
    enabling efficient workflows for frequently referenced materials.

    Args:
        filename: Name of the file in the recent documents folder
    """
    try:
        # Construct safe path
        recent_docs_folder = os.path.expanduser("~/Documents/Recent")
        file_path = os.path.join(recent_docs_folder, filename)

        # Security check - ensure path is within allowed directory
        if not os.path.commonpath([recent_docs_folder, file_path]) == recent_docs_folder:
            return "Error: Invalid file path"

        is_valid, result = validate_file(file_path, ['.pdf', '.docx', '.doc', '.txt'])
        if not is_valid:
            return f"Error: {result}"

        return md.convert(result).text_content

    except Exception as e:
        return f"Error accessing document: {str(e)}"
Creating user-friendly prompts
Prompts provide standardized templates that users can invoke through the host application UI:
@mcp.prompt()
def debug_pdf_path(error: str) -> list[base.Message]:
    """Troubleshoot PDF processing issues with step-by-step guidance.

    This prompt provides structured troubleshooting advice for common PDF
    processing problems, including file permissions, format issues, and path errors.

    Args:
        error: The specific error message encountered during PDF processing
    """
    return [
        base.Message(
            role="user",
            content=[
                base.TextContent(
                    text=f"I encountered this error while processing a PDF: {error}\n\n"
                    f"Please provide step-by-step troubleshooting advice covering:\n"
                    f"1. File path validation\n"
                    f"2. File permissions check\n"
                    f"3. PDF format compatibility\n"
                    f"4. Alternative processing approaches\n\n"
                    f"Focus on practical solutions I can implement immediately."
                )
            ]
        )
    ]

@mcp.prompt()
def summarize_document_batch(directory: str) -> list[base.Message]:
    """Create summaries for multiple documents in a directory.

    Generates a comprehensive analysis prompt for processing multiple documents
    simultaneously, useful for batch document review workflows.

    Args:
        directory: Path to directory containing documents to summarize
    """
    return [
        base.Message(
            role="user",
            content=[
                base.TextContent(
                    text=f"Please process all PDF and DOCX files in the directory: {directory}\n\n"
                    f"For each document, provide:\n"
                    f"1. Brief summary (2-3 sentences)\n"
                    f"2. Key topics identified\n"
                    f"3. Document type and purpose\n"
                    f"4. Any notable formatting or content issues\n\n"
                    f"Present results in a table format for easy review."
                )
            ]
        )
    ]
Advanced MCP server features
FastMCP 3.0 production features
FastMCP 3.0 introduces several production-grade capabilities that streamline deployment and operations:
Component versioning:
Version your tools to enable gradual API evolution without breaking existing clients:
from mcp.server.fastmcp import FastMCP

mcp = FastMCP("DocumentReader")

@mcp.tool(version="1.0")
def read_pdf(file_path: str) -> str:
    """Original implementation."""
    return process_pdf_v1(file_path)

@mcp.tool(version="2.0")
def read_pdf(file_path: str, extract_images: bool = False) -> str:
    """Enhanced version with image extraction."""
    return process_pdf_v2(file_path, extract_images)
Granular authorization:
Control access to specific components using the auth parameter:
@mcp.tool(auth=lambda context: context.user.role == "admin")
def delete_document(file_path: str) -> str:
    """Admin-only document deletion."""
    os.remove(file_path)
    return f"Deleted {file_path}"

@mcp.tool(auth=lambda context: context.user.has_permission("read"))
def read_document(file_path: str) -> str:
    """Read access with permission check."""
    return read_file(file_path)
OpenTelemetry integration:
FastMCP 3.0 includes native OpenTelemetry instrumentation for production monitoring:
from opentelemetry import trace
from opentelemetry.sdk.trace import TracerProvider
from opentelemetry.sdk.trace.export import ConsoleSpanExporter, BatchSpanExporter

# Configure telemetry
trace.set_tracer_provider(TracerProvider())
tracer = trace.get_tracer(__name__)

# Your MCP server automatically emits telemetry spans
# No additional code needed - built into FastMCP 3.0
Multiple provider types:
FastMCP 3.0 supports various component sources beyond decorators:
from mcp.server.fastmcp import FastMCP
from mcp.server.fastmcp.providers import FileSystemProvider, OpenAPIProvider

mcp = FastMCP("MultiProvider")

# Hot-reload components from a directory
fs_provider = FileSystemProvider("./tools")
mcp.add_provider(fs_provider)

# Expose REST API as MCP tools
api_provider = OpenAPIProvider("https://api.example.com/openapi.json")
mcp.add_provider(api_provider)
Production infrastructure: For teams deploying MCP servers at scale, explore our guides on the best vector databases for 2025 and chunking strategies for RAG.
Performance optimization
Optimize your MCP server for production workloads with caching and efficient processing:
import functools
import time
from typing import Dict, Any

# Simple in-memory cache for processed documents
document_cache: Dict[str, Dict[str, Any]] = {}
CACHE_DURATION = 3600  # 1 hour

def cached_document(func):
    """Decorator to cache document processing results."""
    @functools.wraps(func)
    def wrapper(file_path: str) -> str:
        # Create cache key from file path and modification time
        try:
            expanded_path = os.path.expanduser(file_path)
            stat = os.stat(expanded_path)
            cache_key = f"{expanded_path}_{stat.st_mtime}"

            # Check cache
            if cache_key in document_cache:
                cache_entry = document_cache[cache_key]
                if time.time() - cache_entry['timestamp'] < CACHE_DURATION:
                    logger.info(f"Cache hit for {file_path}")
                    return cache_entry['content']

            # Process document
            result = func(file_path)

            # Cache successful results
            if not result.startswith("Error"):
                document_cache[cache_key] = {
                    'content': result,
                    'timestamp': time.time()
                }
                logger.info(f"Cached result for {file_path}")

            return result

        except Exception as e:
            return func(file_path)  # Fallback to uncached processing

    return wrapper

# Apply caching to document processing tools
@cached_document
def read_pdf_cached(file_path: str) -> str:
    """Cached version of PDF reading for improved performance."""
    return read_pdf(file_path)
Security best practices
Implement security measures to protect against common vulnerabilities:
import hashlib
import tempfile
from pathlib import Path

def secure_path_validation(file_path: str, allowed_directories: list) -> tuple[bool, str]:
    """Validate file paths against directory traversal attacks."""
    try:
        # Resolve path to absolute form
        resolved_path = Path(os.path.expanduser(file_path)).resolve()

        # Check if path is within allowed directories
        for allowed_dir in allowed_directories:
            allowed_path = Path(os.path.expanduser(allowed_dir)).resolve()
            try:
                resolved_path.relative_to(allowed_path)
                return True, str(resolved_path)
            except ValueError:
                continue

        return False, "Path not in allowed directories"

    except Exception as e:
        return False, f"Path validation error: {str(e)}"

def sanitize_filename(filename: str) -> str:
    """Remove potentially dangerous characters from filenames."""
    # Remove path separators and other dangerous characters
    dangerous_chars = ['/', '\\', '..', '<', '>', ':', '"', '|', '?', '*']
    sanitized = filename

    for char in dangerous_chars:
        sanitized = sanitized.replace(char, '_')

    return sanitized[:255]  # Limit filename length

# Update tools with security validation
ALLOWED_DIRECTORIES = [
    "~/Documents",
    "~/Downloads",
    "~/Desktop"
]

@mcp.tool()
def read_pdf_secure(file_path: str) -> str:
    """Secure PDF reader with path validation and safety checks."""
    try:
        # Validate path security
        is_safe, safe_path = secure_path_validation(file_path, ALLOWED_DIRECTORIES)
        if not is_safe:
            return f"Security error: {safe_path}"

        # Continue with normal validation and processing
        is_valid, result = validate_file(safe_path, ['.pdf'])
        if not is_valid:
            return f"Error: {result}"

        return md.convert(result).text_content

    except Exception as e:
        logger.error(f"Secure PDF processing error: {str(e)}")
        return f"Error: {str(e)}"
Testing and debugging
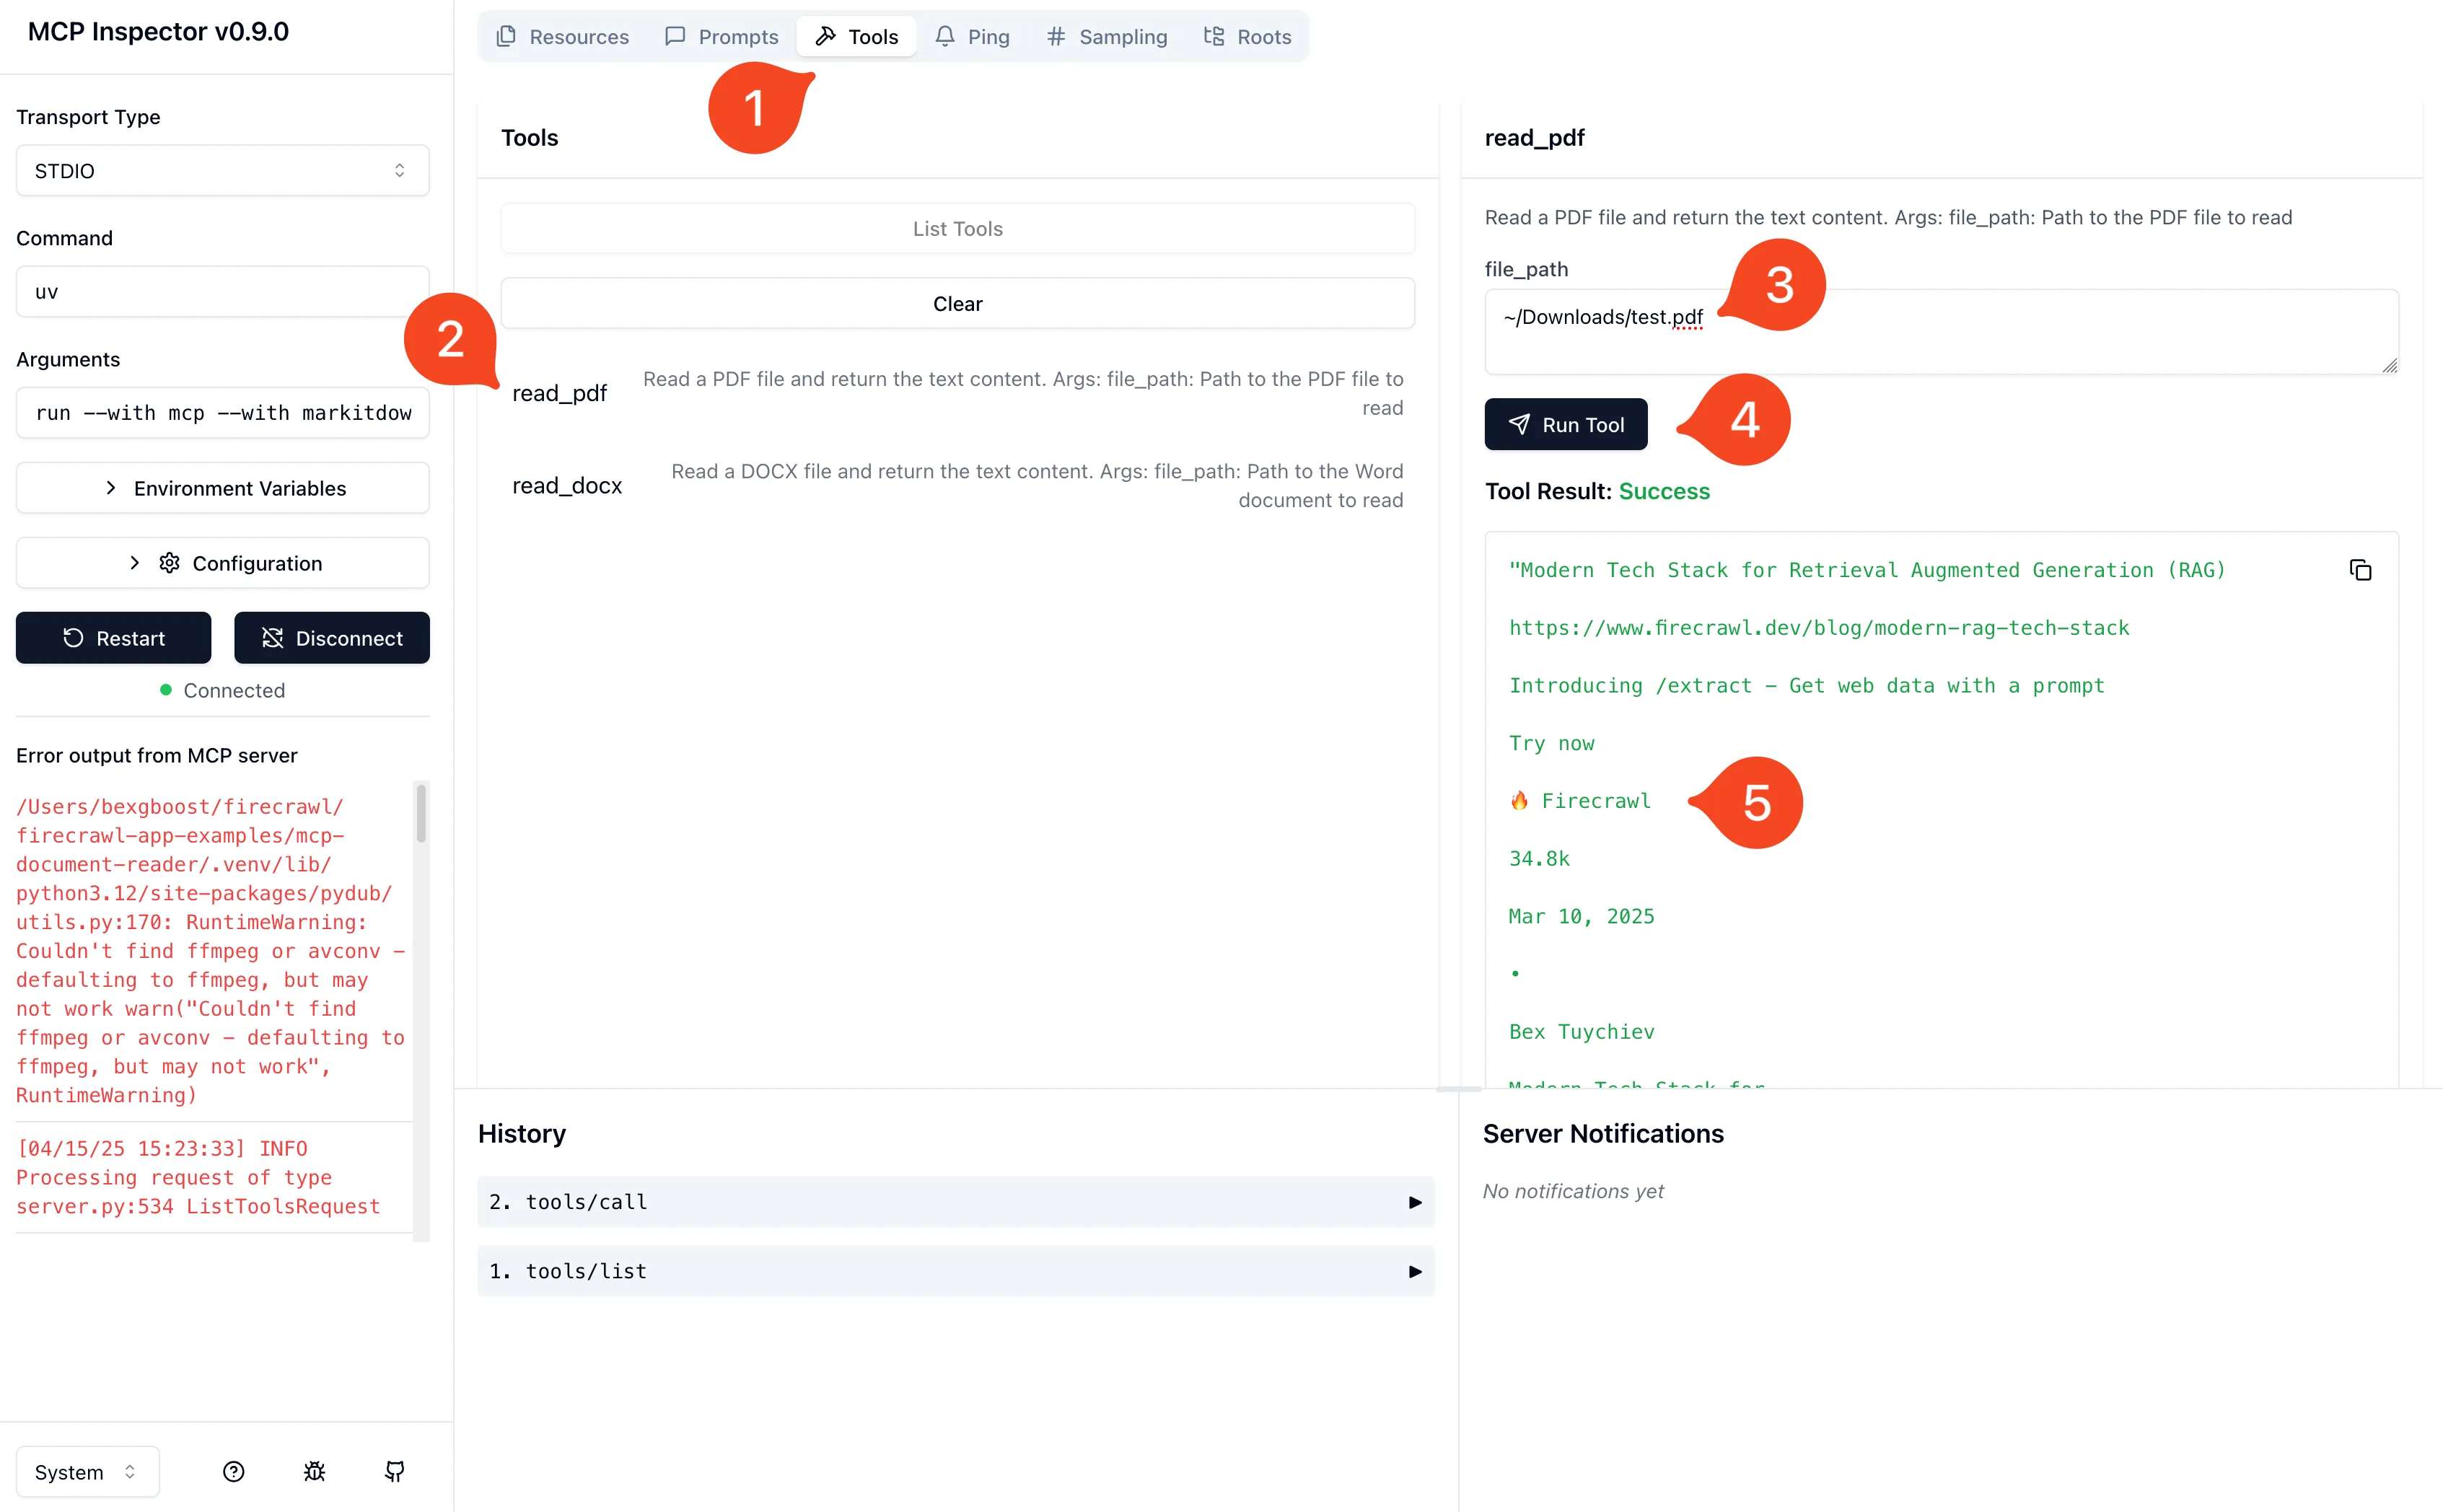
Using the MCP inspector
FastMCP includes a built-in debugging interface that simplifies development and testing:
mcp dev document_reader.pyThis launches the MCP Inspector at http://127.0.0.1:6274, providing a web interface for testing all server components.

Inspector testing workflow:
- Connection: Click "Connect" to establish server communication
- Tools Testing: Test each tool with various input parameters
- Resource Validation: Verify resource access and dynamic parameter handling
- Prompt Preview: Preview prompt templates with different argument values
- Error Scenarios: Test error handling with invalid inputs
Automated testing framework
Implement unit tests for reliable development:
import unittest
import tempfile
import os
from document_reader import read_pdf, read_docx, validate_file

class TestDocumentReader(unittest.TestCase):

    def setUp(self):
        """Create temporary test files."""
        self.test_dir = tempfile.mkdtemp()

        # Create a simple test PDF (would need actual PDF content)
        self.test_pdf_path = os.path.join(self.test_dir, "test.pdf")
        self.test_docx_path = os.path.join(self.test_dir, "test.docx")

    def tearDown(self):
        """Clean up test files."""
        import shutil
        shutil.rmtree(self.test_dir)

    def test_file_validation(self):
        """Test file validation function."""
        # Test non-existent file
        is_valid, message = validate_file("/nonexistent/file.pdf", ['.pdf'])
        self.assertFalse(is_valid)
        self.assertIn("File not found", message)

        # Test invalid extension
        with open(self.test_pdf_path, 'w') as f:
            f.write("test")
        is_valid, message = validate_file(self.test_pdf_path, ['.docx'])
        self.assertFalse(is_valid)
        self.assertIn("Unsupported file type", message)

    def test_error_handling(self):
        """Test error handling for invalid files."""
        result = read_pdf("/nonexistent/file.pdf")
        self.assertTrue(result.startswith("Error:"))

    def test_path_expansion(self):
        """Test tilde path expansion."""
        # This would test the ~ expansion functionality
        result = read_pdf("~/nonexistent.pdf")
        self.assertTrue(result.startswith("Error:"))

if __name__ == '__main__':
    unittest.main()
Performance benchmarking
Monitor server performance with built-in metrics:
import time
import psutil
import os

class PerformanceMonitor:
    """Monitor MCP server performance metrics."""

    def __init__(self):
        self.process = psutil.Process(os.getpid())
        self.metrics = []

    def start_operation(self, operation_name: str):
        """Start monitoring an operation."""
        return {
            'name': operation_name,
            'start_time': time.time(),
            'start_memory': self.process.memory_info().rss / 1024 / 1024  # MB
        }

    def end_operation(self, operation_data: dict):
        """End monitoring and record metrics."""
        end_time = time.time()
        end_memory = self.process.memory_info().rss / 1024 / 1024  # MB

        metrics = {
            'operation': operation_data['name'],
            'duration': end_time - operation_data['start_time'],
            'memory_delta': end_memory - operation_data['start_memory'],
            'peak_memory': end_memory
        }

        self.metrics.append(metrics)
        logger.info(f"Performance: {metrics}")
        return metrics

# Integrate performance monitoring into tools
monitor = PerformanceMonitor()

@mcp.tool()
def read_pdf_monitored(file_path: str) -> str:
    """PDF reader with performance monitoring."""
    operation = monitor.start_operation("read_pdf")
    try:
        result = read_pdf(file_path)
        return result
    finally:
        monitor.end_operation(operation)
Deployment and distribution
Local hosting configuration
For personal or team use, configure your server for local hosting with Claude Desktop and Cursor:
Claude Desktop setup:
mcp install document_reader.pyThis automatically configures the server in Claude Desktop's MCP settings. If you want to go further, you can schedule recurring web tasks using Claude Desktop and Firecrawl's MCP server together.
Cursor IDE setup:
Add to ~/.cursor/mcp.json:
{
  "mcpServers": {
    "document-reader-mcp": {
      "command": "uv",
      "args": ["--directory", "/path/to/your/server/directory", "run", "document_reader.py"],
      "env": {
        "LOG_LEVEL": "INFO"
      }
    }
  }
}
PyPI package distribution
Package your MCP server for broader distribution:
Directory structure:
mcp-document-reader/
├── src/
│   └── document_reader/
│       ├── __init__.py
│       └── server.py
├── tests/
│   └── test_server.py
├── pyproject.toml
├── README.md
└── LICENSE
pyproject.toml configuration:
[build-system]
requires = ["setuptools>=61.0", "wheel"]
build-backend = "setuptools.build_meta"

[project]
name = "mcp-document-reader"
version = "1.0.0"
description = "Production-ready MCP server for document processing with AI"
readme = "README.md"
authors = [
    {name = "Your Name", email = "your.email@example.com"}
]
license = {text = "MIT"}
classifiers = [
    "Development Status :: 5 - Production/Stable",
    "Intended Audience :: Developers",
    "Topic :: Software Development :: Libraries :: Python Modules",
    "Topic :: Scientific/Engineering :: Artificial Intelligence",
    "License :: OSI Approved :: MIT License",
    "Programming Language :: Python :: 3",
    "Programming Language :: Python :: 3.9",
    "Programming Language :: Python :: 3.10",
    "Programming Language :: Python :: 3.11",
    "Programming Language :: Python :: 3.12"
]
dependencies = [
    "mcp>=1.2.0",
    "markitdown[all]>=0.1.0",
    "psutil>=5.9.0"
]
requires-python = ">=3.9"

[project.urls]
Homepage = "https://github.com/your-username/mcp-document-reader"
Documentation = "https://github.com/your-username/mcp-document-reader#readme"
Repository = "https://github.com/your-username/mcp-document-reader.git"
Issues = "https://github.com/your-username/mcp-document-reader/issues"

[project.scripts]
mcp-document-reader = "document_reader.server:main"

[tool.setuptools]
package-dir = {"" = "src"}

[tool.setuptools.packages.find]
where = ["src"]
Publishing process:
# Build the package
uv pip install build twine
python -m build

# Upload to PyPI (requires PyPI account and API token)
twine upload dist/*
User installation:
uv add mcp-document-reader
mcp-document-reader
Production considerations
Scalability planning
Design your MCP server to handle production workloads effectively:
Resource management:
- Memory limits: Implement file size restrictions and memory monitoring
- Concurrent processing: Use async/await for handling multiple requests
- Rate limiting: Prevent abuse with request throttling
- Health checks: Monitor server status and resource usage
import asyncio
from collections import defaultdict
import time

class RateLimiter:
    """Simple rate limiting for MCP servers."""

    def __init__(self, max_requests: int = 10, window_seconds: int = 60):
        self.max_requests = max_requests
        self.window_seconds = window_seconds
        self.requests = defaultdict(list)

    def is_allowed(self, client_id: str = "default") -> bool:
        """Check if request is within rate limits."""
        now = time.time()
        window_start = now - self.window_seconds

        # Clean old requests
        self.requests[client_id] = [
            req_time for req_time in self.requests[client_id]
            if req_time > window_start
        ]

        # Check if under limit
        if len(self.requests[client_id]) < self.max_requests:
            self.requests[client_id].append(now)
            return True

        return False

# Apply rate limiting to tools
rate_limiter = RateLimiter(max_requests=20, window_seconds=60)

@mcp.tool()
def read_pdf_rate_limited(file_path: str) -> str:
    """PDF reader with rate limiting for production use."""
    if not rate_limiter.is_allowed():
        return "Error: Rate limit exceeded. Please try again later."

    return read_pdf(file_path)
Monitoring and logging
Implement comprehensive monitoring for production deployments:
import logging
import json
from datetime import datetime

# Configure structured logging
logging.basicConfig(
    level=logging.INFO,
    format='%(asctime)s - %(name)s - %(levelname)s - %(message)s',
    handlers=[
        logging.FileHandler('mcp_server.log'),
        logging.StreamHandler()
    ]
)

class StructuredLogger:
    """Structured logging for MCP servers."""

    def __init__(self, logger_name: str):
        self.logger = logging.getLogger(logger_name)

    def log_operation(self, operation: str, status: str, **kwargs):
        """Log operations with structured data."""
        log_data = {
            'timestamp': datetime.utcnow().isoformat(),
            'operation': operation,
            'status': status,
            **kwargs
        }

        if status == 'success':
            self.logger.info(json.dumps(log_data))
        else:
            self.logger.error(json.dumps(log_data))

# Use structured logging in tools
structured_logger = StructuredLogger('document_reader')

@mcp.tool()
def read_pdf_logged(file_path: str) -> str:
    """PDF reader with comprehensive logging."""
    start_time = time.time()

    try:
        result = read_pdf(file_path)

        structured_logger.log_operation(
            operation='read_pdf',
            status='success',
            file_path=file_path,
            content_length=len(result),
            processing_time=time.time() - start_time
        )

        return result

    except Exception as e:
        structured_logger.log_operation(
            operation='read_pdf',
            status='error',
            file_path=file_path,
            error=str(e),
            processing_time=time.time() - start_time
        )
        raise

### Docker deployment

Create containerized deployments for consistent production environments:

```dockerfile
# Dockerfile
FROM python:3.11-slim

WORKDIR /app

# Install system dependencies
RUN apt-update && apt-get install -y \
    build-essential \
    && rm -rf /var/lib/apt/lists/*

# Copy requirements and install Python dependencies
COPY pyproject.toml .
RUN pip install uv && uv pip sync pyproject.toml

# Copy application code
COPY src/ ./src/

# Create non-root user for security
RUN useradd -m -u 1000 mcpuser
USER mcpuser

# Health check
HEALTHCHECK --interval=30s --timeout=10s --start-period=5s --retries=3 \
  CMD python -c "import requests; requests.get('http://localhost:8000/health')" || exit 1

EXPOSE 8000

CMD ["python", "-m", "document_reader.server"]
Docker Compose for production:
version: "3.8"

services:
  mcp-document-reader:
    build: .
    ports:
      - "8000:8000"
    volumes:
      - ./logs:/app/logs
      - /home/user/Documents:/app/documents:ro
    environment:
      - LOG_LEVEL=INFO
      - MAX_FILE_SIZE=10485760
    restart: unless-stopped

  # Optional: Add monitoring with Prometheus
  prometheus:
    image: prom/prometheus:latest
    ports:
      - "9090:9090"
    volumes:
      - ./monitoring/prometheus.yml:/etc/prometheus/prometheus.yml
    command:
      - "--config.file=/etc/prometheus/prometheus.yml"
      - "--storage.tsdb.path=/prometheus"
Real-world applications
Enterprise document management
MCP servers excel at automating document-heavy business processes. Here are proven applications across industries:
Integration examples: See how teams are building production applications with LangGraph agents, OpenAI Swarm agents, and website-to-agent workflows.
Legal industry implementation:
@mcp.tool()
def extract_contract_clauses(file_path: str, clause_types: list = None) -> str:
    """Extract specific clauses from legal contracts for review.

    Processes legal documents and identifies key contractual elements
    including terms, conditions, liability clauses, and termination provisions.

    Args:
        file_path: Path to the contract document
        clause_types: List of clause types to extract (optional)
    """
    if clause_types is None:
        clause_types = ['liability', 'termination', 'payment', 'confidentiality']

    try:
        content = read_pdf(file_path)
        if content.startswith("Error"):
            return content

        # Use AI to identify and extract specific clauses
        extracted_clauses = {}
        for clause_type in clause_types:
            # This would integrate with your contract analysis logic
            extracted_clauses[clause_type] = f"Found {clause_type} clauses in document"

        return json.dumps(extracted_clauses, indent=2)

    except Exception as e:
        return f"Error extracting clauses: {str(e)}"
Healthcare data processing:
@mcp.tool()
def process_medical_records(file_path: str, patient_id: str = None) -> str:
    """Process medical records while maintaining HIPAA compliance.

    Extracts relevant medical information from patient documents
    with appropriate privacy protections and audit logging.

    Args:
        file_path: Path to the medical record
        patient_id: Optional patient identifier for audit trail
    """
    try:
        # Log access for compliance audit trail
        structured_logger.log_operation(
            operation='process_medical_records',
            status='started',
            file_path=file_path,
            patient_id=patient_id or 'anonymous',
            access_time=datetime.utcnow().isoformat()
        )

        content = read_pdf(file_path)
        if content.startswith("Error"):
            return content

        # Remove or mask PII before processing
        sanitized_content = sanitize_medical_content(content)

        return sanitized_content

    except Exception as e:
        return f"Error processing medical record: {str(e)}"

def sanitize_medical_content(content: str) -> str:
    """Remove or mask sensitive information from medical documents."""
    import re

    # Mask SSN patterns
    content = re.sub(r'\b\d{3}-\d{2}-\d{4}\b', 'XXX-XX-XXXX', content)

    # Mask phone numbers
    content = re.sub(r'\b\d{3}-\d{3}-\d{4}\b', 'XXX-XXX-XXXX', content)

    # Additional PII masking would go here
    return content
Research and academic applications:
@mcp.tool()
def analyze_research_papers(directory_path: str, research_topic: str) -> str:
    """Analyze multiple research papers for specific topics and themes.

    Processes academic papers and generates comparative analysis
    including methodology review, citation patterns, and key findings.

    Args:
        directory_path: Directory containing research papers
        research_topic: Specific research area to focus analysis on
    """
    try:
        papers_analyzed = []
        paper_files = [f for f in os.listdir(os.path.expanduser(directory_path))
                      if f.lower().endswith('.pdf')]

        for paper_file in paper_files:
            file_path = os.path.join(directory_path, paper_file)
            content = read_pdf(file_path)

            if not content.startswith("Error"):
                # Extract key research elements
                analysis = {
                    'filename': paper_file,
                    'content_length': len(content),
                    'methodology_mentions': content.lower().count('methodology'),
                    'conclusion_section': extract_conclusion_section(content),
                    'citation_count': content.count('[') + content.count('(')
                }
                papers_analyzed.append(analysis)

        return json.dumps({
            'topic': research_topic,
            'papers_processed': len(papers_analyzed),
            'analysis': papers_analyzed
        }, indent=2)

    except Exception as e:
        return f"Error analyzing research papers: {str(e)}"

def extract_conclusion_section(content: str) -> str:
    """Extract conclusion section from academic paper."""
    import re

    # Look for common conclusion section headers
    conclusion_patterns = [
        r'(?i)conclusion[s]?\s*\n(.*?)(?=\n[A-Z][a-z]|\nreferences|\nbibliography|$)',
        r'(?i)summary\s*\n(.*?)(?=\n[A-Z][a-z]|\nreferences|\nbibliography|$)',
        r'(?i)discussion\s*\n(.*?)(?=\n[A-Z][a-z]|\nreferences|\nbibliography|$)'
    ]

    for pattern in conclusion_patterns:
        match = re.search(pattern, content, re.DOTALL)
        if match:
            return match.group(1).strip()[:500]  # First 500 chars

    return "Conclusion section not found"
Industry ROI analysis
Typical implementation results:
| Industry | Process Automated | Time Savings | Annual ROI |
|---|---|---|---|
| Legal Services | Contract review | 70% reduction | $150K-$300K |
| Healthcare | Medical record processing | 60% reduction | $80K-$200K |
| Research | Literature review | 80% reduction | $50K-$150K |
| HR | Resume screening | 85% reduction | $30K-$100K |
| Finance | Document compliance | 65% reduction | $100K-$250K |
Cost-benefit analysis for medium enterprise (500 employees):
- Development cost: $15,000-$25,000 (initial setup)
- Annual maintenance: $5,000-$10,000
- Average annual savings: $120,000-$180,000
- Payback period: 2-4 months
- 3-year net benefit: $350,000-$500,000
Troubleshooting common issues
Debugging file access problems
File access problems:
def diagnose_file_issues(file_path: str) -> dict:
    """Comprehensive file access diagnostics."""
    diagnostics = {
        'file_path': file_path,
        'expanded_path': os.path.expanduser(file_path),
        'exists': False,
        'readable': False,
        'size_mb': 0,
        'permissions': None,
        'recommendations': []
    }

    try:
        expanded_path = os.path.expanduser(file_path)
        diagnostics['expanded_path'] = expanded_path

        # Check existence
        if os.path.exists(expanded_path):
            diagnostics['exists'] = True

            # Check readability
            if os.access(expanded_path, os.R_OK):
                diagnostics['readable'] = True
            else:
                diagnostics['recommendations'].append(
                    "File exists but is not readable. Check file permissions."
                )

            # Get file size
            size_bytes = os.path.getsize(expanded_path)
            diagnostics['size_mb'] = round(size_bytes / 1024 / 1024, 2)

            if size_bytes > MAX_FILE_SIZE:
                diagnostics['recommendations'].append(
                    f"File size ({diagnostics['size_mb']}MB) exceeds limit ({MAX_FILE_SIZE/1024/1024}MB)"
                )

            # Get permissions
            stat_info = os.stat(expanded_path)
            diagnostics['permissions'] = oct(stat_info.st_mode)[-3:]

        else:
            diagnostics['recommendations'].extend([
                "File does not exist. Check the file path.",
                f"Attempted to access: {expanded_path}",
                "Verify the file hasn't been moved or deleted."
            ])

    except Exception as e:
        diagnostics['error'] = str(e)
        diagnostics['recommendations'].append(f"System error: {str(e)}")

    return diagnostics

@mcp.tool()
def debug_file_access(file_path: str) -> str:
    """Diagnose file access issues with detailed troubleshooting."""
    diagnostics = diagnose_file_issues(file_path)

    # Format user-friendly response
    response = f"File Access Diagnostics for: {file_path}\n\n"
    response += f"Expanded Path: {diagnostics['expanded_path']}\n"
    response += f"File Exists: {diagnostics['exists']}\n"
    response += f"Readable: {diagnostics['readable']}\n"
    response += f"Size: {diagnostics['size_mb']} MB\n"
    response += f"Permissions: {diagnostics.get('permissions', 'Unknown')}\n\n"

    if diagnostics['recommendations']:
        response += "Recommendations:\n"
        for i, rec in enumerate(diagnostics['recommendations'], 1):
            response += f"{i}. {rec}\n"
    else:
        response += "✅ No issues detected with file access.\n"

    return response
Solving memory and performance issues
import tracemalloc
import gc

class MemoryMonitor:
    """Monitor memory usage during document processing."""

    def __init__(self):
        self.start_memory = 0
        self.peak_memory = 0

    def start_monitoring(self):
        """Start memory monitoring."""
        tracemalloc.start()
        gc.collect()  # Clean up before monitoring
        self.start_memory = self.get_current_memory()

    def get_current_memory(self) -> float:
        """Get current memory usage in MB."""
        current, peak = tracemalloc.get_traced_memory()
        return current / 1024 / 1024

    def stop_monitoring(self) -> dict:
        """Stop monitoring and return memory statistics."""
        current, peak = tracemalloc.get_traced_memory()
        tracemalloc.stop()

        return {
            'start_mb': self.start_memory,
            'current_mb': current / 1024 / 1024,
            'peak_mb': peak / 1024 / 1024,
            'memory_increase': (current / 1024 / 1024) - self.start_memory
        }

@mcp.tool()
def read_pdf_with_monitoring(file_path: str) -> str:
    """PDF reader with memory monitoring for debugging performance issues."""
    monitor = MemoryMonitor()
    monitor.start_monitoring()

    try:
        result = read_pdf(file_path)
        memory_stats = monitor.stop_monitoring()

        # Log memory usage for analysis
        logger.info(f"Memory usage for {file_path}: {memory_stats}")

        # Warning if memory usage is high
        if memory_stats['memory_increase'] > 100:  # 100MB increase
            warning = f"\n⚠️ High memory usage detected: {memory_stats['memory_increase']:.1f}MB increase"
            return result + warning

        return result

    except Exception as e:
        memory_stats = monitor.stop_monitoring()
        logger.error(f"Error processing {file_path} with memory stats: {memory_stats}")
        return f"Error: {str(e)}"
Fixing host integration problems
@mcp.tool()
def test_server_connectivity() -> str:
    """Test MCP server connectivity and configuration."""
    test_results = {
        'server_status': 'running',
        'tools_registered': len(mcp._tools),
        'resources_registered': len(mcp._resources),
        'prompts_registered': len(mcp._prompts),
        'dependencies_available': [],
        'system_info': {}
    }

    # Test dependencies
    try:
        import markitdown
        test_results['dependencies_available'].append('markitdown: ✅')
    except ImportError:
        test_results['dependencies_available'].append('markitdown: ❌')

    try:
        import psutil
        test_results['dependencies_available'].append('psutil: ✅')

        # Add system info
        test_results['system_info'] = {
            'python_version': f"{sys.version_info.major}.{sys.version_info.minor}.{sys.version_info.micro}",
            'platform': platform.platform(),
            'memory_available_gb': round(psutil.virtual_memory().available / 1024**3, 2),
            'disk_space_gb': round(psutil.disk_usage('/').free / 1024**3, 2)
        }
    except ImportError:
        test_results['dependencies_available'].append('psutil: ❌')

    # Format response
    response = "🔧 MCP Server Connectivity Test\n\n"
    response += f"Server Status: {test_results['server_status']}\n"
    response += f"Tools Registered: {test_results['tools_registered']}\n"
    response += f"Resources Registered: {test_results['resources_registered']}\n"
    response += f"Prompts Registered: {test_results['prompts_registered']}\n\n"

    response += "Dependencies:\n"
    for dep in test_results['dependencies_available']:
        response += f"  {dep}\n"

    if test_results['system_info']:
        response += f"\nSystem Information:\n"
        for key, value in test_results['system_info'].items():
            response += f"  {key}: {value}\n"

    return response
Configuration best practices
Cursor integration best practices:
// Common problems and solutions in ~/.cursor/mcp.json

// ❌ Wrong: Incorrect path structure
{
  "mcpServers": {
    "document-reader": {
      "command": "python",
      "args": ["document_reader.py"]  // Missing absolute path
    }
  }
}

// ✅ Correct: Proper path configuration
{
  "mcpServers": {
    "document-reader-mcp": {
      "command": "uv",
      "args": [
        "--directory",
        "/absolute/path/to/server/directory",
        "run",
        "document_reader.py"
      ],
      "env": {
        "PYTHONPATH": "/absolute/path/to/server/directory",
        "LOG_LEVEL": "DEBUG"
      }
    }
  }
}
Claude Desktop setup guide:
# ❌ Wrong: Installing without proper environment
pip install mcp

# ✅ Correct: Using UV for proper dependency management
uv add "mcp[cli]"
mcp install document_reader.py

# ❌ Wrong: Running without proper permissions
python document_reader.py

# ✅ Correct: Using MCP CLI tools
mcp dev document_reader.py  # For development
mcp run document_reader.py  # For production
Taking your MCP skills further
Immediate actions you can take
Ready to start building?
- Set up your development environment with UV and FastMCP using the commands provided above
- Clone our example repository at github.com/firecrawl/firecrawl-app-examples/tree/main/mcp-tutorial
- Test with the MCP Inspector to understand how tools, resources, and prompts work
- Deploy to Claude Desktop or Cursor using the configuration examples provided
- Customize for your specific use case by modifying the document processing logic
Advanced integration opportunities:
For developers ready to build production-grade AI applications, consider integrating your MCP server with Firecrawl's web scraping capabilities. This combination enables comprehensive AI workflows that process both web content and local documents. Firecrawl provides structured data extraction from websites while your custom MCP server handles internal document processing.
Web data extraction: Learn how to scrape job boards with Firecrawl, build competitive price tracking systems, or create custom instruction datasets for fine-tuning.
Integration example:
# Combine Firecrawl web scraping with document processing
@mcp.tool()
def analyze_web_content_and_documents(url: str, local_document_path: str) -> str:
    """Compare web content with local documents for comprehensive analysis."""
    # This would integrate Firecrawl API for web content
    # Combined with your document processing capabilities
    pass
Enterprise implementation path:
Organizations implementing MCP servers for business processes should start with a pilot project focusing on one document type or workflow. Successful implementations typically follow this progression:
- Pilot Phase (2-4 weeks): Single document type, limited user group
- Expansion Phase (1-2 months): Multiple document types, department-wide rollout
- Enterprise Phase (3-6 months): Organization-wide deployment with security and compliance features
- Optimization Phase (Ongoing): Performance tuning, advanced features, integration with existing systems
Community and support:
Join the growing MCP developer community for ongoing support and collaboration:
- Official MCP Documentation: modelcontextprotocol.io/docs
- FastMCP 3.0 Documentation: gofastmcp.com - Comprehensive guides for the latest version
- FastMCP GitHub Repository: github.com/jlowin/fastmcp - Active community with examples and troubleshooting
- Firecrawl Developer Community: Connect with developers building AI-powered web scraping solutions
- Discord Channels: Real-time support for MCP development questions
Related resources:
Continue your AI development journey with these complementary technologies:
- Firecrawl API Documentation for web scraping integration
- Building Production AI Applications with Firecrawl for comprehensive tutorials
- Best MCP Servers for Cursor for ready-to-use tools
- AI Data Preparation Workflows for enterprise implementation strategies
Customer stories: Read how companies like Replit, Zapier, and Gamma use Firecrawl in their production AI applications.
Get professional support:
For organizations requiring enterprise-grade MCP server development, Firecrawl offers professional services including custom server development, security audits, performance optimization, and ongoing maintenance. Our team has built production MCP servers for Fortune 500 companies across legal, healthcare, and research industries.
Building custom MCP servers opens unlimited possibilities for extending AI capabilities in your specific domain. The combination of FastMCP's developer-friendly approach and the growing ecosystem of AI tools creates opportunities for innovation that weren't possible just months ago. Start building today and join the thousands of developers creating the future of AI-powered workflows.
Frequently Asked Questions
What is the Model Context Protocol (MCP)?
MCP is an open protocol that connects AI applications to external data sources and tools. It enables Claude Desktop, Cursor, and other AI apps to access custom functionality through standardized servers. Think of it as a universal adapter letting LLMs interact with your specific business systems and workflows.
Why use FastMCP instead of the raw MCP SDK?
FastMCP reduces development time by 5x through decorator-based tool registration, automatic error handling, and built-in debugging with MCP Inspector. The raw SDK requires manual protocol implementation and extensive boilerplate code. FastMCP gets you from idea to production in hours instead of days.
Can MCP servers handle enterprise-scale document processing?
Yes, when properly configured with file size limits, caching, and rate limiting. Production MCP servers typically process documents up to 10MB with memory monitoring and async operations for concurrent requests. Organizations see 60-80% time savings on document analysis tasks with custom MCP implementations.
How do I deploy MCP servers for team use?
For local hosting, use `mcp install` for Claude Desktop or configure ~/.cursor/mcp.json for Cursor IDE. For team distribution, package as PyPI packages or use Docker containers. The tutorial covers all deployment methods including configuration files, dependency management, and production considerations.
What security measures should production MCP servers implement?
Implement path validation against directory traversal attacks, file type allowlists, rate limiting, and audit logging for compliance. Restrict file access to designated directories, validate all user inputs, and set strict file size limits. Enterprise deployments require these multiple security layers for safe operation.
How do I fix MCP server connection issues?
Connection problems typically stem from configuration errors or missing dependencies. Verify your MCP configuration file has correct commands and absolute paths. Test independently using `mcp dev your_server.py` before troubleshooting host integration. Check environment variables and dependency installations are complete.
What file size limits should I set for production MCP servers?
Set limits between 5-10MB per document for standard processing. For enterprise use, implement tiered limits: 5MB for interactive operations, 25MB for batch processing with async handling, and 100MB+ for specialized workflows with streaming. Monitor memory usage and adjust based on resources.
Which document formats work best with FastMCP servers?
PDF and DOCX files work excellently through MarkItDown library. PDFs provide reliable text extraction for text-based documents, while DOCX preserves formatting context. For other formats, preprocess by converting PPTX to PDF, use OCR for scanned documents. HTML and Markdown work naturally without preprocessing.
How do I optimize MCP server performance for large document volumes?
Implement caching for processed documents, use async processing for concurrent requests, and stream large files instead of loading into memory. Add database storage for frequently accessed content and monitor memory with psutil. Consider horizontal scaling with load balancers for high-volume deployments.
Can I integrate external APIs with my MCP server?
Yes, use tools for active API calls that AI can trigger, and resources for providing API data as context. Implement error handling, rate limiting, and authentication for external services. Cache API responses to reduce latency and costs. Consider webhooks for real-time updates.